メインコンテンツにスキップ

このバージョンは誤った内容を含んでいる可能性があります。最新の承認済みスナップショットに切り替えてください。

MacBook Unibody Model A1342のiSightカメラボードの交換

必要な工具と部品

  1. この手順は未翻訳です。 翻訳を手伝う。

    MacBook Unibody Model A1342のiSightカメラボードの交換, フロントディスプレイベゼル: 手順 1、 3の画像 1 MacBook Unibody Model A1342のiSightカメラボードの交換, フロントディスプレイベゼル: 手順 1、 3の画像 2 MacBook Unibody Model A1342のiSightカメラボードの交換, フロントディスプレイベゼル: 手順 1、 3の画像 3
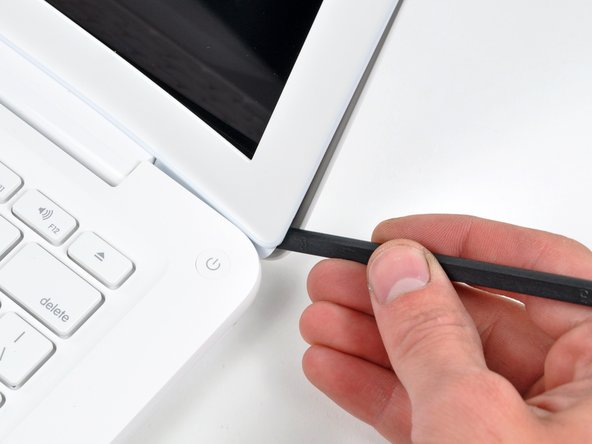
    • Insert the flat end of a spudger between the thin rubber strip surrounding the front display bezel and the rear display bezel.

    • Do not try to insert the spudger between the thin rubber strip and the plastic face of the front display bezel.

    • Use the flat end of your spudger to carefully pry the front display bezel away from the adhesive securing it to the rear display bezel.

    • Do not pry against the fragile glass LCD panel. Also, do not excessively bend the plastic, as it may permanently deform.

    • Continue prying until the front display bezel is free along the right side of the display and behind the right clutch hinge.

  2. この手順は未翻訳です。 翻訳を手伝う。

    MacBook Unibody Model A1342のiSightカメラボードの交換: 手順 2、 2の画像 1 MacBook Unibody Model A1342のiSightカメラボードの交換: 手順 2、 2の画像 2
    • Use the flat end of a spudger to pry the front display bezel off the top edge of the display assembly.

    • It may be helpful to insert and twist the flat end of your spudger to enlarge the gap between the front & rear display bezels as you work your way around the edge of the display.

    • Continue separating until the top edge of the front display bezel is free from the display assembly.

    • Be careful when prying near the iSight camera board, as it has exposed circuitry and is delicate.

  3. この手順は未翻訳です。 翻訳を手伝う。

    MacBook Unibody Model A1342のiSightカメラボードの交換: 手順 3、 2の画像 1 MacBook Unibody Model A1342のiSightカメラボードの交換: 手順 3、 2の画像 2
    • Use your spudger to pry the left side of the front display bezel away from the display assembly.

    • During reassembly, be sure the small plastic pegs on the front display bezel (shown in red) mate up with the holes in the rear display bezel. Failure to do so will prevent the front display bezel from sitting flush against the rear bezel.

  4. この手順は未翻訳です。 翻訳を手伝う。

    MacBook Unibody Model A1342のiSightカメラボードの交換: 手順 4、 2の画像 1 MacBook Unibody Model A1342のiSightカメラボードの交換: 手順 4、 2の画像 2
    • Carefully pry up the front display bezel where it is stuck to the display assembly near the clutch hinges.

  5. この手順は未翻訳です。 翻訳を手伝う。

    MacBook Unibody Model A1342のiSightカメラボードの交換: 手順 5、 1の画像 1
    • Slowly work your way across the lower edge of the front display bezel until it is free from the display assembly.

    • Be sure to pry up as far away from the LCD as possible, as it extends below the edge of the front display bezel.

    • When you get about half way across, pry up from the other side of the front display bezel's lower edge to ease the process.

    • Remove the front display bezel from the display assembly.

    • To help the adhesive avoid losing is tackiness, do not excessively handle the adhesive and be sure to keep it clean until you are ready for installation.

  6. MacBook Unibody Model A1342のiSightカメラボードの交換, iSightカメラボード: 手順 6、 2の画像 1 MacBook Unibody Model A1342のiSightカメラボードの交換, iSightカメラボード: 手順 6、 2の画像 2
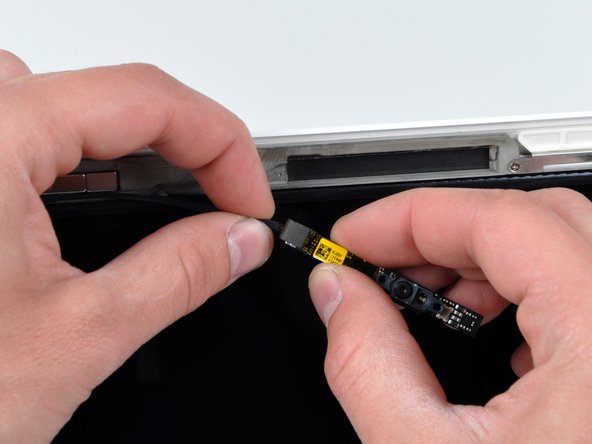
    • スパッジャーの鋭利な先端を使って、ディスプレイアセンブリからカメラボードを持ち上げます。

    • カメラボード上のソケットからカメラケーブルのコネクタを引き離し、ケーブルの接続を外します。

終わりに

デバイスを再度組み立てるには、この説明書の逆の順番で組み立ててください。

8 の人々がこのガイドを完成させました。

以下の翻訳者の皆さんにお礼を申し上げます:

en jp

100%

railgunさんは世界中で修理する私たちを助けてくれています! あなたも貢献してみませんか?
翻訳を始める ›

作成者

2人の作成者と共同で作成されました。

Walter Galan

694,782 ポイント

1,203のガイドは作成済み

0 件のコメント

コメントを追加

統計データ:

過去 24時間: 5

過去 7 日: 13

過去 30 日: 23

今までの合計 9,844