メインコンテンツにスキップ

MacBook Pro 17" Unibody Feet Replacement

必要な工具と部品

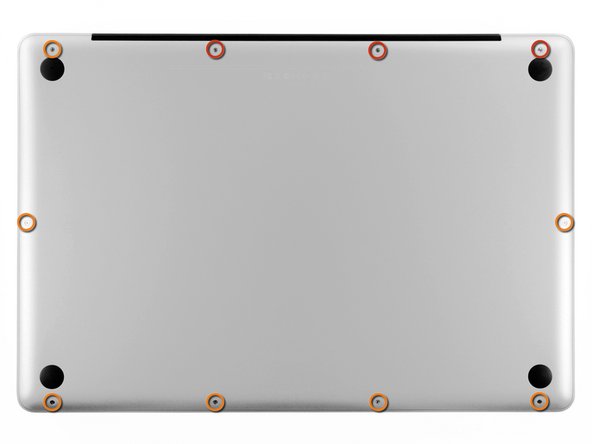
  1. MacBook Pro 17" Unibody Feet Replacement, Lower Case: 手順 1、 1の画像 1
    • Remove the following ten screws securing the lower case to the upper case:

    • Three 13.5 mm Phillips screws.

    • Seven 3 mm Phillips screws.

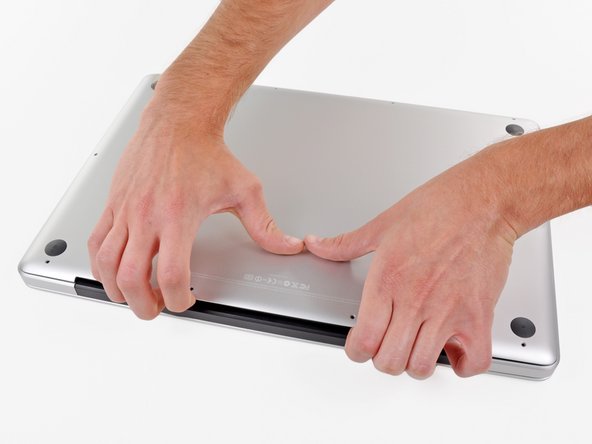
  2. MacBook Pro 17" Unibody Feet Replacement: 手順 2、 2の画像 1 MacBook Pro 17" Unibody Feet Replacement: 手順 2、 2の画像 2
    • Wedge your fingers between the lower case and the vent, and lift upward to release the two clips holding the lower case to the upper case.

    • During reassembly, carefully align the lower case and then press it firmly until both clips engage.

    • Remove the lower case.

  3. MacBook Pro 17" Unibody Feet Replacement, Feet: 手順 3、 3の画像 1 MacBook Pro 17" Unibody Feet Replacement, Feet: 手順 3、 3の画像 2 MacBook Pro 17" Unibody Feet Replacement, Feet: 手順 3、 3の画像 3
    • Remove any broken or damaged feet.

    • Remove any pieces from the old foot that may have broken off in the foot hole.

    • Use tweezers to peel up and remove the old adhesive tape from the foot pad.

  4. MacBook Pro 17" Unibody Feet Replacement: 手順 4、 1の画像 1
    • Scrub the foot pad with adhesive remover to remove any remaining adhesive.

  5. MacBook Pro 17" Unibody Feet Replacement: 手順 5、 1の画像 1
    • Wipe the foot pad with an alcohol prep pad to remove any residue left by the cleaner.

  6. MacBook Pro 17" Unibody Feet Replacement: 手順 6、 1の画像 1
    • Peel a replacement foot from the plastic backing.

  7. MacBook Pro 17" Unibody Feet Replacement: 手順 7、 3の画像 1 MacBook Pro 17" Unibody Feet Replacement: 手順 7、 3の画像 2 MacBook Pro 17" Unibody Feet Replacement: 手順 7、 3の画像 3
    • Align the new foot inside the foot pad.

    • Make sure the alignment nub on the foot is lined up with the small hole near the perimeter of the pad.

    • Lay the foot down while keeping it properly aligned.

    • Check for proper alignment from the inside of the lower case. Use tweezers to slide the alignment nub so it lines up with the hole.

  8. MacBook Pro 17" Unibody Feet Replacement: 手順 8、 1の画像 1
    • Press the new foot down firmly with your finger and maintain pressure for 30 seconds to set the pressure sensitive adhesive. Support the other side of the cover while you press the foot down.

    • Repeat the last six steps for any broken or damaged feet.

終わりに

To reassemble the device, replace the lower case and all of the screws.

9 の人々がこのガイドを完成させました。
作成者

2人の作成者と共同で作成されました。

Arthur Shi

メンバー登録日: 01/03/18

252,816 ポイント

526のガイドは作成済み

チーム

iFixit iFixit人のメンバー

Staff

135 メンバー

16,817のガイドは作成済み

コメント 1 件

I’m not sure if you really need to remove the lower case. It doesn’t really hurt it to do it though, give you a chance to blow out the accumulated dust.

snoakes1 - 返信

コメントを追加

統計データ:

過去 24時間: 0

過去 7 日: 2

過去 30 日: 12

今までの合計 2,232