この手順で使用する道具:
P6 Pentalobe Screwdriver 2009 15" MacBook Pro Battery
$5.49
購入する
上部ケースとバッテリーを固定している3本のペンタローブネジを外します。このスペシャルドライバー で対応できます。
ペンタローブネジ用のドライバーをお持ちでない場合は、1.5 mmマイナスドライバーが利用できます。ドライバーを回してしまうと、ネジ頭が潰れてしまいますので、事前に5星のうち2つのくぼみにきちんとドライバーがフィットするか確認してください。
くぼみがドライバーの先端より大きい場合は、より大きなビットのドライバーを探してください。ドライバーを回す前に、ぴったりとくぼみにフィットするか再度確認してください。
ハードディスクドライブを交換する場合は、手順3〜7をスキップしてください。しかし、作業する前にすべての電源を取り外しておくことをお勧めします。
バッテリーケーブルコネクターの接続を切る際には、バッテリーを十分に傾けて下に隙間を作ってください。
バッテリーケーブルのコネクターをメイン基板のソケットから手前に引いて接続を切り、バッテリーを上部ケースから取り外します。
この修理ガイドを完成したら、新しく装着したバッテリーのカリブレーション を行なってください。
スパッジャーの平面側先端を使って、ロジックボード上のソケットからファンケーブルコネクタを引き抜きます。
コネクタを解放するには、ファンケーブルのワイヤの下から垂直方向にスパッジャーをひねると上手く進みます。
ファンソケットとファンのコネクタは2、3番目の画像で確認できます。スパッジャーでファンコネクターをソケットからまっすぐ引き抜く作業では、ロジックボードからプラスチックファンのソケットを壊さないようにご注意ください。ロジックボードの配置は2番目の画像で確認できますが、お持ちのデバイスと若干異なる場合があります。ただし、ファン用のソケットは同一のはずです。
Appleは、片側に接着剤が付いた透明なプラスチックの小さなストリップをカメラケーブルコネクタの後ろにあるロジックボードに貼り付けて、ソケットに固定されています。 このストリップが作業の邪魔にならないように移動させる際は、ロジックボードに装着されているコンポーネントは外さないでください。
一本の指でケーブルリテイナーの先端を抑えて、スパッジャーの先端で片側のリテイナー先端をわずかに持ち上げて、回転させながらカメラケーブルコネクタから離します。
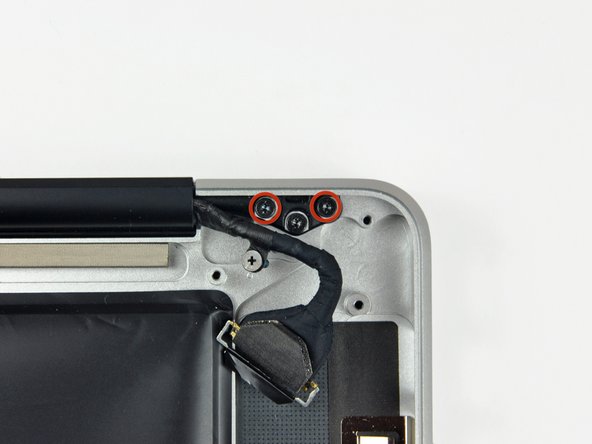
上部ケースにディスプレイデータケーブルのリテイナーを固定している7 mm プラスネジを1本外します。
このネジはディスプレイデータケーブルのアースループに固定されたままです。 ディスプレイを交換する場合は、必ずこのネジを新しいユニットに移してください。
ディスプレイデータケーブルのリテイナーを上部ケースから取り出します。
ディスプレイデータケーブルのロックに固定されたプラスチックのプルタブを摘んで、デバイスのDC-in側に向けて回転させます。
ディスプレイデーターケーブルコネクタをソケットからまっすぐ引き抜きます。
ソケットから上に引き上げるのではなく、ロジックボードの表面に沿ってコネクターを引き抜いてください。
次のネジを取り出します。
ロジックボードを上部ケースに固定している3.5 mm T6 トルクスネジー8本
DC-Inボードを上部ケースに固定しているT6トルクスネジー2本
まだボードを取り出さないでください!ロジックボードの下に装着されたままのコネクターがあります。まずこれらの接続を外さなければなりません。
ロジックボードアセンブリの左側をゆっくりと持ち上げて、上部ケースから慎重に取り出してください。取り出す作業中、ポート側に絡まないようご注意ください。
まだ、ロジックボードを完全に取り出さないでください!
次の作業に移る前に、上部ケースに接続されたコネクタが全て外れているか確認してください。(バッテリーコネクタ以外)
ロジックボードの下側にスパッジャーが差し込めるほどのスペースが出来るまで持ち上げて、マイクを上部ケースから外してください。
ロジックボードをポート開口部からスライドして引き抜き、ロジックボードアセンブリを上部ケースから取り出します。
ロジックボードを再装着する前に、マイクを左側のスピーカーの筐体に押し下げて固定するのが最も簡単です。
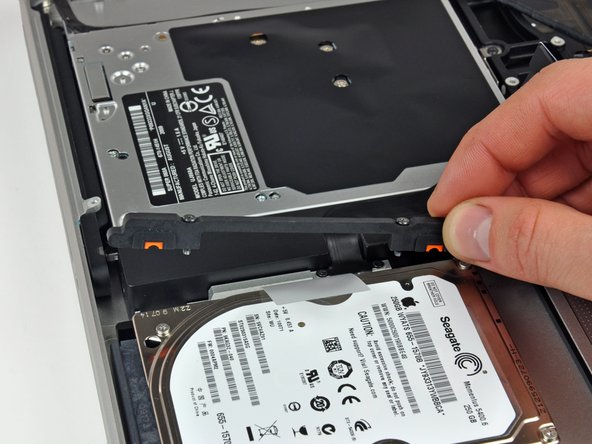
Remove the two Phillips screws securing the hard drive bracket to the upper case.
These screws are captive to the hard drive bracket.
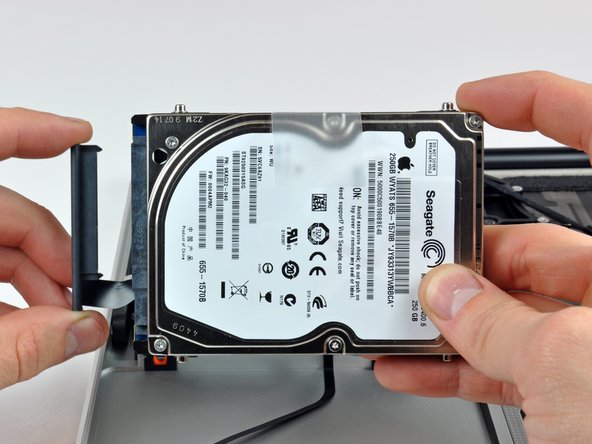
Remove the hard drive bracket from the upper case.
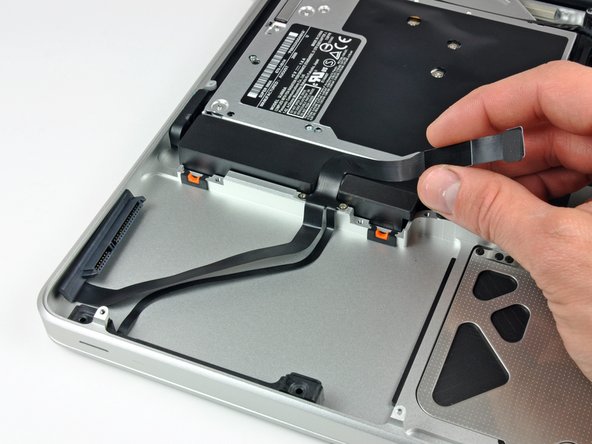
Remove the following four screws securing the hard drive and IR sensor cable to the upper case:
Two 1.5 mm Phillips screws.
Two 4 mm Phillips screws.
Slide the hard drive and IR sensor bracket away from the edge of the upper case.
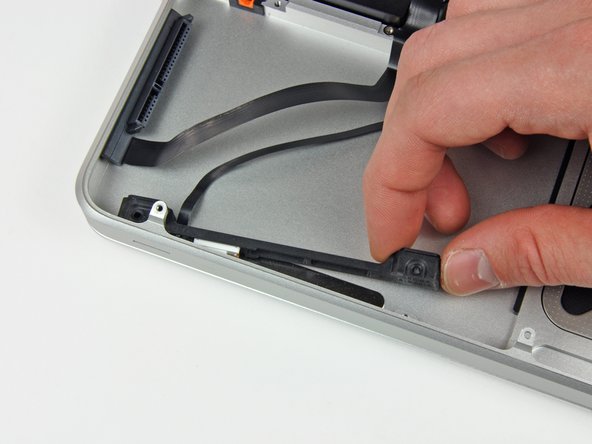
Carefully peel the hard drive and IR sensor cable from the upper case.
Remove the hard drive/IR sensor cable from the upper case and set it aside.
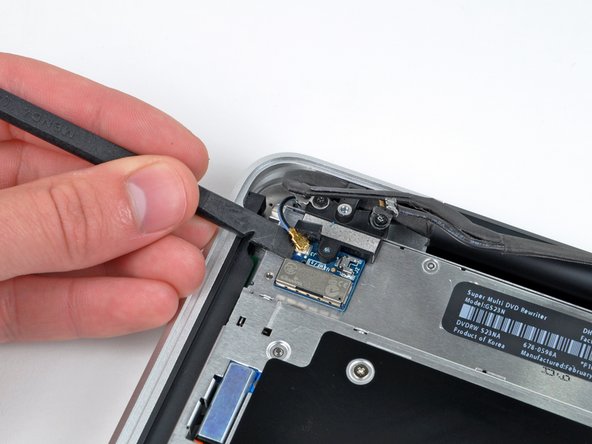
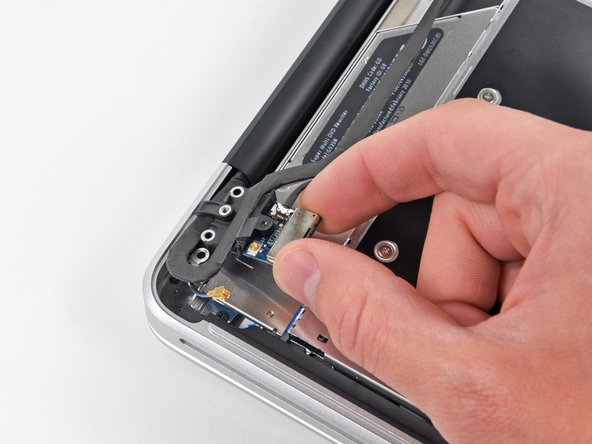
Disconnect the Bluetooth cable by pulling the male end straight away from its socket.
Use the flat end of a spudger to carefully pry the AirPort antenna off its socket on the AirPort card.
Pull the connector parallel to the face of the logic board, not straight up.
Remove the two 8 mm Phillips screws securing the Bluetooth/camera cable retainer to the upper case.
One of the screws may remain captive in the Bluetooth/camera cable ground loop. If replacing the display, be sure to transfer this screw to the new unit.
Lift the AirPort board/cable retainer assembly out of the upper case.
Remove the following four screws securing the subwoofer and right speaker to the upper case:
Two 3.2 mm Phillips screws.
One 2.6 mm Phillips screw.
One 5 mm Phillips screw.
Lift the subwoofer and right speaker assembly out of the upper case.
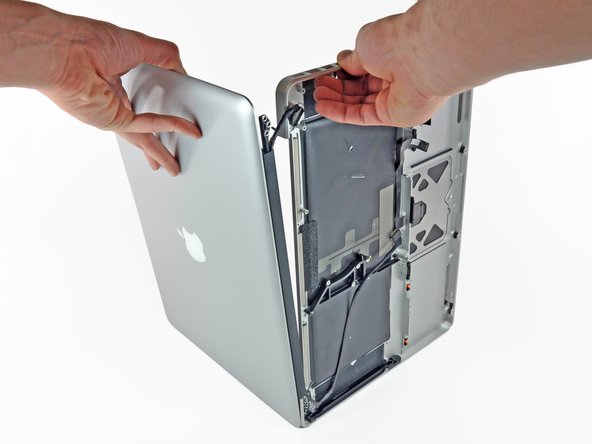
Open your MacBook Pro so the display is perpendicular to the upper case.
Place your opened MacBook Pro on a table as pictured.
While holding the display and upper case together with your other hand, remove the 6 mm Torx screw from the lower display bracket.
Be sure to hold the display and upper case together with your other hand. Failure to do so may cause the freed display/upper case to fall, potentially damaging each component.
Remove the last remaining 6 mm Torx screw securing the display to the upper case.
Grab the upper case with your right hand and rotate it slightly toward the top of the display so the upper display bracket clears the edge of the upper case.
Rotate the display slightly away from the upper case.
Lift the display away from the upper case, minding any brackets or cables that may get caught.
このガイドを埋め込む
サイズを選択し、以下のコードをコピーして、このガイドを小さなウィジェットとしてサイト/フォーラムに埋め込みます。
1つの手順
全ガイド
小サイズ - 600px
中サイズ - 800px
大サイズ - 1200px
プレビュー