はじめに
本ガイドでは故障したロジックボードを交換する手順を説明しています。このマザーボードにはMacBook Proの右側にある全てのポートが搭載されています。
必要な工具と部品
-
-
メモリパネルから全て同じ長さ2mmのプラスネジを外します。
-
メモリパネルをつかめるように持ち上げてから手前にずらして、筐体から引っ張って外します。
These screws are different from the rest, they should be kept separate from the others.
Concur, my screws were Phillips #0 as
-
-
-
長さ2.8mmのプラスネジ2本を外します。ネジはバッテリー収納スペース内のバッテリー固定ラッチの近くにあります。
These screws are different from the rest, they should be kept separate from the others.
Keep these two Philips screws separate. The screws are approximately 0.5mm shorter in length. When using one or two of the other longer screws in the battery compartment when reassembling, the lid will not open because the screw(s) do yam the lid button.
I had a logic board replaced by Apple (bad nVidia GPU), and believe it or not the Apple tech mixed up the screws. My latch did not work as good until I discovered and swapped the misplaced screws.
No believe it or not about it! I had same board replacement job done, and a screw was angled and crossthreaded, and the memory cover was hacked into place with insulating sheet lifted and crumpled.
I removed the memory here as you would normally if you were changing it.
-
-
-
本体のポート側の側面にある、長さ3.2mmのプラスネジ4本を外します。
If you are using a muffin pan to keep removed parts separate (a method I recommend highly), note that Steps 5, 6, and 7 involve removing the same size screw—and thus you can put them all in the same pile. This is unlike just about every other part you will remove during this procedure.
Using shot glasses!
If you are a mac newbie like me take care when you reassemble not to insert a screw in the DVI display port screw holes (shame). I cannot manage to get it out anymore.
I did the same thing once, and eventually got it out. Try tweezers, a screwdriver, magnets, holding the MBP on its side so gravity is working with you, etc. Eventually the little bugger will come out, you just have to keep working at it.
RE: Misplaced Screws in the DVI port, I was upgrading an early 2008 MacBook Pro with an SSD to get some more life out it, and sure enough, misplaced one of these small screws into the DVI port upon reassembly. Screwdrivers, shaking, gravity... nothing worked. UNTIL I went to my dad's house and his super-comprehensive workbench, where he found a small, high-pull magnet and the little bugger flew right out. Refrigerator magnets won't cut it, you will need a more powerful magnet, such as these: http://www.kjmagnetics.com/products.asp?...
Hope this helps someone... it was an easy solution to a frustrating problem
-
-
-
上側筐体のヒンジ側を持ち上げてから側面に指を当てて、順番にケースの固定を外して下さい。側面の固定を外し終わった後、手前側の固定を外すために上側筐体を上下に揺する必要があるかも知れません。
-
DVD挿入口の上には4つの樹脂製の爪があり、また赤外線レシーバーの上と左側にも爪があります。これらの爪をこじらずに外すのは大変に難しいです。また、組み付け直すのも難しくなっています。
The clips above the DVD slot (below the deck palm rest) are an absolute bear. They're hard to get released, and even harder to get back locked when you reassemble. (I've read to tilt the deck toward you when reassembling, inserting the front edge first, and press about an inch back from the edge to get all the front clips locked first before lowering the rest (back) of the deck.) No success for me yet, best of luck.
I thought these two videos did an excellent job of showing the technique of removing and replacing the drive.
MacBook Pro/PowerBook Keyboard Replacement (Part 1 of 3):
http://www.youtube.com/watch?v=jUonF9OSv...
MacBook Pro/PowerBook Keyboard Replacement (Part 3 of 3):
http://www.youtube.com/watch?v=JWeFXWXpp...
After watching that, I had the keyboard replaced in 2 minutes.
Chris -
the technique you describe of putting the front down first, is exactly what I did and it worked well
Those clips on the front edge are very challenging. I have a set of nylon pry tools that are for taking apart car dashboards without scratching the vinyl or plastic. I was able to get a long one in from the side and twist it which freed the clips without damaging the plastic on the upper case or the aluminum on the lower case.
Putting it back together presented another challenge. When I first re-assembled it I think I pushed too hard over the DVD slot and accidentally bent the metal down. I was able to bend it back up using a thicker part of those same nylon pry tools, and then i was able to get it snapped back down successfully. Had I known this would happen, I would have just put the nylon tool in the slot to reinforce the metal as I was snapping the case back down.
As everyone has said, the front clips by the DVD can be really tight. Use the spudger to pry the top and bottom halves apart. Slow work it in from one side to separate the top and bottom.
When reassembling the case, work the front clips by the DVD drive back in first. Once you slide them back in, the rest of the case fits easily.
I had a lot of trouble with getting those clips to lock in place again when reassembling. The way I eventually did it was to wedge something into the front of the CD/DVD slot so that I wouldn't warp the laptop casing. I used the end of a pen; when wedged in the tip of the pen was the right height to not support the casing above and below the CD/DVD slot and not allow it to warp.
I simply ensured the pen was aligned with one particular clip, lifted the laptop slightly, and squeezed the top and bottom edge of the laptop casing very firmly at that point. Each clip clicked in quite easily doing it this way. Just remember to move the pen (or whatever you are using) along to whichever clip you are clicking in.
You're on the right track David. But what works really good is something that gets more surface area contact than the pen--I carefully insert a stack of 3" square post-it notes about 3/8" into the slot. And because they're stacked, you can easily add/subtract post-its to get as tight a fit as possible. Then, assuming you have everything lined up, use quite a bit of downward pressure. You should hear a few snaps as the clips reseat.
Davidからの引用:
I had a lot of trouble with getting those clips to lock in place again when reassembling. The way I eventually did it was to wedge something into the front of the CD/DVD slot so that I wouldn't warp the laptop casing. I used the end of a pen; when wedged in the tip of the pen was the right height to not support the casing above and below the CD/DVD slot and not allow it to warp.
I simply ensured the pen was aligned with one particular clip, lifted the laptop slightly, and squeezed the top and bottom edge of the laptop casing very firmly at that point. Each clip clicked in quite easily doing it this way. Just remember to move the pen (or whatever you are using) along to whichever clip you are clicking in.
I would agree with everyone that the clips above the DVD drive are very temperamental. They came off easily for me but were a pain getting to clip back in place correctly.
Make sure you have the front clipped on securely before screwing the case back together otherwise the lid will not close properly.
I have taken apart quite a few laptops but this is my first Mac. This confirms my statements, to anyone that will listen, that these are the most "exquisite" machines ever produced. I just performed these HDD Replacement steps and with appropriate fear and trepidation popped the clips off. It would have been very helpful if someone had mentioned that they come straight up. I wasn't sure so I wiggled and (carefully) pried with the spudger until one of them went "POP". The credit card idea was helpful but my card was pretty soft so I didn't dare use it with too much force. When I got the top cover loose I just leaned it back against the screen so as not to take a chance on damaging the cable. Reassembly was according to the notes, but again the spudger was perfect if inserted into the drive slot (careful on the felt!) to support the base of the clips. Thanks to all for the notes. BTW; Prayer helps!
There is a fifth plastic clip between the IR sensor and the screw hole. (ie. 1 cm left of the IR sensor)
On the top of the case mark the center of each of the four clips that are over the CD slot and the one clip to the left of the latch with a pencil. When re-installing the top case apply pressure over the clip to the left of the latch until you hear a snap. For the four clips over the CD slot, upend the entire case. Then insert the flat end of the spudger into the CD slot under the center of each clip. Apply pressure from the top of the case while providing support with the spudger in the CD slot until the clip snaps in. This will minimize the chances of bending the CD slot which would prevent CDs from ejecting.
Take care reassembling new the DVD drive. It's easy to bend the top piece of metal down (the one that engages the clips) and your DVD can get stuck occasional ejecting. Very annoying. Maybe give it a little prophylactic bend upward. I placed a blunt letter opener in the slot and torqued it, while applying downward pressure from the top deck... This allowed the clips to engage nicely without bending this piece down.
i've used both of my inch nails, it works fine as well. no trouble to report.
i used a pry tool i had left over from replacing the screen on my iphone, any flat stiff item, like a credit card would work. watch the youtube video linked above, http://www.youtube.com/watch?v=jUonF9OSv..., skip ahead in the video to 4:57 where you see her use a pry tool. I had no problem separating and reassembling this section. Only issue i had was the two screws in the battery area. Only one of them would grab, so I left the other one out.
Here is an additional video showing how to remove the cables for both the left and right fans. At time 2:00 in the video he starts to work on the left fan. This video will help prevent you from attempting to detach the cables incorrectly.
I've opened these up many, many times, and by far the easiest method I have found to disengage the front clips is as follows:
Lift up the top case by the rear corners near the hinge, keep lifting so the top case is tilting towards you. You will feel some resistance, but keep lifting and you will hear the clips disengage with a 'snap'. Doing it this way should not bend the top case metal or loosen the spacing between the top case metal and plastic trim. The clips will not break, they will still engage when you put the top case back on.
It basically takes me 5 or 10 seconds to take off the top case now, and the case goes back on nice and tight as before.
YMMV and all that, but that's my experience.
Thank you for all the advance warnings, I had no issues with replacing the case. It just snapped into place with a little help from the spudger.
You're welcome! I was the one who added the spudger tips, as I had a devil of a time making the DVD drive clips snap back into place without one when I followed this guide.
Hello,
I didn't have much problems reassembling the MacBook. Thanks a lot!
For the hard reassembly part with the clips: I pushed quite hard with both thumbs directly over the place where the clips are. You need to figure out exactly where they are, but it worked well.
I repeat it to make it clear: I pushed from the top on the location under which the clip sat, with two thumbs after having checked that the lid was well in place.
My tools were one spudger and a basic tech toolkit from iFixit.
Thanks a lot!
-
-
-
-
トラックパッドとキーボードのリボンケーブルとロジックボードの接続を外します。必要であればカプトンテープを剥がして下さい。
-
これで上側筐体が外せるようになりました。
If you does not have the spudger, use the Dremel to file a wooden piece
(Chinese stick maybe) to transform in a spatula. Works fine for me
Where can I get the cable from step 9 above?
just broke it!
That cable is attached to the upper case. It can be found here for the A1226 and here for the A1260.
To unplug the cable, pull the black connector straight up from the logic board.
I didn`t need to unplugged the cable to change the right fan. As Karen wrote above, it is for a fan to change not necessary.
I didn't look well before the plug connecting top case to motherboard (see my note in step 8). When it came time for assembly it took a while for me to figure out when the plug connected in the motherboard. Take care on step 8 so that YOU have to make the disconnection in step 9. Then reassembly on this step will be much easier.
Step 9, 2007 Mac Book Pro right fan replacement. It’s not necessary to disengage the keyboard ribbon, you can just tilt the upper shell back and support it against the screen. Be sure not to put tension on the ribbon and to check that the ribbon “plug” is seated securely on the base before reinstalling the top shell.
These instructions were really great. For $15 I got a used fan off eBay and a Torx T6 driver and Phillips 00 driver from the hardware store. Thanks also for the comment about marking where the plastic clips are by the DVD and IR slot with pencil. When reassembling I slotted a piece of wood (kebab skewer) into the DVD slot and pressed down on the pencil mark with the eraser end of the pencil.
My 10 year old MacBook Pro is going strong. Thanks for these very much. It was fun to do as well.
-
-
-
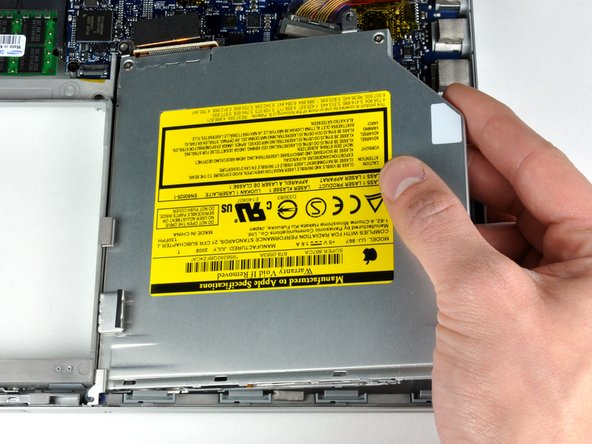
以下の合計4本のネジを外して下さい。
-
長さ3.3mmの銀色のプラスネジ2本がSuperDriveの両側にあります。
-
長さ4.7mmの銀色のT6トルクスネジ1本がSuperDriveの左上の角にあります。
-
長さ6.2mmの黒色のプラスネジがSuperDriveの右上の角にあります。
-
光学ドライブを持ち上げて本体から外して下さい。
The bent metal clip on the right hand side can make the drive seem stuck, even once all 4 screws are removed. You can tilt the drive forward and gently wiggle it up and down to see the clip coming out, and pull by the clip to remove the drive.
-
-
-
iSightのケーブルとディスプレイデータケーブルをロジックボードから外します。取り外す際はコネクタと反対側にまっすぐ動かして下さい。必要であればテープを剥がして下さい。
For the cable on the right, about 1/2" ribbon cable, you have to slide the black bar near the screen back toward the screen to get the cable out safely.
Kate Clair - 返信
for that little tiny connector on the left: look carefully at it and you will see a line running down it, creating a backward C on the right. You have to gently get the smudge tool it at the bottom left and angle it a bit, this is where it will come apart.
Kate Clair - 返信
-
-
-
画像で示した8個のコネクタを外します。外す際はスパッジャーをそれぞれの電線がつながっている方の下に差し込んで持ち上げて下さい。
i managed to break the connectors for the left side ambient light sensor and the right side thermal sensor while attempting this step, i was trying to remove the logic board in order to attempt to reflow the gfx chip as my laptop has been dead with that issue for a year or two, will it run when i put it back together without these?
I also learned the hard way that you should not pop off the entire connector. The connector is a U-shaped holder (should remain attached to circuit board) and the piece with the wires that snaps into that holder. You may want to try using tweezers to hold the U-shaped piece down while slowly pry the wires and its piece out.
Its important that you DO NOT pry from the side opposite of the cable, as that is what will pull the connector off of the motherboard. If you look very carefully, the cable connector has the word "PUSH". If you pry from the cable side and gently lift the connector directly upward, it should disconnect smoothly.
In fact, the word "pry" is very misleading...
A gentle twisting motion of the flat end of the spudger seemed to work best.
I also took off the entire connector. The instruction to put spudger beneath the connector is very misleading. You should put the spudger underneath the cable and turn to lift the cable head out of the connector. I was so confident in the instructions up until that point that I ignored my instinct.
I also followed these instructions and broke off the ambient light sensor. Evidently, you should ONLY pry from the wired side of the connection.
-
-
-
T6トルクスドライバーを使って、ロジックボード上部を下側筐体に固定している長さ6mmの黒いネジを外します。
I've done this operation twice, and it was missing from my computer both times....
-
-
-
以下の合計15本のネジを外します
-
長さ4.4mmの黒いプラスネジ1本が、メモリスロットの右側にあります。
-
長さ4.7mmの銀色のT6トルクスネジ8本が、ロジックボードを下側筐体に固定しています。
-
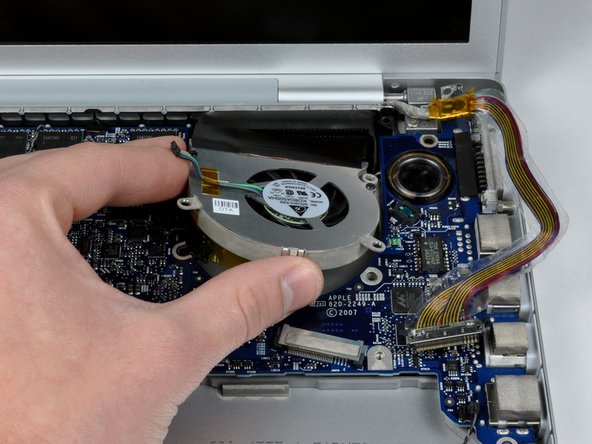
長さ6.2mmの黒いT6トルクスネジ1本が、左ファンの右側にあります。
-
長さ9.4mmの銀色のT6トルクスネジ5本が、左右のファンを固定しています。
The orange screws actually just secure the heat synch to the board, not the board to the case. You can leave them in as mentioned in the next step.
Dave Bates - 返信
So let me get this straight, if you leave the upper 5 orange screws in, the heatsinks remain attached to the logic board? Does this mean that I won't need to apply new thermal paste in the proceeding steps?
If you leave the upper 5 orange screws on, the heatsink/pipes come out effortlessly, still mounted onto the main board. That way the thermal connections are retained.
-
-
-
メモリモジュールの左右にあるタブを同時に開放して下さい。このタブはメモリモジュールを所定の位置に固定しており、開放することでメモリモジュールは「ポンッ」と上がってきます。
-
メモリモジュールを直接コネクタから外します。
Why is thermal paste not mentioned here? I added a fine layer of it on top of the chips that touch the heatsink as I thought I was supposed to but now my client says her computer is running hotter than normal. Should I not have used any?
Good catch, I added a bullet about that. You were definitely right to apply a new layer of thermal paste, as long as you thoroughly cleaned off the old paste from the heat sinks and processors. Do you mean that it is running hotter when looking at the processor temperature in a program like iStat Nano? The outer case of the computer may feel hotter than usual because new thermal paste generally has a higher thermal conductivity than the stuff Apple used, so more heat is drawn to the heat sinks and outside of the computer rather than being contained on the board itself.
-


取り付け直す際は、逆の順番で作業を行って下さい。
取り付け直す際は、逆の順番で作業を行って下さい。
234 の人々がこのガイドを完成させました。

17 件のコメント
In step 15 re: foam bumper. On the reinstall of the foam bumper what do you use to reattach it and hold it in place?
You can use double sided tape, foam or regular scotch,3m to reattach it.
Thank you ifixit! I used this guide to remove and replace my logic board in my early 2008 MBP. I am among the successful (so far) ones who managed to reflow the gpu solder via the oven method. I purchased a few items from you to do the job. I had nothing to lose, so I went for it - and a detailed step by step guide no doubt was key to my success. The Arctic thermal paste was important to the reassembly as was removing all the dust clogging fans and heatsinks. My machine, which has been sitting collecting dust since last summer is humming quietly - I was able to upgrade to Yosemite on this old workhorse and testing it now. Woo hoo!
I recently had to reflow the chipset on my A1226 and then applied new thermal paste.
However, I forgot to remove the plastic tabs at the top of the logic board and they melted from the temperature of the heat gun. Now I cannot screw in the two center top screws on the back cover. First what are those pieces called and how can I get replacements?
They are tiny but apparently have a key function in reassembling the case.
I would appreciate any advice.
Thank you.
Howard U.
I forgot to attach the two bumpers before reassembling my MBP the first time I baked the logic board, so I saved them (for the next time). I needed to do another baking, so I reinstalled them after I was done. I did not have trouble reinstalling the screws as you describe - so maybe some part of the melted bumpers is obscuring the holes?
Yo, I took out the logic board, because the display was not coming on. I had done all the other test to eliminate the chance that it was not the board.
It came out fairly easy, and I sent it away to California to get a new chipset installed to fix it. It came back, I stuck it back in, and voila, she booted up. I am thankful for your guide, it was easy to follow. Next I am replacing the logic board in an A 1286.
Thanks a lot, ifixit! My early 2008 MBP (A1260) suddenly had failed to start-up, in an irregular fashion. Thus, I used this guide to remove my logic board, then I baked the board according to the "oven method", applied new thermal paste afterwards and reassembled everything. Voila, the MBP runs smoothly again, even under El Capitan. It's amazing !
Can you explain how to make the "oven method", I have one Macbook Pro with the same problem.
Oxer -
hi, my a1260, did not power up. but, if i unplug all components of logic board, hd, cd and screen, he power up. i dont has any backup parts to test where is the bug. has any way to know if the problem is the magsafe, daughter board or logic board? anyone did have the same problem and solvet it?
Thanks for the tutorial! However, I'm not adventurous enough to take a chance. I live in NYC and was wondering if you could recommend someone who could do the job? New Jersey and Connecticut are fine. I'm willing to travel withing reasonable distance.
So far I've been turned up by all the mac Mac repair shops that I have contacted in NYC as nobody would consider to replace a mother board for a machine born before 2009 (mine was born at the end of 2007).
Thanks!
Hi Sabine, your request was months ago and not sure if you found help, but just it now and wanted to pass along that I had a good experience with the NYC shop behind this url: https://www.ebay.com/itm/EXCHANGE-MACBOO...
and while I did not use them, I have a trusted source that also recommends L2 Computers in New York city .
I know that this is an older thread, but, I thought I’d post and see if I can get a bit of advice still. I have one of the dreaded MBPs with the nVidia chip problem. This particular MBP I’d almost classify as “mint” condition, as I’ve used it very little before the chip failed. Anyway, I pulled the logic board, cleaned up what little thermal paste that was there, reapplied, and reassembled. It worked only briefly after that, so I just gave up and put it away.
Recently, I’ve been rethinking trying again, this time with a “new” board if I can find one. Nothing to lose, really. But, I’m not sure if I’m just wasting my time.
Does anyone know if the last incarnations of this board fixed the GPU problem? If I could find one for a decent, fair price, is there any way to know if it’s the “newest” final version of the board?
Just looking for any help I can get. As it is, I have a nearly new, older MBP that’s basically a paperweight. Apple was zero help, even though it was barely used.
Suggestions??
Thanks!
Dave
Hi djmaher2008, I am also having the GPU problem on my old Late 2007 MBP.
If you can find a logic board with the nVidia G84-603-A2 chip, you should be safe according to this video: https://www.youtube.com/watch?v=uAC4Bzwm....
Just curious if I could fix it myself after all this years laying in a drawer as a ‘project for later’, I followed this excellent guide today to see the chip revision, and indeed, I had the faulty G84-602-A2 chip. I attempted a reflowing of the gpu (5min with a heat gun at 400°C, cf this video: https://www.youtube.com/watch?v=QnZ7EoOd...) and that seemed to work :D Or at least, temporary ;)
Before start, make a clone of your old HD into the new one, if you don't want to initiate a fresh copy. (Carbon Copy software is good).
ColmillodeChile - 返信
Besides using WD 500GB models, are the WD 640GB and WD 750GB (the 9.5mm thickness model) good to go for? I am still considering as I have heard from other websites on the computer does not draw enough power to power up the 640 and 750 as it has the clicking sound and the rainbow keeps appearing. Anyone has install one before yet?
Please advice. Appreciated! Thanks a million to all the Mac gurus out there!
Danny Lim -
What is this about removing the PRAM battery causing a reinitialization of the HDD? For serious?
Adrian - 返信
No, that's nonsense
max damage -
Wait, I misunderstood you. I thought the comment was directed at the PRAM battery removal page. Silly me.
Nevermind. Yes, it is always a good idea to backup one's data before doing stuff like this. I never do, and have never had any problems, but it's still a good idea.
Adrian - 返信
The two screws removed in step 3 should not be mixed with screws in steps 5 through 7. Though similar, they are actually slightly shorter and have a bigger head. If you put the longer screws back in here when reassembling, the button to unlatch the top will not work properly.
Doug - 返信
I think you may have commented on the wrong page. This page only has 3 steps, and the screws are removed in step 2, not 3.
(MacBook Pro 15" Core 2 Duo Models A1226 and A1260 RAM Replacement)
Don - 返信
I'm not sure how the user notes get attached to the various procedures here, but my comment does seem to show up properly when viewing the steps for Hard Drive Replacement. However, the number of the step may be off if viewed as part of another procedure.
Doug - 返信