このバージョンは誤った内容を含んでいる可能性があります。最新の承認済みスナップショットに切り替えてください。
必要な工具と部品
-
-
この手順は未翻訳です。 翻訳を手伝う。
-
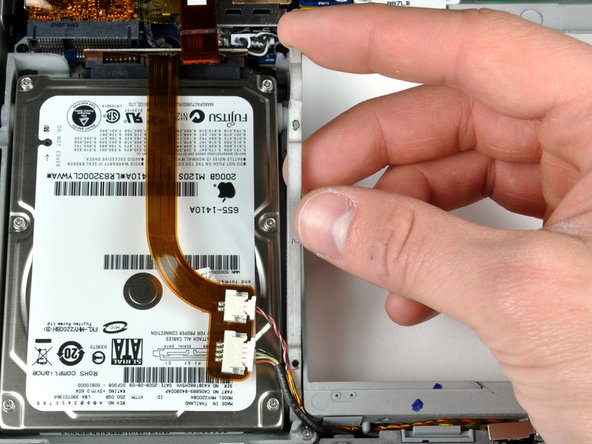
Disconnect the orange hard drive ribbon cable from the logic board.
-
Remove tape as necessary and use a spudger (or carefully push a credit card under the tape) to carefully loosen the adhesive securing the sleep light and IR sensor connectors to the top of the hard drive.
-


1093 の人々がこのガイドを完成させました。

22 件のコメント
Hi folks, is it possible to inserting a new 1 GB 2,5" HDD with a thickness of 12.5 mm into the MBP?
can anyone help me?
Sorry about my bad english...
Andreas from germany
Not to the pre-unibody MBPs it isn't possible, no. Maximum size 9.5 mm drives
I used the A1260 hard drive replacement guide to swop out a Western Digital Scorpio SATA (WD3200BEVT) 320 Gig 5400rpm for a Western Digital SATA (ST9750420AS) Momentus 750 Gig 7200rpm. (http://www.seagate.com/www/en-us/product...) The whole operation went flawlessly thanks to the guide. The improvement in speed / access with the bigger, faster hard drive is very noticeable. Just to let people know that the installation of a 750 gig drive is an accomplished fact in a A1260 series MacBook Pro.
Thanks for the very thoroughly and easy-to-follow guide. I'm no technical genius, but thanks to the guide I manage to replace the original disc with a Toshiba THNS 512GG8BBAA. I printed out the instructions and attached the screws with scotch to the right picture as I went along - not a chance of mixing or loosing the screws. It all went well, and the improvement is awesome!
After some trepidation, it all came together flawlessly in about an hour. Great guide, and good advice in the notes about organizing those 27 screws. This will put at least another year of life in my aging Macbook.