はじめに
MagSafe 2 パワーアダプタにダメージが入っている場合、これを交換する必要があります。このガイドを使って、MagSafe DC-Inボードの交換パーツをインストールします。
必要な工具と部品
-
-
-
スパッジャーの平面側先端を使用して、I/Oボードコネクタをロジックボード上のソケットからまっすぐ上にこじ開けます。
-
同様に、I/OボードのケーブルコネクターをI/Oボードのソケットから外します。
-
MacBook ProからI/Oボードケーブルを外します。
-
-
-
-
スパッジャーの先端を使ってI/Oボードのデータケーブルのロックを持ち上げて外し、バッテリー側に回します。
-
スパッジャーの平面側先端を使って、I/Oボードデータのケーブルをまっすぐ基板上のソケットからスライドして外します。
-
-
-
スパッジャーの平面側先端を使って、左側スピーカーのコネクターを基板上のソケットから持ち上げて接続を外します。
-
右側のスピーカーコネクターを基板上のソケットから持ち上げて接続を外します。
-
-
-
バッテリー付近の端を持ち上げて、MacBook Pro上部に向けて傾けます。
-
スパッジャーの平面側先端を使って、丁寧にMagSafe 2コネクターを基板上の下側にあるソケットから外します。
-
MagSafe 2コネクタの取り外しは、難しい場合があります。 バッテリーの交換などの作業をするために一時的にロジックボードを取り外す場合は、MagSafe DC-Inボードを固定している2つの2.5 mm T5トルクスネジを外すと作業が簡単になります。 それからロジックボードとMagSafeボードを一緒に取り出してください。
-
-
-
MagSafe DC-Inボードを上部ケースに固定している、2本の2.5 mm T5トルクスネジを外します。
-
MagSafe DC-Inボードを右側にスライドして、上部ケース内の奥から取り出します。
-
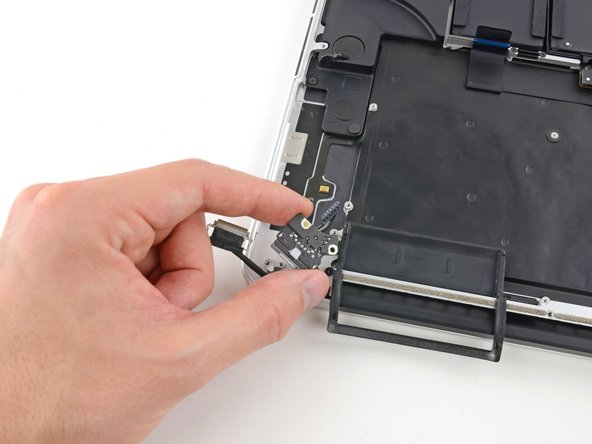
MagSafe DC-Inボードを、上部ケースアセンブリから持ち上げて取り出します。
-


デバイスを再組み立てする際は、これらの手順を逆の順番に従って作業を進めてください。
デバイスを再組み立てする際は、これらの手順を逆の順番に従って作業を進めてください。
21 の人々がこのガイドを完成させました。
以下の翻訳者の皆さんにお礼を申し上げます:
100%

Midori Doiさんは世界中で修理する私たちを助けてくれています! あなたも貢献してみませんか?
翻訳を始める ›

11 件のコメント
I have a 820-3332 logic board (late 2013 MBP 15" Retina, same as this how-to) ) that is missing the socket on the underside of the logic board the magsafe board's wired connection slides into on the underside of the logic board as shown in the final steps. I can't find any mention of a new one anywhere. Looks like it was glued on at the factory. So I'm sitting here with a brand new magsafe 2 board with no way to attach it to the logic board. I though of soldering it directly to the pins that the socket mounts up against on the logic board but there are six pins on the logic board and five wires going to five connection points inside the connector that slides into the socket on the board. Looking at the six pin holes in the new magsafe 2 board connector from the top I see three wires, an empty pin hole and then two wires so I wouldn't even know which pins to attach to which board.
Anyone have any suggestions for this mess?
Any suggestions?
Wow! Somewhat complicated to get that DC board out. Wondering if I should even attempt this.
I have a liquid-damaged (coffee) MBP of this vintage. If I plug in the power adapter, the machine boots and runs fine; however, it shows the battery is "not available" in the battery menu and, when I unplug the magsafe adapter, the machine immediately powers off. As the logic board seems to work fine when plugged in, what do you think about attempting to stick in a DC board? Or is that battery "not available" message an indicator that the battery is also hosed? I don't see any obvious damage to the battery (but...).
Thanks for any advice.
This guide is very good and simple to follow. It may seem tricky but it really isn’t, just take your time to unscrew everything and place them in labeled bins, so you can remember where each screw goes.
I had a bit of trouble with the logic board, after everything was unscrewed it took some fiddling around to finally get the logic board to release and lift up.
Great tutorial.
Great, thank you. I got a 20 euro MagSafe board and it works perfectly.
The guide is accurate, and it is indeed easier than I expected.
For reassembly though I had to take out the logic board twice again because one of the small connectors ‘stayed behind’ the logic board and I only discovered later.
So a tip is to count the connectors you removed, and count again to make sure all are in place to connect and didn't stay in an unreachable place before you reattach the logic board.
Also as another tip, for easier reassembly, I put all the screws (and some parts) on the adhesive tape so they stayed in place and I could spatially fix them. I glued the tape to a paper sheet so I could take notes at which step the screws belonged and also other notes.