はじめに
お持ちのMagSafe 2の電源アダプタが損傷している場合は、交換することができます。このガイドを参照して、交換用のMagSafe DC-Inボードを取り付けましょう。
必要な工具と部品
-
この手順で使用する道具:Tweezers$4.99
-
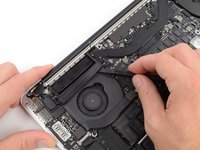
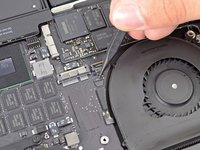
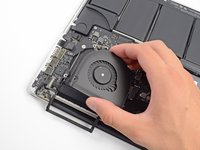
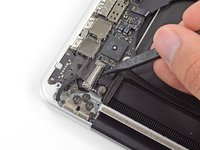
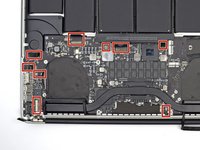
スパッジャーやピンセットを使って、3本のAirPortアンテナケーブルをAirPortボード上のソケットを持ち上げて接続を外します。
-
-
-
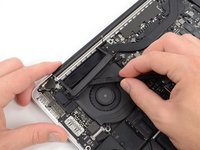
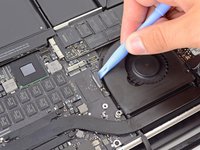
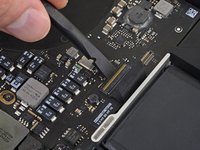
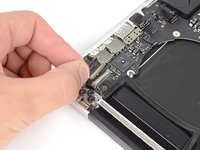
スパッジャーの平面側先端を使用して、I/Oボードコネクタをロジックボード上のソケットからまっすぐ上にこじ開けます。
-
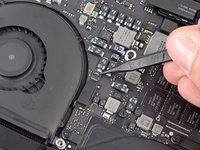
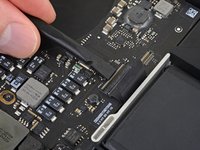
同様に、I/OボードのケーブルコネクターをI/Oボードのソケットから外します。
-
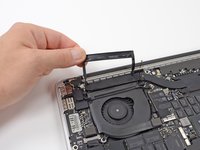
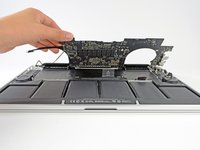
MacBook ProからI/Oボードケーブルを外します。
-
-
-
-
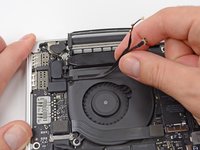
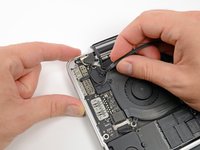
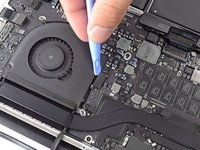
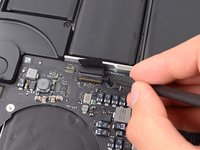
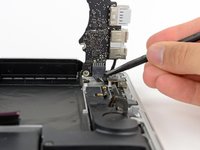
スパッジャーの先端を使ってI/Oボードのデータケーブルのロックを持ち上げて外し、バッテリー側に回します。
-
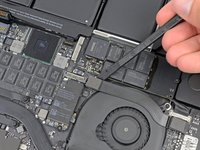
スパッジャーの平面側先端を使って、I/Oボードデータのケーブルをまっすぐ基板上のソケットからスライドして外します。
-
-
-
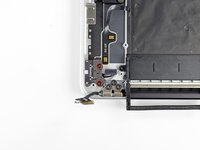
上部ケースとMagSafe DC-Inボードを固定している2.5 mm T5トルクスネジを2本外します。
-
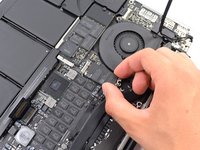
MagSafe DC-Inボードを上部ケース内部から解放するため右側に向けてスライドさせます。
-
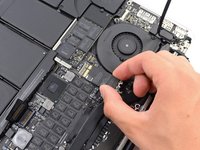
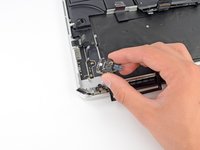
MagSafe DC-Inボードを上部ケースアセンブリから持ち上げて取り出します。
-


デバイスを再度組み立てるには、この説明書の逆の順番で組み立ててください。
14 の人々がこのガイドを完成させました。


8件のガイドコメント
Thank you for this guide, my room flooded and my laptop got wet. the entire display had a water bubble, but i kept it under 2 fans for a month, and the water dried out except for a little spot at the bottom of the screen. But, my computer stopped charging, and i didnt see any lights on the charger turning on. the laptop worked as long as connected to power, but wasn’t charging my battery. When my battery power eventually hit zero, my laptop wouldn’t switch on anymore. Took it to an apple store, they quoted me a price of $1350, when a new laptop starts at $1200. I found out the problem was the magsafe port, ordered the part and the screwdrivers needed, followed this guide, and in about 3 - 3.5 hours and parts cost under $50, my laptop is working properly again with no problems. For a first timer, the whole process looks daunting, but it was kind of fun and not at all as problematic as I thought it would be. Thanks again.
OMG! It is entirely possible to both remove and replace the MagSafe Connector without removing the logic board, making this 5 or 6 steps instead of 33!!
Once you remove the lower case (and disconnect the battery if you feel you must—I’ve been inside my MacBook a dozen times and no longer find that necessary, although it probably is safer to disconnect it), you can skip skip straight to Step 28 and remove the display data cable. Move that out of way and remove the two screws securing the MagSafe Connector.
Now, with a little finesse you can lift the MagSafe board and slide its connector out of the logic board. I nudged it out a bit with a screwdriver from the part that was visible (on the other side of the logic board) and gently pulled the five wires and it slid right out. It didn’t put any stress on the wires at all.
To give myself some wiggle room I also removed:
one screw from step 30 (5.2 mm Raised Head T5 Torx screw)
two screws from step 16 (4.4 mm T5 Torx screw and 5.0 mm T5 Torx screw with 2 mm collar)
Please don't get hung up on undoing all those cable connectors (which way does it pull? Is it snapped properly back? Etc). You need to be able to lift the logic board only a couple of mm to extract/replace the DC-board connector - but to do that you just need to remove the logic board locating screws and the ones holding the left hand fan in place. See steps 16 and 30. Get those out of the way - and each into a labelled compartmented box - and the board lifts that 2mm and the replacement is easy. They are all different and must go back into the right place. I always disconnect the battery connector - and always fail to push it down hard enough on replacement. it needs a GOOD PUSH - then both ends click and we're off.
I’ve read this all through and at first it looked daunting, but the above comment which reduced it to many fewer steps got me interested. What is the most difficult part (I really don’t want to damage anything, rip off delicate connections etc.)
I’m hoping my magsafe connector is fried, as not expensive to replace. What visible evidence is there showing it has failed? Does it have to show signs of burning, or can it fail with no obvious damage?
Charger was getting very hot and no LEDs lighting up.
I replaced the power adapter and cleaned all magsafe contacts, the outer two were black (the ground terminals?) but plastic surround not melted. Laptop works fine with charger connected, but only shows 2% charge which never changes. If I take out connector, laptop closes down quickly. I hope the logic board is OK……