メインコンテンツにスキップ

このバージョンは誤った内容を含んでいる可能性があります。最新の承認済みスナップショットに切り替えてください。

必要な工具と部品

  1. , 下部ケース: 手順 1、 1の画像 1
    この手順で使用する道具:
    Magnetic Project Mat
    $19.95
    購入する
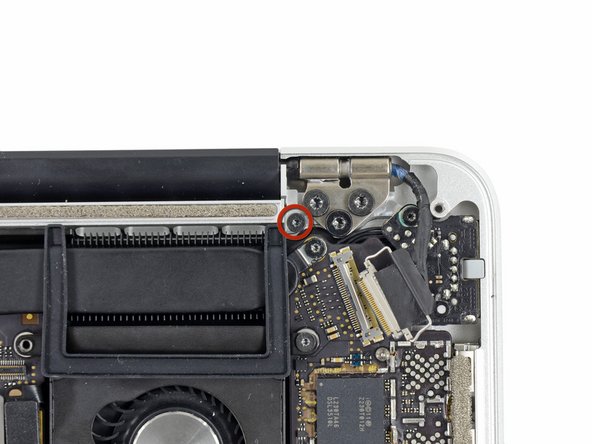
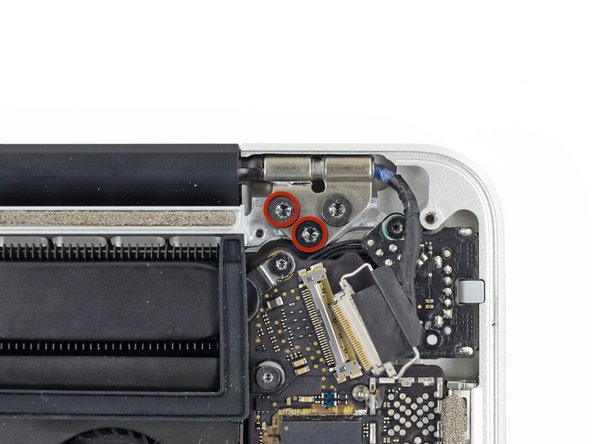
    • 底ケースと上部ケースを留めている次のネジを10本外します。

    • 2.3 mm P5ペンタロープネジー2本

    • 3.0 mm P5 ペンタロープネジー8本

    • この作業中、外した各ネジの管理を安全に行ってください。再組み立ての際は、デバイスのダメージを防ぐため、正しい位置に装着してください。

  2. : 手順 2、 1の画像 1
    • 上部ケースと底ケースの間に指を差し込みます。

    • 丁寧に底ケースを上部ケースから外していきます。

    • 完全に底ケースを取り出します。

  3. : 手順 3、 3の画像 1 : 手順 3、 3の画像 2 : 手順 3、 3の画像 3
    • 再組み立ての際、下部ケースの中央を軽く押して、2つのプラスチッククリップを再度取り付けます。

    • 下部ケースは中央で上部ケースと2つのプラスチック製クリップで接続されています。

  4. , バッテリーコネクター: 手順 4、 1の画像 1
    • バッテリーボードに装着されているプラスチックカバーを外します。

  5. : 手順 5、 1の画像 1
    • ロジックボードにバッテリーボードを取り付けている次のネジを外します。

    • 2.8 mm T6トルクスネジー2本

    • 7.0 mm T6トルクス肩付きネジー1本

  6. : 手順 6、 2の画像 1 : 手順 6、 2の画像 2
    • ピンセットを使って、バッテリーコネクターボードの右側底付近にある小さいプラスチックカバーを取り出します。

  7. : 手順 7、 1の画像 1
    • バッテリーコネクターをロジックボードアセンブリに留めている広幅の6.4 mm T6トルクスネジを外します。

  8. : 手順 8、 2の画像 1 : 手順 8、 2の画像 2
    • 丁寧にロジックボードからバッテリーコネクターボードを引き上げます。

    • 若干バッテリーケーブルを曲げてください。ボードがロジックボード上で引き上げられた状態にして、作業の邪魔にならないようにします。

    • ボードを完全に折り曲げたり、ケーブルにしわを入れないでください。バッテリーにダメージを与えてしまいます。

  9. , バッテリーボード: 手順 9、 2の画像 1 , バッテリーボード: 手順 9、 2の画像 2
    • ピンセットでインターポーザーを掴みます。

    • インターポーザーとはLSI間の接続を担う役割を持つインターフェイスの名称です。この修理ではバッテリーとロジックボードを接続しているボードを対象とします。

    • インターポーザーをロジックボードから引き上げて外します。

    • このボードを取り外す際は修理作業中、バッテリーが完全に外されているか確認してください。コンピューターがアクシデントにより再起動しないようにご注意ください。バッテリーを取り出しておく事もおすすめです。

  10. , iSightカメラケーブル: 手順 10、 2の画像 1 , iSightカメラケーブル: 手順 10、 2の画像 2
    • スパッジャーの先端を使って、iSight カメラケーブルコネクターをロジックボード上のソケットからまっすぐ押し出します。

    • コネクターの両側をソケットから丁寧に押してください。

  11. : 手順 11、 1の画像 1
    • iSightカメラケーブルを脇に取り置きます。

  12. , AirPortボードアセンブリ: 手順 12、 3の画像 1 , AirPortボードアセンブリ: 手順 12、 3の画像 2 , AirPortボードアセンブリ: 手順 12、 3の画像 3
    • スパッジャーの平面側先端を使ってAirPortボードから3つのアンテナケーブルコネクターの接続を外します。

    • 3つのケーブルは異なる長さで黒色のスリーブでコーティングされています。再組み立ての際は次の点にご注意ください。

    • 長いスリーブのケーブルをポートに一番近いソケットに接続します。

    • 短いスリーブのケーブルはネジの隣に接続します。

    • 最後のケーブルにはスリーブはありません。ファンの隣にある最後のソケットに接続します。

  13. : 手順 13、 1の画像 1
    • アンテナケーブルをAirPortボードから離して作業の邪魔にならない位置に置きます。

  14. , ディスプレイアセンブリ: 手順 14、 3の画像 1 , ディスプレイアセンブリ: 手順 14、 3の画像 2 , ディスプレイアセンブリ: 手順 14、 3の画像 3
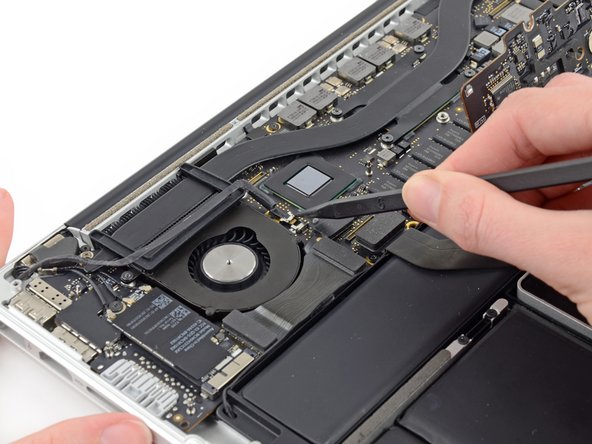
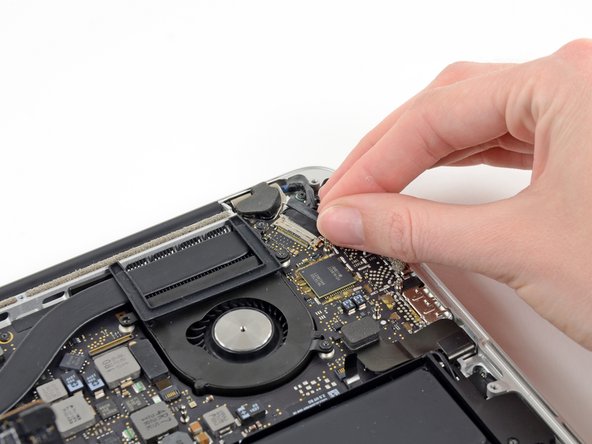
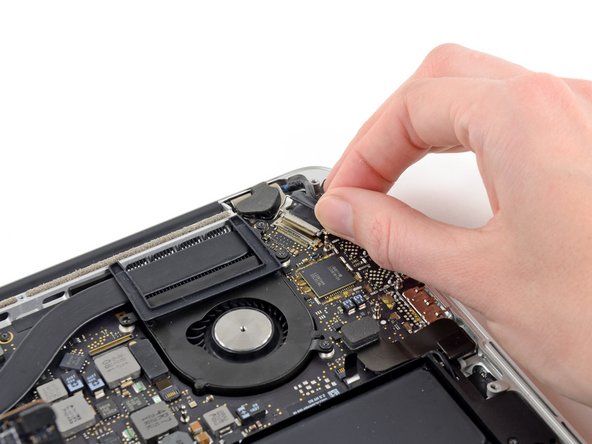
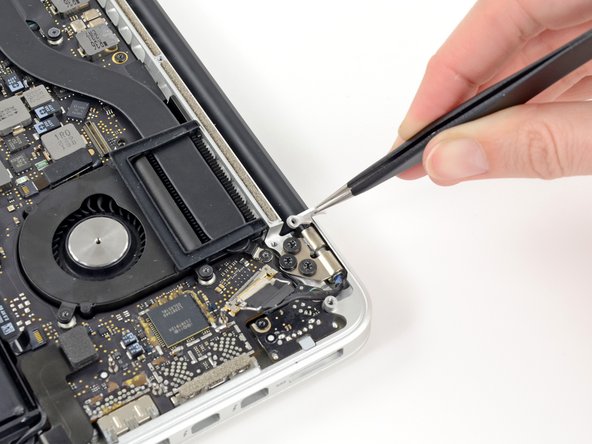
    • ディスプレイデータケーブルに装着されている黒色のプルタブを掴み、コンピューターのDC電源の方に向かって回転させます。

    • ディスプレイデータケーブルをまっすぐロジックボードのソケットから引っ張ります。

    • ディスプレイデータケーブルを上に向けて引っ張らないでください。ソケットはとても傷つきやすいです。ケーブルをロジックボードの表面と並行になるように引っ張ります。

  15. : 手順 15、 2の画像 1 : 手順 15、 2の画像 2
    • ピンセットの先端を使って、左右のディスプレイの丁番を覆っているゴム製の丁番を取り外します。

  16. : 手順 16、 2の画像 1 : 手順 16、 2の画像 2
    • アルミニウム製の丁番ブラケットに留められた3.1 mm T5 トルクスネジを2本外します。

  17. : 手順 17、 2の画像 1 : 手順 17、 2の画像 2
    • ピンセットを使って、左側のアルミニウム製丁番ブラケットを持ち上げて、左右のディスプレイ丁番から取り出します。

  18. : 手順 18、 2の画像 1 : 手順 18、 2の画像 2
    • 上部ケースとディスプレイを留めている5.3 mm T8 トルクスネジ(両側に2本ずつ)を4本取り外します。

  19. : 手順 19、 2の画像 1 : 手順 19、 2の画像 2
    • MacBook Proを約110度開き、画像のようにコンピューターのサイドを下にしてテーブルの上に置きます。

    • ディスプレイと上部ケースを左手で固定しながら、上部ディスプレイのブラケットから残りのT8 トルクスネジを外します。

    • ディスプレイと上部ケースを左手で同時に動かないように持ってください。しっかり持たないとディスプレイと上部ケースがどちらもぐらついて、両方のコンポーネントにダメージを与えてしまうことがあります。

    • 上部ケースにディスプレイを固定している残りのT8トルクスネジを外します。

  20. : 手順 20、 3の画像 1 : 手順 20、 3の画像 2 : 手順 20、 3の画像 3
    • それぞれのデバイスの上半分をそれぞれの手でしっかり掴みます。

    • ゆっくりとディスプレイアセンブリから離すように、デバイスの下半分を前向きに向かって押し出します。

    • 丁寧に両方のコンポーネントを脇に置き、下側のキーボード半分を下向きに置きます。

  21. この手順は未翻訳です。 翻訳を手伝う。

    : 手順 21、 2の画像 1 : 手順 21、 2の画像 2
    • With the display facing towards you and the plastic clutch cover down, grab the clutch cover and slide it all the way to the right, towards the hinge.

    • Lift the plastic cover from the bottom and remove it from the display.

  22. この手順は未翻訳です。 翻訳を手伝う。

    : 手順 22、 1の画像 1
    • Peel up the tape covering the cable connector.

  23. この手順は未翻訳です。 翻訳を手伝う。

    : 手順 23、 1の画像 1
    • Remove the two screws securing the cable to the case:

    • Two T8 Torx screws.

  24. この手順は未翻訳です。 翻訳を手伝う。

    : 手順 24、 1の画像 1
    • Remove the six screws securing the antenna assembly in place:

    • Six PH00 Phillips screws.

    • Lift the antenna assembly to reveal the LCD cable connector underneath the left side.

  25. この手順は未翻訳です。 翻訳を手伝う。

    : 手順 25、 1の画像 1
    • Grab the metal bar securing the LCD cable connector in place and rotate it towards the bottom of the display.

    • Pull the LCD cable straight out of its socket on the display.

    • Do not lift up on the display data cable, as its socket is very fragile. Pull the cable parallel to the face of the display.

ゴール

17 の人々がこのガイドを完成させました。

作成者

1人の作成者と共同作成されました。

Jonah Aragon

メンバー登録日: 08/05/18

5,339 ポイント

5のガイドは作成済み

チーム

Experimax Coon Rapids Experimax Coon Rapids人のメンバー

Business

3 メンバー

17のガイドは作成済み

6 件のコメント

Hi,

Can anyone help me ? It might be possible that my MacBook Pro 13” early 2015 restarts by it self once in a few minutes because this cable is slightly damaged? It had before LCD problems and has been serviced. As I have noticed, when I touch the cable and move it a little bit, computer restarts immediately, so I thought this might be the restarting problem.

(I have to say that I have already tried other options : I have fresh reinstalled the operating system, so theres no software issue, I have repasted the processor, I have checked the cables connections). The only strange thing is that it doesn’t turn on with the battery disconnected…

Does anyone have any suggestion?

Thanks a lot!!

Ina - 返信

Are there instructions using the MacBook Pro (Retina, 15-inch, Early 2013)? The inside is completely different. Alas.

Jennifer Dibble Fanning - 返信

I'm getting this because the hing broke. The real problem is both hinges have broken. Seems like the other hinge is not possible to replace. Is that right? Will just this one side be enough to open with light use? My Mac is a early 2013 15inch pro. Model A1398

Stewart Lyon - 返信

This works on a mid-2015 Pro Retina also. The display is *slightly* different in that the black antenna cover does not simply slide to one side and come off. It has little tiny end caps that can be popped on/off. Apart from that and the antenna had one more screw all the way on the right (away from the display connecter) that doesn’t have to be removed to just lift up the antenna and while holding the antenna slightly up, you can remove and replace the LCD connector. All else was the same and I was able to fix my Mid 2015 MacBook Retina Pro. Thanks iFixit!!!

larry schuler - 返信

Hey peeps, hope you are all doing well

I have a backlight issue with my MacBook Pro early 2013 Retina display 13 in and I am trying to figure out where the issue is stemming from. I am wondering if i could use the LCD cable from an older model (Unibody mid 2010 matchbook pro 13in), would that work or be compatible with my current device? Any insight would be highly appreciated, Thank you.

AlharithAlshaqsi - 返信

コメントを追加

統計データ:

過去 24時間: 4

過去 7 日: 31

過去 30 日: 111

今までの合計 15,116