はじめに
このガイドを使って、AirのMagSafe DC-inボード、USBソケットとヘッドホンジャックを含むI/Oボードを交換します。
必要な工具と部品
ビデオの概要
-
-
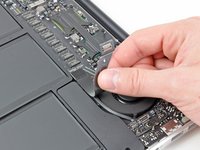
スパッジャーの平面側先端を使って、I/Oボード上のソケットからI/Oボードケーブルコネクタを持ち上げます。
-
-
-
-
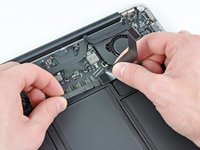
ロジックボード上のソケットから電源ケーブルを引っ張り、I/Oボードの接続を外します。
-
-
-
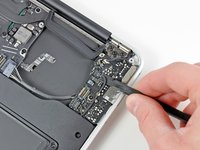
I/Oボードを上部ケースに固定している3.6 mm T5トルクスネジを1本外します。
When inserting new board, make sure the headphones jack socket rim is registered properly with the case hole before tightening T5 screw.
-


デバイスを再組み立てする際は、これらの手順を逆の順番に従って作業を進めてください。
デバイスを再組み立てする際は、これらの手順を逆の順番に従って作業を進めてください。
22 の人々がこのガイドを完成させました。
以下の翻訳者の皆さんにお礼を申し上げます:
100%

Midori Doiさんは世界中で修理する私たちを助けてくれています! あなたも貢献してみませんか?
翻訳を始める ›

3 件のコメント
Superb instructions - made it easy!
Thanks! It saved me $250 dollars doing this. One thing I want to mention to anyone doing this, be careful with the dis-attachment of some smaller cables. They are very sensitive and have tiny parts sometimes that can come off. Fortunately for me, it didn’t prevent it from working, but just a warning. Notice how you are detaching those little cables very carefully before putting them back. I’m thinking about the microphone cable connector up and out of its socket on the I/O boar specifically.