はじめに
このガイドを参照して、I/Oボードを交換しましょう。
必要な工具と部品
-
この手順で使用する道具:P5 Pentalobe Screwdriver Retina MacBook Pro and Air$5.99
-
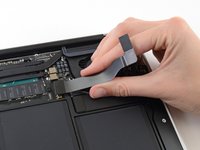
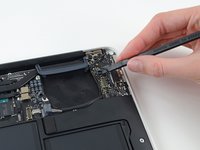
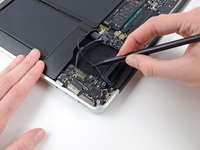
P5ペンタローブドライバーを使って、下部ケースをはずしてください。ネジは次の長さに分かれます。
-
9mm ネジー 2本
-
2.6mm ネジー 8本
-
-


デバイスを再度組み立てるには、この説明書の逆の順番で組み立ててください。
デバイスを再度組み立てるには、この説明書の逆の順番で組み立ててください。
34 の人々がこのガイドを完成させました。


7 件のコメント
I did this as my first DIY repair inside a MacBook. I'm pretty handy, but nothing close to a computer tech. I studied the guide a few times; ordered the Pentalope driver; bought a magnifying hobby light; set up an organized workstation and went to work. I did sweat through several of the cable and ribbon strap removals, but if you take your time and follow the guide it should work. I did find that having a set of precision tweezers and a couple of plastic spudgers was extremely helpful.
My need to attempt this was the result of stupidly spilling a beer all across my keyboard. After drying it out via a fan blowing on it 24/7 for 2 days I decided to crack it open and look for water damage to the LSI's . The area that appeared to be hit the worst was the I/0 board. So I removed it & cleaned with Isopropyl. Afterward, everything fired up and seemed to work fine. Until today. Now the left USB port seems to have died. Probably will replace the board. This guide made it possible. Thanks Jeff and Ifixit.
Jay Quilty - 返信
Very precise guide. I’d say I had this apart, the new board in and put back together in about 30 minutes. like stated above, take your time with some of the more delicate cables and you should be fine. Thanks Jeff.
tristan wy - 返信
Thanks, really great to have resources like this available. Only suggestion would be to make the photos a higher resolution so you can zoom in better. Whilst I am fairly handy with this sort of this I managed to replace my I/O board after the old one got killed by a damaged powersupply that developed a short on the DC side.