はじめに
消耗したバッテリーを交換する際の参考にしてください。
ご注意: もし交換用のバッテリー上に薄いプラスチックのフィルムが付いている場合は、これを外さないでください。MacBookも内側につけられている間、バッテリーパックを保護する役割があります。
必要な工具と部品
-
-
-
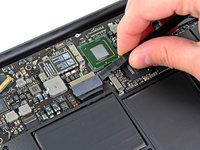
バッテッリーは、ロジックボードに近い方から持ち上げ、上部ケースより外します。
-
100%になるまで充電します。充電後も最低2時間はプラグを繋げたままにします。それからプラグを外して、通常通り使用しながら、自然に放電させます。バッテリー残量小のサインが表示されたら、これまでの作業を保存して、スリープ状態になるまで放置してください。スリープ状態に入ったら、少なくとも5時間置きます。それから一気に100%まで充電します。
-
新しいバッテリーを装着後、通常通り作動しない場合は、MacBook ProのSMCをリセットしなければならない可能性があります。
-


作業終了後、再組み立てする際は逆の手順で作業してください。
309 の人々がこのガイドを完成させました。
以下の翻訳者の皆さんにお礼を申し上げます:
100%

これらの翻訳者の方々は世界を修理する私たちのサポートをしてくれています。 あなたも貢献してみませんか?
翻訳を始める ›

59件のガイドコメント
Arrived with 52% charge, capacity 4593 mAh of 4680 mAh. 98% health, manufacture date of the iFixit replacement battery is Feb 4 2012 (2.9 years), with 0 charge cycles. My order arrived extremely fast, and replacing the battery itself was easier than expected. Overall speed of my MBA seems to have improved somewhat as well. Despite my MBA mid-11 being almost 3.5 years old, the internals, fan included, were all fairly free from dust. So far, so good.
I removed a battery pack from a mid-2011 MBA. Two of the lithium polymer cells had expanded so much that the upper case was bulging out about 0.5cm. The bulge un-bulged itself as soon as I loosened the screws on the lower case. There doesn't seem to be any significant damage to the hardware. Pretty wild. Also, despite this repair being listed as "Difficulty: Moderate", it's about the easiest thing you can do that involves opening the bottom cover.
THIS IS FANTASTIC!! I ordered it on a Thursday & received it on a Saturday! Came very protected in the box. It took me only 40 min to replace the battery & these instructions were excellent to follow! I highly recommend!
I would like to agree: the difficulty is even less than easy
Leona Eden - 返信