メインコンテンツにスキップ

MacBook Air 11インチ Mid 2012 ヒートシンクの交換

必要な工具と部品

  1. MacBook Air 11インチ Mid 2012 ヒートシンクの交換, 下部ケース: 手順 1、 1の画像 1
    この手順で使用する道具:
    P5 Pentalobe Screwdriver Retina MacBook Pro and Air
    $11.99
    購入する
    • まず、コンピューターをシャットダウンし、柔らかい素材の表面上に天面を下にして置きます。

    • 以下の10本のネジを外します:

    • 星型ペンタローブネジ 8mm 2本

    • 星型ペンタローブネジ 2.5mm 8本

    • 星型ペンタローブネジを外す際に必要な特別ドライバーはこちらで購入できます。

  2. MacBook Air 11インチ Mid 2012 ヒートシンクの交換: 手順 2、 1の画像 1
    • ディスプレイと下部ケースの間に指を入れ、下部ケースを引き上げて外します。

  3. MacBook Air 11インチ Mid 2012 ヒートシンクの交換, バッテリー: 手順 3、 2の画像 1 MacBook Air 11インチ Mid 2012 ヒートシンクの交換, バッテリー: 手順 3、 2の画像 2
    • この手順では、作業中にパーツがショートしないように、バッテリーを取り外します。

    • スパッジャーの平面側先端を使用して、バッテリーコネクター両側の短辺を持ち上げて、ロジックボードのソケットから外します。

    • アクシデントでコネクタがソケットに接触しないように、バッテリケーブルをロジックボードから少し離して反対側に折り曲げます。

  4. MacBook Air 11インチ Mid 2012 ヒートシンクの交換, SSD: 手順 4、 1の画像 1
    • SSDをロジックボードに固定している1つの2.9 mm T5トルクスネジを取り外します。

  5. MacBook Air 11インチ Mid 2012 ヒートシンクの交換: 手順 5、 2の画像 1 MacBook Air 11インチ Mid 2012 ヒートシンクの交換: 手順 5、 2の画像 2
    • 一方の手でSSDを掴み引き上げて、スパッジャーを使って差し込み、SSDの解放側を持ち上げます。

    • SSDを過剰に高くまで持ち上げないで下さい。

    • ドライブをソケットからまっすぐ引いてロジックボードから取り外します。

    • SSDを再装着する際は固定ネジを取り付ける前に、SSDが正しい位置に取り付けられているか確認してください。

  6. MacBook Air 11インチ Mid 2012 ヒートシンクの交換, I/O ボードケーブル: 手順 6、 1の画像 1
    • スパッジャーの平面側先端を使って、I/Oボード上のソケットからI/Oボードケーブルを持ち上げます。

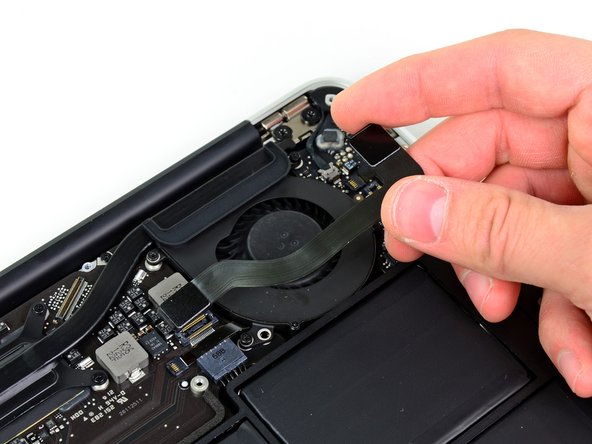
  7. MacBook Air 11インチ Mid 2012 ヒートシンクの交換: 手順 7、 1の画像 1
    • ファンに留められた接着剤からI/Oボードケーブルを剥がします。

  8. MacBook Air 11インチ Mid 2012 ヒートシンクの交換: 手順 8、 2の画像 1 MacBook Air 11インチ Mid 2012 ヒートシンクの交換: 手順 8、 2の画像 2
    • スパッジャーの平面側先端を使用して、I/Oボードコネクタを持ち上げて、ロジックボードのソケットから取り外します。

    • コネクタをソケットから外すときは、コネクタをまっすぐ持ち上げてください。 ソケットはロジックボード上の非常に深いところにあり、コネクタの左右両側からこじ開けてしまうと、ロジックボードを損傷してしまうことがあります

    • I/Oボードケーブルを取り出します。

  9. MacBook Air 11インチ Mid 2012 ヒートシンクの交換, ファン: 手順 9、 1の画像 1
    • スパッジャーの先端を使って、ファンケーブルZIFソケットの保持フラップを持ち上げます。

    • ソケット自体ではなく、ヒンジのある保持フラップを持ち上げているか確認してください。

  10. MacBook Air 11インチ Mid 2012 ヒートシンクの交換: 手順 10、 1の画像 1
    • ファンを天蓋に固定している下記の3つのネジを取り外します。

    • 2つの5.2 mm T5 トルクスネジ

    • 1つの3.6 mm T5 トルクスネジ

  11. MacBook Air 11インチ Mid 2012 ヒートシンクの交換: 手順 11、 1の画像 1
    • 天蓋からファンを持ち上げて、ゆっくりとファンのリボンケーブルをソケットから引きながら、同時にファンを取り出します。

  12. MacBook Air 11インチ Mid 2012 ヒートシンクの交換, ヒートシンク: 手順 12、 1の画像 1
    • ロジックボードにヒートシンクを固定している2.5 mm T5トルクスネジを4本外します。

  13. MacBook Air 11インチ Mid 2012 ヒートシンクの交換: 手順 13、 1の画像 1
    • 4本のネジを全て取り外した後で、ヒートシンクがロジックボードに残留している場合は、スパッジャーを使ってCPUおよびGPU表面からヒートシンクを慎重に分離します。

    • ロジックボードからヒートシンクを取り出します。

    • ヒートシンクを再び取り付ける際は、必ず放熱グリスを新しく塗布してください。 今まで使用したことがない方向けに、簡単にできるガイドがあります。

終わりに

デバイスを再組立する際は、これらのインストラクションを逆の順番に従って作業を進めてください。

12 の人々がこのガイドを完成させました。

以下の翻訳者の皆さんにお礼を申し上げます:

en jp

100%

Midori Doiさんは世界中で修理する私たちを助けてくれています! あなたも貢献してみませんか?
翻訳を始める ›

作成者

4人の作成者と共同で作成されました。

Andrew Optimus Goldheart

メンバー登録日: 10/17/09

502,275 ポイント

407のガイドは作成済み

チーム

iFixit iFixit人のメンバー

Staff

136 メンバー

16,573のガイドは作成済み

5 件のコメント

I did this last night to my macbook air 11" mid 2012. I had been running at 100 to 105°C, and had up to 10 minute delays coming back from a sleep, while the CPU hit 100% with high temps. When I got into the macbook, it was pretty easy... though the parts are small. Getting to the heatsink was easier than I have found on most desktop ATX case machines. The thermal paste on the CPU was dried and cake-like. I gently removed the paste with the spudger, and it came off easily. I cleaned it up with Arctic paste remover and cleaner, and then reassembled with arctic silver 5. I used the long, rice grain - like bead of grease approach, rather than the recommended smearing technique. Right now, I have a number apps open, and am running at 60°C (vs. the mid 90°C range), and it comes back from sleep immediatly. I don't see the dreaded kernal_task, and i have loaded up the machine and it only hits about 85°. I think in general, I am running about 30°C cooler, and the machine is performing like new again.

Keith Elliston - 返信

I just finished replacing the thermal paste on my CPU . I put a 1 mm-wide vertical line on a clean CPU and put the cleaned copper plate back. I think I’ll buy a new battery set too. I’m glad I made that maintenance on my MacBook Air because it was hot and the fan was draining the battery. (The Mac is still working… :P )

Philippe Morin - 返信

Successful re-application of Heat Sink Paste on 110 month old Macbook Air 2012 in October 2021… this Machine has been a champ.

For those playing along at home you don’t really need to remove the Fan Ribbon.. you can just move the fan off the the side… and so no need to pop the SSD.

Excellent guide as usual… took 30 mins tops.

dagmarfraser - 返信

I’m curious as to which idle and/or load temps would be considered ‘normal’!? Mine are in the ballpark of Mr. Elliston (first comment here). TIA

frank.pepplinkhuizen - 返信

Mine is a mid 2012, and was idling at 170 F and running any app caused it to hit 200+ F. After following this guide to replace thermal compound and clean out the fan I’m now idling at about 130 F and running apps I hit about 160 F (iTunes playing and a PowerPoint running). It took me about 20 mins.

Russell Aberer - 返信

コメントを追加

統計データ:

過去 24時間: 2

過去 7 日: 11

過去 30 日: 39

今までの合計 7,796