メインコンテンツにスキップ

Logitech G502 Lightspeed Feet Replacement

必要な工具と部品

  1. Logitech G502 Lightspeed Feet Replacement, Switch the mouse off: 手順 1、 2の画像 1 Logitech G502 Lightspeed Feet Replacement, Switch the mouse off: 手順 1、 2の画像 2
    • Before you begin, flip the power switch into the OFF position.

  2. Logitech G502 Lightspeed Feet Replacement, Heat the mouse feet: 手順 2、 2の画像 1 Logitech G502 Lightspeed Feet Replacement, Heat the mouse feet: 手順 2、 2の画像 2
    • Heat an iOpener and apply it to the mouse feet for one minute.

    • You may use a hair dryer or heat gun. If you do, set it to the lowest temperature setting and apply heat for 10 seconds.

  3. Logitech G502 Lightspeed Feet Replacement, Remove the front foot: 手順 3、 3の画像 1 Logitech G502 Lightspeed Feet Replacement, Remove the front foot: 手順 3、 3の画像 2 Logitech G502 Lightspeed Feet Replacement, Remove the front foot: 手順 3、 3の画像 3
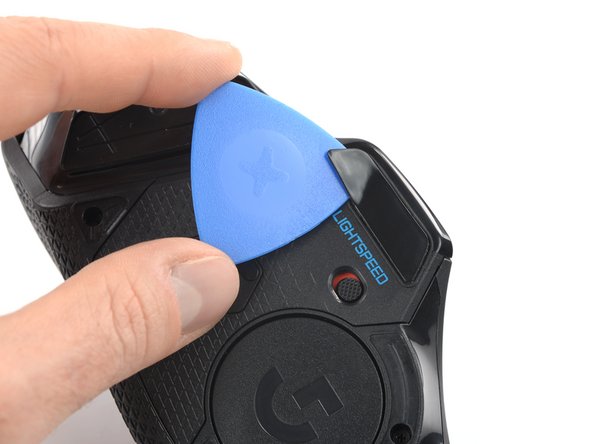
    • Insert the tip of an opening pick underneath the front foot at the gap in its recess.

    • The mouse feet are made of two layers. Make sure you insert the pick under the bottom layer to completely remove the foot.

    • When possible, grab with your fingers and slowly pull to peel it off completely.

  4. Logitech G502 Lightspeed Feet Replacement, Remove the front right foot: 手順 4、 3の画像 1 Logitech G502 Lightspeed Feet Replacement, Remove the front right foot: 手順 4、 3の画像 2 Logitech G502 Lightspeed Feet Replacement, Remove the front right foot: 手順 4、 3の画像 3
    • Insert the tip of an opening pick underneath the tiny front right foot at the gap in its recess.

  5. Logitech G502 Lightspeed Feet Replacement, Remove the rear foot: 手順 5、 3の画像 1 Logitech G502 Lightspeed Feet Replacement, Remove the rear foot: 手順 5、 3の画像 2 Logitech G502 Lightspeed Feet Replacement, Remove the rear foot: 手順 5、 3の画像 3
    • Insert the tip of an opening pick underneath the rear foot starting at the gap in its recess.

    • When possible, grab with your fingers and slowly pull to peel it off completely.

  6. Logitech G502 Lightspeed Feet Replacement, Remove the left foot: 手順 6、 3の画像 1 Logitech G502 Lightspeed Feet Replacement, Remove the left foot: 手順 6、 3の画像 2 Logitech G502 Lightspeed Feet Replacement, Remove the left foot: 手順 6、 3の画像 3
    • Insert the tip of an opening pick underneath the left foot at the gap in its recess.

    • When possible, grab with your fingers and slowly pull to peel it off completely.

  7. Logitech G502 Lightspeed Feet Replacement, Remove the sensor foot: 手順 7、 2の画像 1 Logitech G502 Lightspeed Feet Replacement, Remove the sensor foot: 手順 7、 2の画像 2
    • Insert the tip of an opening pick under the front point of the sensor foot. Keep the pick at a steep angle relative to the mouse to get under the foot's adhesive.

    • Make sure to keep the sensor lens free of any adhesive.

    • Remove the sensor foot.

終わりに

To reassemble your device, follow these instructions in reverse order.

2 の人々がこのガイドを完成させました。

Tobias Isakeit

メンバー登録日: 03/31/14

118,106 ポイント

189のガイドは作成済み

チーム

Tobias Isakeit - Repairability Engineer Tobias Isakeit - Repairability Engineer人のメンバー

Business

1 メンバー

1,086のガイドは作成済み

3 件のコメント

Any recommendations where can I get new feet and adhesive?

Aleš Ferlan - 返信

You can use a double-sided tape or if you want to buy a replacement, look for G502 Lightspeed Rubber Feet on the aftermarket that sells it

Nicholin V -

Www.feetglide.com

Rex Luscus - 返信

コメントを追加

統計データ:

過去 24時間: 4

過去 7 日: 48

過去 30 日: 166

今までの合計 5,592