メインコンテンツにスキップ

Lenovo Yoga C930-13IKB Speaker Replacement

必要な工具と部品

  1. Lenovo Yoga C930-13IKB Speaker Replacement, Back Cover: 手順 1、 1の画像 1
    • Flip the device over so that the underside is facing up.

    • Remove the six 3.5 mm T5 Torx screws.

  2. Lenovo Yoga C930-13IKB Speaker Replacement: 手順 2、 2の画像 1 Lenovo Yoga C930-13IKB Speaker Replacement: 手順 2、 2の画像 2
    • Pry off the back cover using the plastic opening tool.

    • Loosen the back cover in multiple spots using the opening tool, then remove the whole back.

    • You may have to run the plastic tool along the edges until you find a small gap to separate the back cover from the laptop.

    • Do not use a metal tool when working with your device.

  3. Lenovo Yoga C930-13IKB Speaker Replacement: 手順 3、 2の画像 1 Lenovo Yoga C930-13IKB Speaker Replacement: 手順 3、 2の画像 2
    • Carefully lift the cover off with your hands.

  4. Lenovo Yoga C930-13IKB Speaker Replacement, Battery: 手順 4、 3の画像 1 Lenovo Yoga C930-13IKB Speaker Replacement, Battery: 手順 4、 3の画像 2 Lenovo Yoga C930-13IKB Speaker Replacement, Battery: 手順 4、 3の画像 3
    • Unplug the battery from the motherboard by pinching the cables with your fingers and tugging out with force.

    • Use the spudger for assistance.

  5. Lenovo Yoga C930-13IKB Speaker Replacement: 手順 5、 1の画像 1
    • Unscrew the four 3mm screws with a Phillips screwdriver.

  6. Lenovo Yoga C930-13IKB Speaker Replacement: 手順 6、 2の画像 1 Lenovo Yoga C930-13IKB Speaker Replacement: 手順 6、 2の画像 2
    • The battery is still held in place with two stretch-release adhesive strips, similar to ones found in an iPhone.

    • Use your fingers to pry up the clear plastic pull-tab for one of the stretch release adhesives.

    • Grasp the pull-tab and slowly pull away from the battery at a shallow angle. The adhesive strip will stretch to many times its length and slowly release from underneath the battery.

    • Repeat the procedure for the second strip on the opposite side of the battery.

    • Be careful not to bend the battery. Breaking the battery is dangerous.

    • Remove the battery with your hands.

  7. Lenovo Yoga C930-13IKB Speaker Replacement, Speakers: 手順 7、 2の画像 1 Lenovo Yoga C930-13IKB Speaker Replacement, Speakers: 手順 7、 2の画像 2
    • Remove the four 2mm screws that attach the speakers to the laptop body using a Phillips #00 screwdriver.

  8. Lenovo Yoga C930-13IKB Speaker Replacement: 手順 8、 3の画像 1 Lenovo Yoga C930-13IKB Speaker Replacement: 手順 8、 3の画像 2 Lenovo Yoga C930-13IKB Speaker Replacement: 手順 8、 3の画像 3
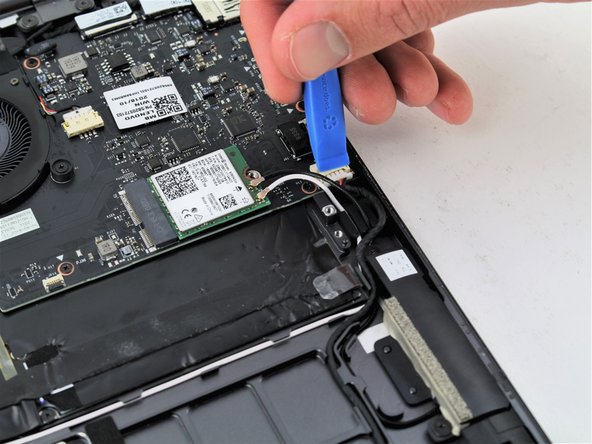
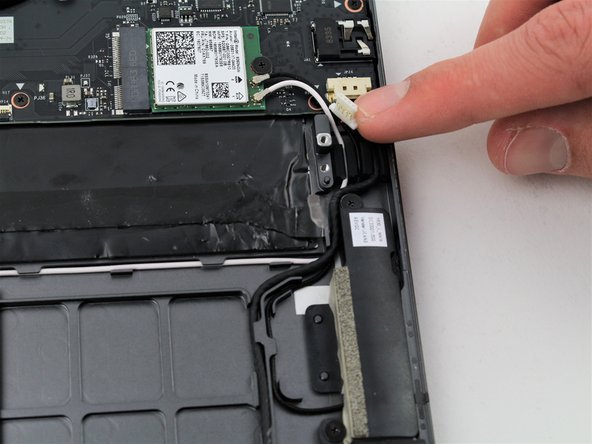
    • Gently unplug the connector using two fingers.

    • Use an opening tool if needed.

  9. Lenovo Yoga C930-13IKB Speaker Replacement: 手順 9、 2の画像 1 Lenovo Yoga C930-13IKB Speaker Replacement: 手順 9、 2の画像 2
    • Lift the black wire that connects the speakers to the motherboard from its track using an opening tool.

    • Press the wire down firmly and in the right track when reassembling.

  10. Lenovo Yoga C930-13IKB Speaker Replacement: 手順 10、 2の画像 1 Lenovo Yoga C930-13IKB Speaker Replacement: 手順 10、 2の画像 2
    • Remove the right speaker using your fingers.

    • Remove the left speaker, which is connected to the right speaker by the black and red wire.

    • When reassembling, make sure the black and red wire is in the right track so that you are able to put the back cover back without wire poking out.

終わりに

To reassemble your device, follow these instructions in reverse order.

2 の人々がこのガイドを完成させました。

作成者

4人の作成者と共同で作成されました。

Andrew Walker

メンバー登録日: 01/23/20

166 ポイント

1ガイドが承認済み

チーム

Cal Poly, Team S19-G5, White Winter 2020 Cal Poly, Team S19-G5, White Winter 2020人のメンバー

CPSU-WHITE-W20S19G5

4 メンバー

16のガイドは作成済み

コメント 1 件

What would be the additional steps to replace a right hinge as the speakers are in the hinge?

Brian Dernbach - 返信

コメントを追加

統計データ:

過去 24時間: 0

過去 7 日: 5

過去 30 日: 22

今までの合計 769