メインコンテンツにスキップ

Lenovo V14-IIL LCD Screen Panel Replacement

必要な工具と部品

  1. Lenovo V14-IIL LCD Screen Panel Replacement, Back Panel: 手順 1、 2の画像 1 Lenovo V14-IIL LCD Screen Panel Replacement, Back Panel: 手順 1、 2の画像 2
    • Make sure the laptop is powered off and unplug all cables before beginning any repair.

    • Flip your laptop over and place on a flat surface so you can access the screws on the base cover.

    • Remove the six 7 mm screws from the back panel of the laptop using a Phillips #0 screwdriver.

    • Remove the four 4 mm screws from the bottom edge of the laptop using a Phillips #0 screwdriver.

  2. Lenovo V14-IIL LCD Screen Panel Replacement: 手順 2、 1の画像 1
    • Use an iFixit opening tool to pry apart the case by sliding it along each side of the laptop.

    • You may need to move the tool to different locations to fully release the back cover.

  3. Lenovo V14-IIL LCD Screen Panel Replacement: 手順 3、 1の画像 1
    • Lift away the back panel and set it aside.

  4. Lenovo V14-IIL LCD Screen Panel Replacement, Display Assembly: 手順 4、 2の画像 1 Lenovo V14-IIL LCD Screen Panel Replacement, Display Assembly: 手順 4、 2の画像 2
    • Using a Phillips #0 screwdriver, remove the four 5 mm screws from the hinges of the laptop.

  5. Lenovo V14-IIL LCD Screen Panel Replacement: 手順 5、 1の画像 1
    • Lift up the latch and gently pull the display cable free.

  6. Lenovo V14-IIL LCD Screen Panel Replacement: 手順 6、 2の画像 1 Lenovo V14-IIL LCD Screen Panel Replacement: 手順 6、 2の画像 2
    • Using the spudger, disconnect the two wireless LAN cables (black and gray) from the wireless LAN card.

    • Remove the LAN cables from the three brackets on the fan.

  7. Lenovo V14-IIL LCD Screen Panel Replacement: 手順 7、 1の画像 1
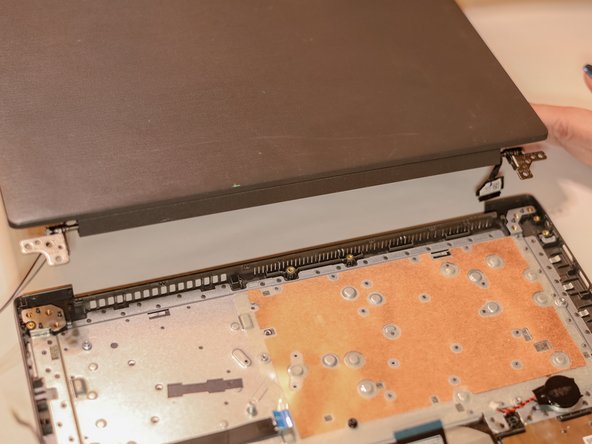
    • Ensure that all cables and hinges are detached.

    • Lift the display assembly away from the base.

  8. Lenovo V14-IIL LCD Screen Panel Replacement, Screen Bezel: 手順 8、 2の画像 1 Lenovo V14-IIL LCD Screen Panel Replacement, Screen Bezel: 手順 8、 2の画像 2
    • Slide the cable hinge cover to the right.

    • Pull the part away from the screen.

  9. Lenovo V14-IIL LCD Screen Panel Replacement: 手順 9、 2の画像 1 Lenovo V14-IIL LCD Screen Panel Replacement: 手順 9、 2の画像 2
    • Use the iFixit opening tool to separate the bezel panel.

    • Slide the opening tool all the way around to loosen the bezels on all sides.

    • You may need to use the tool to gently loosen the adhesive tape.

    • Lift away the bezel panel.

  10. Lenovo V14-IIL LCD Screen Panel Replacement, LCD Screen Panel: 手順 10、 2の画像 1 Lenovo V14-IIL LCD Screen Panel Replacement, LCD Screen Panel: 手順 10、 2の画像 2
    • Using a Phillips #0 screwdriver, remove the six 2.2 mm screws from the hinges of the laptop.

    • Using a Phillips #0 screwdriver, remove the four 2.8 mm screws from the hinges and top corners of the laptop.

  11. Lenovo V14-IIL LCD Screen Panel Replacement: 手順 11、 2の画像 1 Lenovo V14-IIL LCD Screen Panel Replacement: 手順 11、 2の画像 2
    • Lift up the LCD panel and gently turn it over as though closing the lid.

  12. Lenovo V14-IIL LCD Screen Panel Replacement: 手順 12、 1の画像 1
    • Lift the bracket securing the cable in place.

    • Gently pull the cable until it disconnects and lift away the old LCD panel.

終わりに

To reassemble your device, follow these instructions in reverse order.

ある他の人がこのガイドを完成しました。

作成者

2人の作成者と共同で作成されました。

Sydney Askins

メンバー登録日: 01/16/24

378 ポイント

2のガイドは作成済み

チーム

Tennessee Tech University, Team 1-2, Pickering Spring 2024 Tennessee Tech University, Team 1-2, Pickering Spring 2024人のメンバー

TNTECH-PICKERING-S24S1G2

3 メンバー

4のガイドは作成済み

0 件のコメント

コメントを追加

統計データ:

過去 24時間: 0

過去 7 日: 1

過去 30 日: 12

今までの合計 71