はじめに
Spilling a beverage on a keyboard can result in some keys becoming unreliable. Replacing the keyboard is often the best solution, and is typically inexpensive. If replacing the keyboard, verify that the correct model is specified. Ensuring that the new keyboard is compatible and is the correct language will minimize undesired frustration.
Another option, however, is to repair the damaged keyboard. If a replacement is expensive or hard to find, or if only a few keys are affected, it may be worth the time to clean the keys, which is often the problem when a keyboard has had liquid spilt on it.
The principles described below are applicable to other makes and models of laptops that have similar low-profile keys. Details may vary, such as whether you should first disengage the top or the bottom of a keycap or the butterfly mechanism.
Before attempting to repair frequently-used keys, try removing a keycap from a key you rarely use. Examine it closely to establish any differences from the ones described here.
必要な工具と部品
-
-
First, remove the battery and then remove two rubber bungs which are then visible in the battery compartment. Their surfaces are flush with the battery compartment roof.
-
Using two notches to gain access, slide the inter-key sheet upwards, revealing 6 small screws.
-
Remove these screws.
-
Now carefully lift the top of the keyboard and angle it towards you, revealing its two ribbon cables.
-
Gently lift the locking tabs on the ribbon cables and withdraw the ribbons. You can now remove the keyboard.
-
-
-
Insert an opening tool beneath one of the top corners of the key you wish to remove and angle it upwards until you feel it unclip.
-
Repeat at the other top corner.
-
You should now be able to lift the key cap off, moving it slightly in the direction of its lower edge.
-
-
-
-
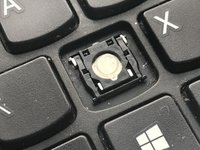
The butterfly mechanism has two pegs at the top and two at the bottom, which is retained under 4 metal clips.
-
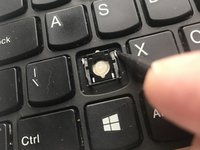
Disengage one of the top pegs by gently pushing it up and out of its clip.
-
Repeat with the other top peg.
-
-
-
First, blow out the dust and loose dirt. Then, clean out the well with isopropyl alcohol and an old toothbrush. Pay particular attention to the metallic area around the silicone. Allow it to dry.
-
-
-
To replace the butterfly mechanism, first, verify that you are holding it the right way round and the right way up.
-
Position the bottom pegs in their clips and then, holding it in position with a finger, press each of the top two pegs into their clips.
-
To replace the key cap, carefully place it accurately in position and first press the top corners in order to engage the top clips. Then press the bottom corners to engage the bottom clips.
-
Check that the key cap is level, all four clips engaged and that it moves freely up and down.
-


To reassemble your device, follow these instructions in reverse order.
To reassemble your device, follow these instructions in reverse order.
12 の人々がこのガイドを完成させました。

チーム

3 件のコメント
helped me. my button started working.
What kind of tools do I need to follow the instructions? Do I need to buy them or kan i use something I already have at home?
Hi @femkebrassinne, the tools used in this guide are all listed at the top if you need to buy any of them. That said, if you have any tools at home that meet the need of this repair, those are the tools you should use!