はじめに
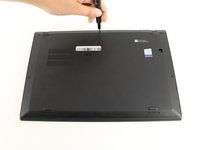
このガイドでは、Lenovo ThinkPad X1 Carbon 第6世代のバッテリーの取り外し方法と交換方法について説明します。ノートパソコンのバッテリーは、使用するにつれて容量が減少し、一般的なバッテリーは数年しか持ちません。 パソコンの調子が悪く、バッテリーに原因があると思われる場合は、 バッテリーの交換を始める前にトラブルシューティングペジを参照してください。 壊れた電源アダプタは問題を引き起こすころがあります。作業を始める前に、ラップトップの電源を切って、プラグから抜いてください。バッテリーを取扱う際は注意しながら、交換した後のバッテリーは正しく処理してください。
必要な工具と部品


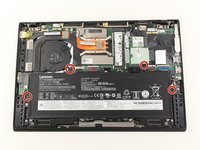


このデバイスを再組み立てするには、インストラクションを逆の順番に従って作業を進めてください。
このデバイスを再組み立てするには、インストラクションを逆の順番に従って作業を進めてください。
21 の人々がこのガイドを完成させました。
以下の翻訳者の皆さんにお礼を申し上げます:
100%

Midori Doiさんは世界中で修理する私たちを助けてくれています! あなたも貢献してみませんか?
翻訳を始める ›

チーム

Cal Poly, Team S19-G4, White Winter 2020 Cal Poly, Team S19-G4, White Winter 2020人のメンバー
CPSU-WHITE-W20S19G4
3 メンバー
23のガイドは作成済み
9 件のコメント
Does it require to switch off battery in BIOS first?
My work wanted to e-waste my 3 year-old ThinkPad. Bought the replacement battery here, followed the instructions—it works fine now. Thanks a lot.
danke )) ))
Great guide, and what an easy laptop to work on!!!
Step 4 is wrong.
You cannot pull the battery out on bottom edge because of the grey plastic arresting aids which you can see in the picture of step 3.
You first have to slide the battery as far as possible to the bottom edge into these grey parts so that the plug connection on top gets lose slightly and then carefully pull it out on side of the mainboard connector.
Also you do not need that Jimmy in step 2. After removing the screws just pull and lift the base cover with your fingers from the area where the hinges are located and then it easily slips out at the front.