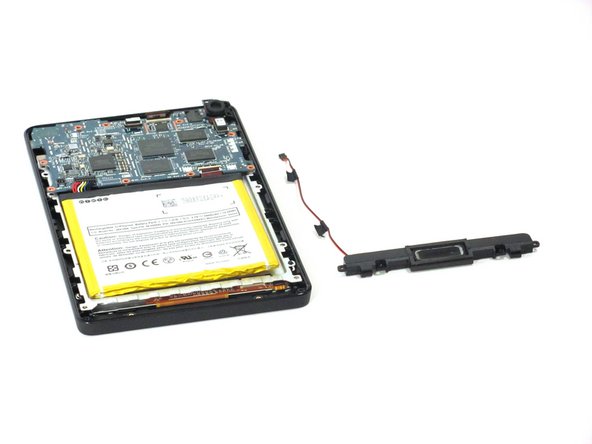
メインコンテンツにスキップ

Kindle Fire HD 6 スクリーンの交換

必要な工具と部品

  1. Kindle Fire HD 6 スクリーンの交換, バックパネル: 手順 1、 1の画像 1
    • デバイス前面を裏返して、柔らかい布などの上に置きます。

    • 次の手順では、デバイスにある程度の力を入れて作業しなければなりません。デバイスの表面が飛散している場合は怪我の元となりますのでご注意ください。

    • プラスチックの開口ツールをデバイスのフロントと背面パネルの間に差し込みます。隙間にツールを入れるには左右に少しずつ揺らしながら下ろしてください。

    • デバイス周辺をツールで少しずつ動かしながら、フロントパネルからクリップを外します。

  2. Kindle Fire HD 6 スクリーンの交換: 手順 2、 2の画像 1 Kindle Fire HD 6 スクリーンの交換: 手順 2、 2の画像 2
    • デバイス内部からバックパネルを慎重に外します。

  3. Kindle Fire HD 6 スクリーンの交換, スピーカー: 手順 3、 1の画像 1
    • スピーカーを固定している3.5mm T5トルクスネジを2本外します。

  4. Kindle Fire HD 6 スクリーンの交換: 手順 4、 2の画像 1 Kindle Fire HD 6 スクリーンの交換: 手順 4、 2の画像 2
    • バッテリー側面に走っているスピーカーワイヤのクリップを外して、バッテリーコネクタの隣のマザーボードの中にクリップで留めます。慎重にまっすぐ引き上げます。

  5. Kindle Fire HD 6 スクリーンの交換: 手順 5、 2の画像 1 Kindle Fire HD 6 スクリーンの交換: 手順 5、 2の画像 2
    • デバイスからスピーカーを持ち上げます。

  6. Kindle Fire HD 6 スクリーンの交換, リアカメラ: 手順 6、 1の画像 1
    • カメラ上部から3.5mm T5トルクスネジを2本外します。

  7. Kindle Fire HD 6 スクリーンの交換: 手順 7、 3の画像 1 Kindle Fire HD 6 スクリーンの交換: 手順 7、 3の画像 2 Kindle Fire HD 6 スクリーンの交換: 手順 7、 3の画像 3
    • カメラを取り外す際に、カメラレンズを破損しないようにご注意ください。

    • 慎重にカメラを引き抜いて、デバイスから取り出します。引き抜く際に、オレンジのテープがついた黒白のコネクタのクリップを外してください。

  8. Kindle Fire HD 6 スクリーンの交換, バッテリー: 手順 8、 1の画像 1
    この手順で使用する道具:
    iOpener
    $19.99
    購入する
    • バッテリーを接着剤から慎重に剥がします。

    • バッテリーに穴を開けてしまうと、危険な化学物質が排出されてしまうため、作業は慎重に行ってください。

    • バッテリーが取り出せない場合は、 iOpenerもしくはヘアドライヤーを使って接着剤を柔らかくします。それからプラスチックカードをバッテリーの下に差し込んで、接着剤を切開します。

    • バッテリーを取り出さないでください。バッテリーを完全に取り出す前に、コネクタの接続を外さなければなりません。

  9. Kindle Fire HD 6 スクリーンの交換: 手順 9、 2の画像 1 Kindle Fire HD 6 スクリーンの交換: 手順 9、 2の画像 2
    • バッテリーとマザーボードを繋いでいるマルチカラーのコネクタをまっすぐ引き抜いて外します。

    • バッテリーを取り出します。

  10. Kindle Fire HD 6 スクリーンの交換, マザーボード: 手順 10、 2の画像 1 Kindle Fire HD 6 スクリーンの交換, マザーボード: 手順 10、 2の画像 2
    • ゼロ挿入力コネクタは、簡単に破損する可能性があります。 この作業を始める前に、ケーブルコネクタの認識と切断に関するiFixitガイドを読んで、ケーブルコネクタを安全に取り外す方法を確認してください。

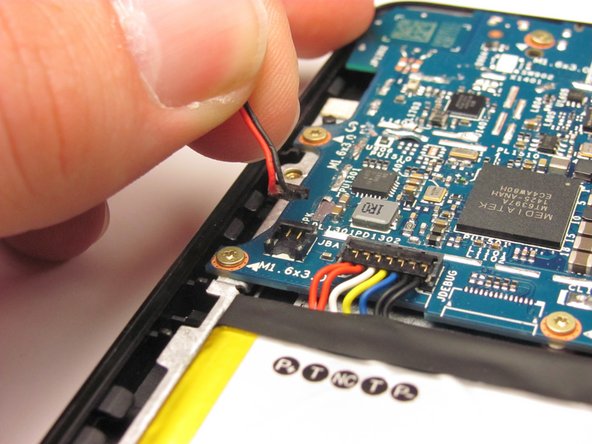
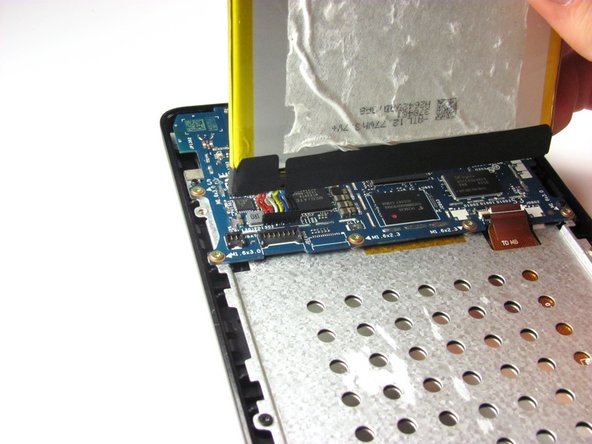
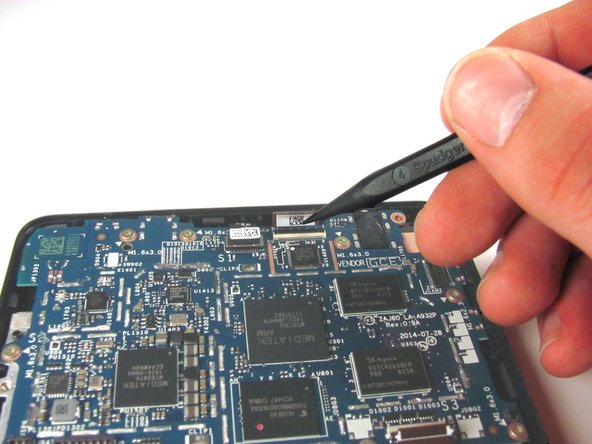
    • スパッジャーの先端を使って、マザーボード上部と下部にある2本のゼロ挿入力コネクタの接続を外します。

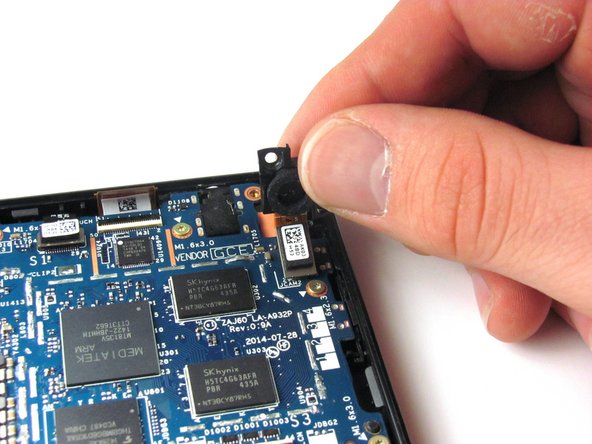
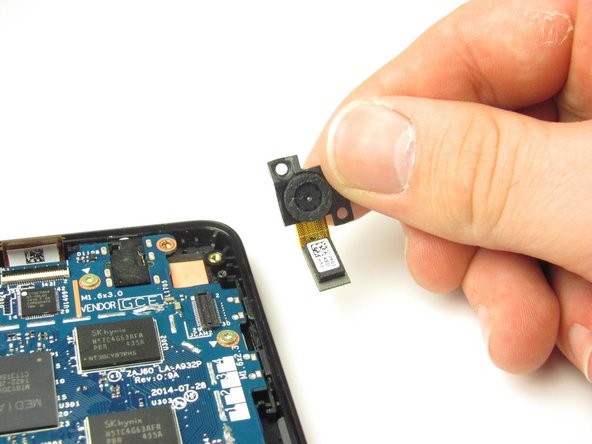
    • 最初のコネクタはオレンジのテープに装着されており、マザーボードの右下にあります。このコネクタを取り出します。

    • 2番目のコネクタは長くて薄い形状です。マザーボード上部の中央からわずかに右寄りにあります。このコネクタを取り出します。

  11. Kindle Fire HD 6 スクリーンの交換: 手順 11、 2の画像 1 Kindle Fire HD 6 スクリーンの交換: 手順 11、 2の画像 2
    • スパッジャーの平面側を使って、マザーボードの上部中央にある白黒コネクタのクリップを外して接続を外します。

  12. Kindle Fire HD 6 スクリーンの交換: 手順 12、 1の画像 1
    • マザーボードの端周辺に留められた 3.5mm T5トルクスネジを10本外します。

  13. Kindle Fire HD 6 スクリーンの交換: 手順 13、 2の画像 1 Kindle Fire HD 6 スクリーンの交換: 手順 13、 2の画像 2
    • 下側からマザーボードを持ち上げます。デバイス上部に向けて約2mm程度押し出して上部端のフックを外さなければなりません。

  14. Kindle Fire HD 6 スクリーンの交換, スクリーン: 手順 14、 1の画像 1
    • メタルプレートからゴールドの2mm T5トルクスネジを5本外します。

  15. Kindle Fire HD 6 スクリーンの交換: 手順 15、 2の画像 1 Kindle Fire HD 6 スクリーンの交換: 手順 15、 2の画像 2
    • マザーボードに装着されているオレンジ色のテープはメタルプレートまで繋がっています。プレートを取り外すときは、テープ周辺でプレートを動かして、テープを伸ばしたり裂いたりしないように注意してください。

    • スパッジャーの平面側を使って、メタルプレートを持ち上げてます。

  16. Kindle Fire HD 6 スクリーンの交換: 手順 16、 2の画像 1 Kindle Fire HD 6 スクリーンの交換: 手順 16、 2の画像 2
    • デバイスからメタルプレートを取り出します。

  17. Kindle Fire HD 6 スクリーンの交換: 手順 17、 1の画像 1
    • スクリーンとベゼルを固定している、シルバーの2mm T5トルクスネジを4本外します。

  18. Kindle Fire HD 6 スクリーンの交換: 手順 18、 3の画像 1 Kindle Fire HD 6 スクリーンの交換: 手順 18、 3の画像 2 Kindle Fire HD 6 スクリーンの交換: 手順 18、 3の画像 3
    • 取り外し作業中、スクリーンに傷を加えないようにご注意ください。スクリーンを取り外した後は、柔らかい布などの上に置いてください。

    • スクリーン側に吸盤カップを装着します。吸盤カップの中央をしっかりと押し込みます。

    • デバイスからスクリーンを慎重に引き抜きます。

  19. Kindle Fire HD 6 スクリーンの交換: 手順 19、 1の画像 1
    • スクリーンを柔らかい表面上に載せて、傷などから保護します。

終わりに

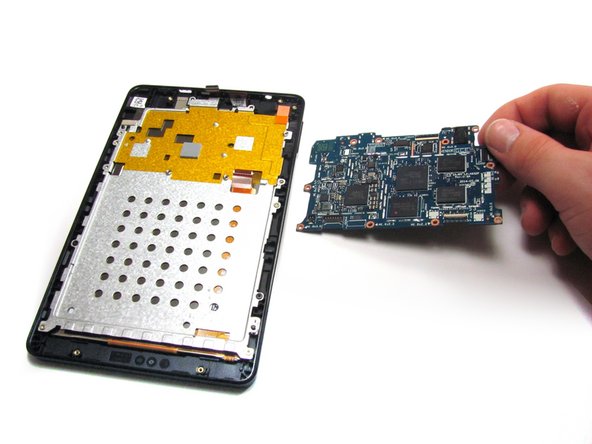
このデバイスを再組み立てするには、インストラクションを逆の順番に従って作業を進めてください。

11 の人々がこのガイドを完成させました。

以下の翻訳者の皆さんにお礼を申し上げます:

en jp

100%

Midori Doiさんは世界中で修理する私たちを助けてくれています! あなたも貢献してみませんか?
翻訳を始める ›

作成者

3人の作成者と共同で作成されました。

Cassandra Beck

メンバー登録日: 01/13/15

885 ポイント

5のガイドは作成済み

チーム

Cal Poly, Team 70-4, Forte Winter 2015 Cal Poly, Team 70-4, Forte Winter 2015人のメンバー

CPSU-FORTE-W15S70G4

4 メンバー

12のガイドは作成済み

8 件のコメント

Yes, author didn't go the complete distance. When actually removing glass by heating til adhesive softens. And releases from the bezel. Before tossing the cracked digitizer, I noticed 2 silver rectangle pieces, stuck to outer glass adhesive. That had black double stick tape on these pieces of silver colored metal which are a smaller rectangle. And somewhat camouflaged their existence . And I determined, they stick to rectangle recesses in the bezel. Easily overlooked by most. I hunted around, never finding any reference anywhere in text or video. However, I did find a picture of them. On a pink colored bezel on ebay. I don't know their function, but, could it the source of the problem that people are experiencing. After they replace digitizer they can't get the fire hd 6 to recognize it. DON'T KNOW! Hope you can shed some light on this!!! Other than this snafu, I give author good marks for the rest of very helpful guides Thank you.

jeff toler - 返信

After completing this task completely the touch screen is not working? Did I do something wrong or need to fix a connection? Please help!!!

Cwebb - 返信

I just did this, twice actually. The first time I tried to separate the new digitizer from the frame, since the replacement frame was black and my original was blue. BAD IDEA. Don't do it - trying to get it out of the frame, settled into the original one, including the metal spacers referred to above, is bound to fail. Just remove the camera from the old frame with the cracked digitizer and move it to the new one - it's only taped in place. Other than that and the fact that the article *seriously* understates the incredible amount of 2-sided glued foam that holds the battery in, the replacement was a breeze.

Tom Jackson - 返信

I discovered you don’t actually even have to remove the battery. I gave up trying to get it off and just unscrewed everything. However, after replacing the screen, the touch screen won’t work now. Any ideas what I did wrong?

Darcy - 返信

Add me to the list of people who tried this but ended up with a non-working digitizer after replacement. Anyone ever figure this out?

Peter Wood - 返信

コメントを追加

統計データ:

過去 24時間: 3

過去 7 日: 8

過去 30 日: 16

今までの合計 11,097