はじめに
このガイドを使って、Kindle 3のキーボードを交換します。破損したキーボードを交換するためにデバイスを解体する方法を扱っています。
必要な工具と部品


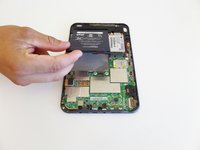


デバイスを再組み立てする際は、これらの手順を逆の順番に従って作業を進めてください。
9 の人々がこのガイドを完成させました。
以下の翻訳者の皆さんにお礼を申し上げます:
100%

Midori Doiさんは世界中で修理する私たちを助けてくれています! あなたも貢献してみませんか?
翻訳を始める ›
チーム

CSU Fullerton, Team 1-5, Bruce Fall 2014 CSU Fullerton, Team 1-5, Bruce Fall 2014人のメンバー
CSUF-BRUCE-F14S1G5
4 メンバー
16のガイドは作成済み
4件のガイドコメント
It works, but seriously overdoes the dismantling required . I just did this on a wifi 3g version (serial number started with B00A) and it took less than 30 minutes.
Steps 2,3 and 4 .You don't need to remove the silver screws holding the battery, the 3g unit or the inner ones on the black bit at lower right. None of them hold the board to the case, but ALL the grey screws do.
Step 5 You only need to undo the ribbon cable to the screen (marked orange) - the others don't need disturbing and are hard to put back correctly.
Steps 6 & 7 - Skip these.
Step 8 - the whole board lifts out - start at the top and be gentle - in case you've missed a screw or two.
Rebuilding - best to test before putting all the screws back, and refit the back starting at the switch end rather than the top or sides.
Thanks for the guide. Used to strip down a device saturated with suntan lotion. Per Dave’s comments I skipped detaching the extra ribbon connectors, but needed to take out most of the silver screws to get the main boards apart. I also wanted to detach the battery before wading in with contact cleaner and baby buds. Now back working a treat. Daniel
This guide no longer includes any extra/unnecessary steps—the above comments refer to an old version of the guide.