はじめに
This repair guide will teach you how to replace the speaker in your Ultratab C954. If you have referred to the prerequisite guide for the back cover removal then start on step 4. If your tablet still has the back cover on steps 1-3 will explain how to remove it. This guide requires the use of a soldering iron, if you do not have experience with a soldering iron please seek assistance.
必要な工具と部品
-
-
On the top of the tablet there are two 1cm screws that hold the back cover on. Locate these screws and remove them using a Phillips head #0 screw driver.
-
-
-
This is what your tablet should look like once the back cover is removed. You are now ready to begin repairing your tablet. Follow the corresponding guide for instructions on repairing major components.
-
To reattach the back cover begin by sliding the cover on making sure the buttons and the speaker are in their designated holes on the back cover. Then attach the two covers by pressing them together until you hear the plastic tabs interlock.
-
With the two screens held together the last step is to put the two 1cm screws on the top of the tablet back in. Your tablet is now ready for use again!
-
-
-
-
With the back cover removed from your tablet locate the speaker and the speaker wires shown in the red box.
-
-
-
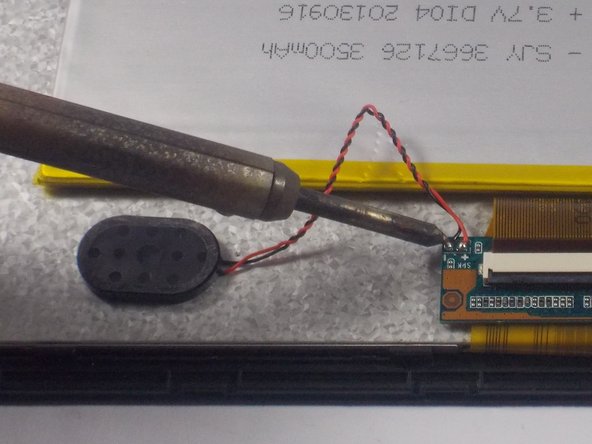
Locate the positive and negative terminals of the speaker.
-
To attach the new speaker you must solder the new wires to the terminals on the motherboard. To do this hold the wire on the old solder, using a small amount of solder melt the solder and wires to the old connection points.
-
For an explanation on soldering refer to iFixit's soldering guide はんだ付けとはんだ除去の作業ガイド
-


To reassemble your device, follow these instructions in reverse order.
To reassemble your device, follow these instructions in reverse order.
チーム

UMass Dartmouth, Team 1-7, Shastany Spring 2015 UMass Dartmouth, Team 1-7, Shastany Spring 2015人のメンバー
UMASSD-SHASTANY-S15S1G7
3 メンバー
4のガイドは作成済み