メインコンテンツにスキップ

Jabra Speak 510 Motherboard Replacement

必要な工具と部品

  1. Jabra Speak 510 Motherboard Replacement, Outer Casing: 手順 1、 2の画像 1 Jabra Speak 510 Motherboard Replacement, Outer Casing: 手順 1、 2の画像 2
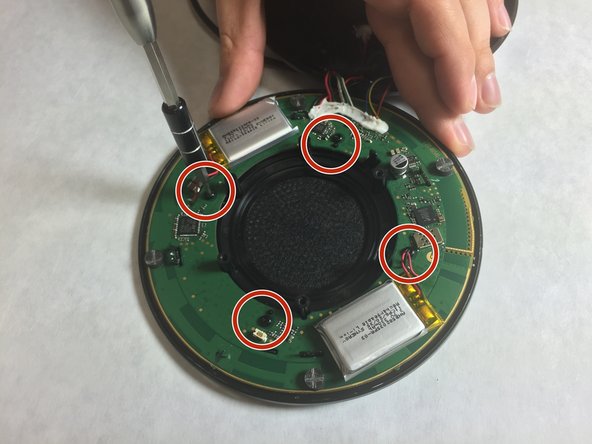
    • Using a metal spudger, peel back the foam pad on the bottom of the device to reveal six screws.

  2. Jabra Speak 510 Motherboard Replacement: 手順 2、 1の画像 1
    • Remove the six 20 mm T6 screws from the bottom of the device.

  3. Jabra Speak 510 Motherboard Replacement: 手順 3、 2の画像 1 Jabra Speak 510 Motherboard Replacement: 手順 3、 2の画像 2
    • Remove the back plate and the grey foam underneath.

  4. Jabra Speak 510 Motherboard Replacement: 手順 4、 3の画像 1 Jabra Speak 510 Motherboard Replacement: 手順 4、 3の画像 2 Jabra Speak 510 Motherboard Replacement: 手順 4、 3の画像 3
    • Use a small, pointed metal spudger to release the plastic tabs connecting the faceplate to the bottom of the speaker.

    • A small cable connects the faceplate to the device. Carefully disconnect the cable before fully opening the device.

    • Slowly flip the device open like a clam shell.

    • There are several wires soldered to the motherboard that prevent the faceplate from detaching completely.

  5. Jabra Speak 510 Motherboard Replacement, Motherboard: 手順 5、 2の画像 1 Jabra Speak 510 Motherboard Replacement, Motherboard: 手順 5、 2の画像 2
    • Using the T6 Torx Screwdriver, remove the four (4mm) screws.

  6. Jabra Speak 510 Motherboard Replacement: 手順 6、 1の画像 1
    • After removing the screws, take out the center covering to free the motherboard by lifting the tabs and pulling it off.

  7. Jabra Speak 510 Motherboard Replacement: 手順 7、 2の画像 1 Jabra Speak 510 Motherboard Replacement: 手順 7、 2の画像 2
    • Peel off the white adhesive to desolder the connections underneath.

    • Desolder the wires connected to the motherboard.

    • You can find soldering tips in the How To Solder and Desolder Connections guide.

    • Keep track of where the wires are connected. When re-assembling you will have to connect the wires in the correct spot.

終わりに

To reassemble your device, follow these instructions in reverse order.

4 の人々がこのガイドを完成させました。

作成者

3人の作成者と共同で作成されました。

Jordan Murphy

メンバー登録日: 02/16/16

717 ポイント

3のガイドは作成済み

チーム

IUPUI, Team 2-3, Harley Spring 2016 IUPUI, Team 2-3, Harley Spring 2016人のメンバー

IUPUI-HARLEY-S16S2G3

4 メンバー

8のガイドは作成済み

3 件のコメント

Great walk-through... thanks

Walaa Maher - 返信

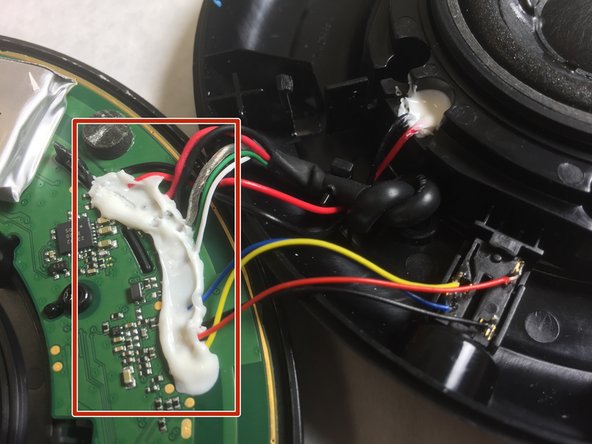
Be very careful when desoldering the connector cables! The soldering lugs are poor quality and tend to tear off the PCB

Thomas Sprenger - 返信

Hello

Where I can buy the motherboard replacement?

Regards

Lobo Gris - 返信

コメントを追加

統計データ:

過去 24時間: 4

過去 7 日: 25

過去 30 日: 73

今までの合計 7,428