メインコンテンツにスキップ

Installing OpenCore on Mac Guide #3

必要な工具と部品

  1. Installing OpenCore on Mac Guide #3, Installing OpenCore on Mac Guide #3: 手順 1、 1の画像 1
    • Now we get to install OpenCore on your Mac's Hard Drive or Solid State Drive!

    • PLEASE make sure you are familiar with Guide #2 before continuing.

  2. Installing OpenCore on Mac Guide #3: 手順 2、 3の画像 1 Installing OpenCore on Mac Guide #3: 手順 2、 3の画像 2 Installing OpenCore on Mac Guide #3: 手順 2、 3の画像 3
    • First, we need to download the latest version of OpenCore.

    • Go to OpenCore's website: https://github.com/dortania/OpenCore-Leg...

    • Scroll past the information until you get to "Assets"

    • Click the link "OpenCore-Patcher-GUI.app.zip"

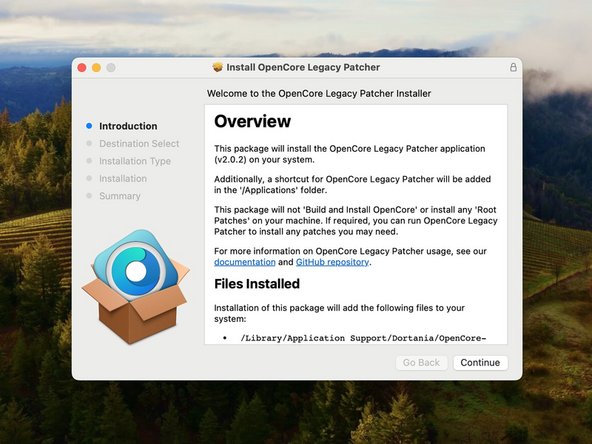
  3. Installing OpenCore on Mac Guide #3: 手順 3、 1の画像 1
    • Download the GUI app.

    • You may have to manually extract the ZIP file with Extractor.

    • If Finder does not let you open the app, Right-Click it and choose "Open"

  4. Installing OpenCore on Mac Guide #3: 手順 4、 1の画像 1
    • Here's what OpenCore's windows looks like when you first open the app.

    • Depending on the environment that OpenCore is running on, the window may vary slightly.

    • To get familiar with the app, let's look at some of the buttons:

  5. Installing OpenCore on Mac Guide #3: 手順 5、 2の画像 1 Installing OpenCore on Mac Guide #3: 手順 5、 2の画像 2
    • First we have "Build and Install OpenCore"

    • This option is currently unavailable, simply OpenCore is running on a MacBook Pro 2022. When Apple still supports a Mac model, OpenCore cannot be installed.

    • "Build and Install OpenCore" is what we'll use when we install the legacy EFI onto the Mac. You'll understand more in a minute.

  6. Installing OpenCore on Mac Guide #3: 手順 6、 1の画像 1
    • Next we have "Post-Install Root Patch"

    • When we finish installing macOS in Guide #4, Root Patching is what will fix any bugs that may occur on the Mac. But, that has no purpose for us right now.

  7. Installing OpenCore on Mac Guide #3: 手順 7、 1の画像 1
    • Now we have "Create macOS Installer"

    • This is basically the same command for making a macOS installer on a USB drive. 起動用USBを作成する方法

    • As of now, we may or may not be using this later. Please check Guide #4 for more information.

  8. Installing OpenCore on Mac Guide #3: 手順 8、 1の画像 1
    • Last but not least, we have "Support."

    • This is simply if you wish to contact the company. I have actually never used this.

  9. Installing OpenCore on Mac Guide #3: 手順 9、 1の画像 1
    • Oh, yes! "Settings"

    • We will be working here in "Settings" so go ahead and click this little button.

  10. Installing OpenCore on Mac Guide #3: 手順 10、 3の画像 1 Installing OpenCore on Mac Guide #3: 手順 10、 3の画像 2 Installing OpenCore on Mac Guide #3: 手順 10、 3の画像 3
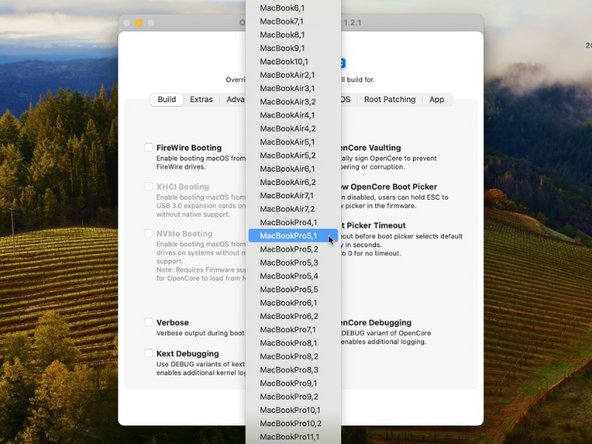
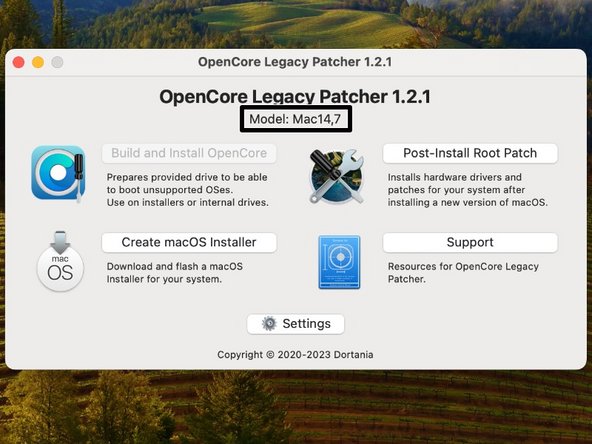
    • Before we get anywhere, select your Mac in the panel.

    • On the main screen, OpenCore will show the model of your Mac.

  11. Installing OpenCore on Mac Guide #3: 手順 11、 1の画像 1
    • Okay, now let's get OpenCore ready. Before you install it on your Mac, you need to build the correct EFI.

    • This is definitely not as hard as it sounds.

    • You probably won't need to fix anything in this first panel, so you can jump to "Extras"

  12. Installing OpenCore on Mac Guide #3: 手順 12、 2の画像 1 Installing OpenCore on Mac Guide #3: 手順 12、 2の画像 2
    • By default, OpenCore usually knows what's best for your Mac. So all settings are probably already set correctly, but we want to skim over them to double check.

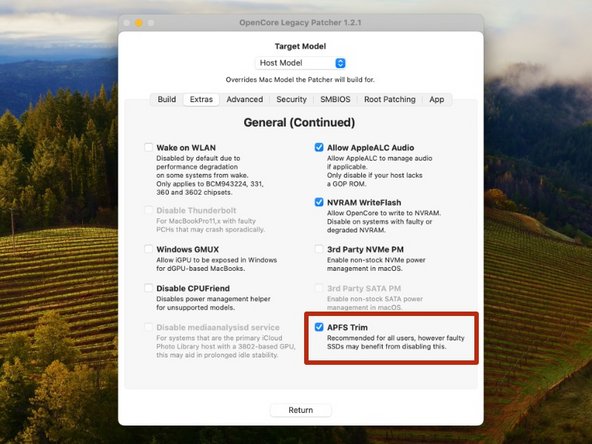
    • In extras, you'll see a bunch of NVRAM options. You'll probably leave most of this untouched.

    • Now, you will see "APFS Trim." If you are running a Mac that is newer than 2011, you could probably uncheck this, as your Mac knows what APFS is. Older than 2010 has no idea what APFS is, so keep this checked.

    • In the end, I have always kept this checked, as I have never had an issue with it checked. If you have a faulty Solid State drive, then you should definitely uncheck this.

    • If you're unsure, just leave it checked for now.

  13. Installing OpenCore on Mac Guide #3: 手順 13、 2の画像 1 Installing OpenCore on Mac Guide #3: 手順 13、 2の画像 2
    • Head over to "Advanced" on the panels.

    • The only thing you should change here is "FeatureUnlock." This fancy thing allows some of the newer things that old Macs can't do (Like AirPlay, Universal Control, Sidecar, etc.)

    • I would recommend changing this to "Enabled" even if it is set for "Partial." In this case, you get upgrade macOS and get the new features. If you have issues, you can always change it back.

  14. Installing OpenCore on Mac Guide #3: 手順 14、 1の画像 1
    • Now head to "Security" in the panel.

    • Security deals with SIP (System Integrity Protection) on your Mac. In order the run this EFI, and Root Patches later on, you must have SIP disabled slightly.

    • OpenCore always has these three items checked. I would recommend not touching this unless you have issues later on. If that happens, check all of the items.

    • As you check items, SIP gets lower. If nothing is checked, SIP is completely enabled. If everything is checked, SIP is disabled. By keeping the three items checked, you can use your Mac with SIP mostly enabled.

    • DO NOT TOUCH KERNEL SECURITY! Kernel Security deals with making sure nothing gets deep into the Mac's files. But, Root Patching needs to get deep into the files to work. So, keep the two items on the left checked.

  15. Installing OpenCore on Mac Guide #3: 手順 15、 1の画像 1
    • You could skip "SMBIOS," but we'll cover what this is real quick:

    • SMBIOS is the serial number and Board ID information about your Mac's Logic Board. If something terrible happens, OpenCore has a way to overwrite the Serial Number and Board ID. This does not change the Serial Number or Board ID, but it makes macOS look at the EFI and force it to take that custom Serial Number.

    • The only time you would need to change the Mac's serial number is if you are running macOS on a VERY old Mac. Or if you plug in the macOS USB drive and you get a prohibitory sign, then you should use SMBIOS. We will cover this in detail later on.

  16. Installing OpenCore on Mac Guide #3: 手順 16、 1の画像 1
    • Just completely skip "Root Patching" for now. We will use this after we get OpenCore installed.

  17. Installing OpenCore on Mac Guide #3: 手順 17、 2の画像 1 Installing OpenCore on Mac Guide #3: 手順 17、 2の画像 2
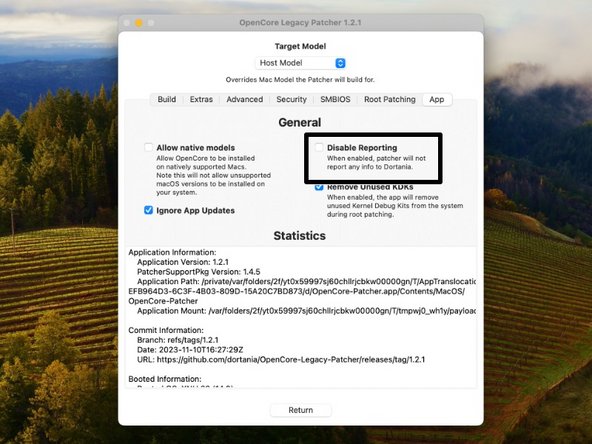
    • And we are at "App."

    • This simply changes how OpenCore works as an app, and not EFI.

    • The only thing you should change is "Disable Reporting." This will prevent OpenCore from sending any information to the company. And, this will make you Mac faster.

  18. Installing OpenCore on Mac Guide #3: 手順 18、 1の画像 1
    • We're almost done, click "Return" on the bottom of the window.

  19. Installing OpenCore on Mac Guide #3: 手順 19、 3の画像 1 Installing OpenCore on Mac Guide #3: 手順 19、 3の画像 2 Installing OpenCore on Mac Guide #3: 手順 19、 3の画像 3
    • Now, let's get this EFI on the Mac.

    • Click "Build and Install OpenCore" in the main window.

    • Choose "Install to disk"

    • Choose your Mac's Hard Drive or Solid State Drive in the list.

    • All disks are different. You may have a Toshiba, Samsung, Western Digital, Seagate, or even an Apple disk in your Mac.

  20. Installing OpenCore on Mac Guide #3: 手順 20、 1の画像 1
    • For quick troubleshooting tips:

    • If you get a window that looks like this, there is a good chance that Apple still supports your Mac. Double check to make sure of this.

    • Try giving OpenCore special permissions: go to System Preferences > Security > Full Disk Access > and allow OpenCore to have full disk access.

    • You may have to upgrade macOS before you can install OpenCore on the Hard Drive itself. In this case, install OpenCore (using the same settings) on an external USB drive.

    • Since OpenCore creates a new partition on the drive, you do not need to format the drive in order to install OpenCore. Now, if you are going to use the USB drive to install macOS, you'll need to format it at that point.

  21. Installing OpenCore on Mac Guide #3: 手順 21、 3の画像 1 Installing OpenCore on Mac Guide #3: 手順 21、 3の画像 2 Installing OpenCore on Mac Guide #3: 手順 21、 3の画像 3
    • Choose the EFI option in the list.

    • Enter your password.

    • All done! Click "OK" in the window that appears.

    • You may or may not get the option to reboot your Mac right there. In this case, I would recommend rebooting later on, since you have not yet updated macOS.

  22. Installing OpenCore on Mac Guide #3: 手順 22、 2の画像 1 Installing OpenCore on Mac Guide #3: 手順 22、 2の画像 2
    • Real quick, let's take a look at how to use OpenCore.

    • Reboot your Mac, and hold the Option (alt) key while starting up.

    • Your startup manager may look something like this:

    • Choose the "EFI Boot" option. Click the arrow pointing up to continue.

    • When OpenCore boots, you will be greeted to a new boot manager looking thing. Here, choose the drive you wish to start your Mac.

    • If you have a 2012 or older, your boot manager will be a grey instead of black. Unfortunately, OpenCore will always load in this dark boot. So, you'll see the light grey screen, the dark boot manager, and then a dark screen with the white Apple logo.

    • If you have a 2013 or newer, the Mac will always boot in this dark mode.

    • I will be making a guide to where you can customize the OpenCore boot picker screen, add custom icons, and so much more later on. Unfortunately, that guide will not be available anytime soon.

  23. Installing OpenCore on Mac Guide #3: 手順 23、 1の画像 1
    • Mac will continue to boot normally, and you'll be able to log in again, and everything will feel quite normal.

    • Later on, we'll change OpenCore to where it doesn't take us through the boot picker, and it immediately loads macOS. We'll work on that later on though.

    • As for now, you have installed OpenCore, and you are ready to update macOS.

終わりに

All done! You have successfully installed OpenCore! Now you can move to Guide #4 to update macOS.

作成者

2人の作成者と共同で作成されました。

Jadon

メンバー登録日: 09/05/23

1,632 ポイント

4のガイドは作成済み

0 件のコメント

コメントを追加

統計データ:

過去 24時間: 14

過去 7 日: 51

過去 30 日: 220

今までの合計 747