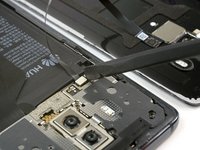
メインコンテンツにスキップ

Huawei Mate 10 Pro Daughterboard Replacement

必要な工具と部品

  1. Huawei Mate 10 Pro Daughterboard Replacement, SIM Card Tray: 手順 1、 2の画像 1 Huawei Mate 10 Pro Daughterboard Replacement, SIM Card Tray: 手順 1、 2の画像 2
    • Insert a SIM opening tool in the hole on the left side and push it in.

    • Remove the SIM card tray.

  2. Huawei Mate 10 Pro Daughterboard Replacement, Back Cover: 手順 2、 1の画像 1
    • Switch off your phone.

    • Prepare an iOpener and apply it to the back of the phone for about two minutes to loosen the adhesive beneath the back cover.

  3. Huawei Mate 10 Pro Daughterboard Replacement: 手順 3、 3の画像 1 Huawei Mate 10 Pro Daughterboard Replacement: 手順 3、 3の画像 2 Huawei Mate 10 Pro Daughterboard Replacement: 手順 3、 3の画像 3
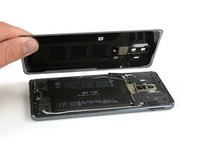
    • Lift up the back cover with a suction cup until you can insert the flat end of a halberd spudger.

    • Use the halberd spudger to cut the adhesive beneath the back cover on all sides of the phone.

    • Use opening picks to avoid the adhesive from sticking to the back cover again while cutting the adhesive on all sides.

  4. Huawei Mate 10 Pro Daughterboard Replacement: 手順 4、 2の画像 1 Huawei Mate 10 Pro Daughterboard Replacement: 手順 4、 2の画像 2
    • Don't remove the back cover all the way, yet. The fingerprint sensor cable is still connected to motherboard.

    • Flip the back cover over to the side.

    • Remove the Phillips #00 screw which holds down the metal shield, sitting on top of the connection of the fingerprint sensor cable.

  5. Huawei Mate 10 Pro Daughterboard Replacement: 手順 5、 2の画像 1 Huawei Mate 10 Pro Daughterboard Replacement: 手順 5、 2の画像 2
    この手順で使用する道具:
    Tweezers
    $4.99
    購入する
    • Use a pair tweezers to remove the metal shield covering the connector of the fingerprint sensor.

    • Disconnect the fingerprint sensor cable with a spudger.

    • When reassembling your phone apply new adhesive where it is necessary.

  6. Huawei Mate 10 Pro Daughterboard Replacement, Daughterboard: 手順 6、 3の画像 1 Huawei Mate 10 Pro Daughterboard Replacement, Daughterboard: 手順 6、 3の画像 2 Huawei Mate 10 Pro Daughterboard Replacement, Daughterboard: 手順 6、 3の画像 3
    • Unscrew the back cover from the base, then remove black cover.

    • Screws can be placed on a magnetic board to reduce chance of being lost.

  7. Huawei Mate 10 Pro Daughterboard Replacement: 手順 7、 1の画像 1
    • Unhook black strip over battery at both ends and remove.

  8. Huawei Mate 10 Pro Daughterboard Replacement: 手順 8、 3の画像 1 Huawei Mate 10 Pro Daughterboard Replacement: 手順 8、 3の画像 2 Huawei Mate 10 Pro Daughterboard Replacement: 手順 8、 3の画像 3
    • Pop out daughterboard and disconnect black and white wires.

終わりに

To reassemble your device, follow these instructions in reverse order.

作成者

2人の作成者と共同で作成されました。

Annabelle Harding

メンバー登録日: 03/31/22

433 ポイント

3のガイドは作成済み

チーム

IUPUI, Team 3-5, Harley Spring 2022 IUPUI, Team 3-5, Harley Spring 2022人のメンバー

IUPUI-HARLEY-S22S3G5

3 メンバー

6のガイドは作成済み

0 件のコメント

コメントを追加

統計データ:

過去 24時間: 2

過去 7 日: 8

過去 30 日: 16

今までの合計 452