メインコンテンツにスキップ

このバージョンは誤った内容を含んでいる可能性があります。最新の承認済みスナップショットに切り替えてください。

必要な工具と部品

  1. この手順は未翻訳です。 翻訳を手伝う。

    : 手順 1、 2の画像 1 : 手順 1、 2の画像 2
    • Apply pressure to the dark plastic casing and slide the casing downward, off of the phone.

  2. この手順は未翻訳です。 翻訳を手伝う。

    : 手順 2、 2の画像 1 : 手順 2、 2の画像 2
    • Fold the plastic flap open.

  3. この手順は未翻訳です。 翻訳を手伝う。

    : 手順 3、 2の画像 1 : 手順 3、 2の画像 2
    • Pull on the red tab to slide the battery out.

    • Take out the battery.

    • Replace with new battery.

  4. この手順は未翻訳です。 翻訳を手伝う。

    : 手順 4、 1の画像 1
    • Use a T5 Torx screwdriver to remove the five screws anchoring the plastic flap to the phone.

    • One of the five screws may be hidden beneath a "Void" sticker to the right of the serial label.

  5. この手順は未翻訳です。 翻訳を手伝う。

    : 手順 5、 1の画像 1
    • Once the screws are removed from the plastic flap, the piece should easily come out.

  6. この手順は未翻訳です。 翻訳を手伝う。

    : 手順 6、 2の画像 1 : 手順 6、 2の画像 2
    • After the screws are removed, fold circuit panel upwards, exposing the phone's primary buttons.

    • In order to remove the circuit board you must disconnect the labeled component.

  7. この手順は未翻訳です。 翻訳を手伝う。

    : 手順 7、 1の画像 1
    • Once the back side of the buttons are exposed, they will fall out either by punching them out from the front side, or by using tweezers to pull them out of the back.

  8. この手順は未翻訳です。 翻訳を手伝う。

    : 手順 8、 2の画像 1 : 手順 8、 2の画像 2
    • Rotate your HTC Freestyle so that the main screen is facing upward and toward you.

    • Use a plastic opening tool to pry the screen and electronic internals apart from the main phone housing.

  9. この手順は未翻訳です。 翻訳を手伝う。

    : 手順 9、 2の画像 1 : 手順 9、 2の画像 2
    • Orient the component so that the battery compartment and camera are facing upwards.

    • Use the #00 Phillips screwdriver to remove the exterior screws that are holding the piece together.

    • There should be screws on both lateral sides of the phone as well as one screw in the top corner to the right of the camera

  10. この手順は未翻訳です。 翻訳を手伝う。

    : 手順 10、 2の画像 1 : 手順 10、 2の画像 2
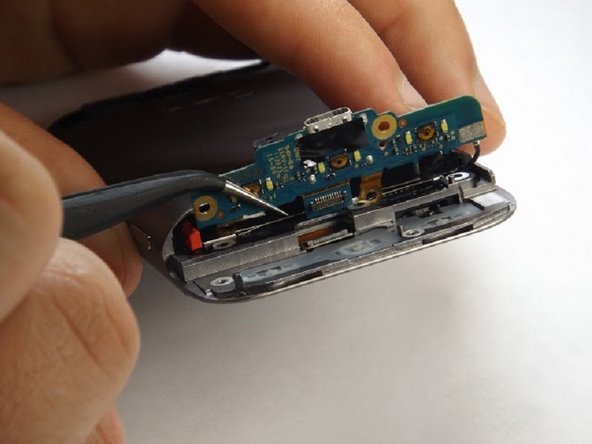
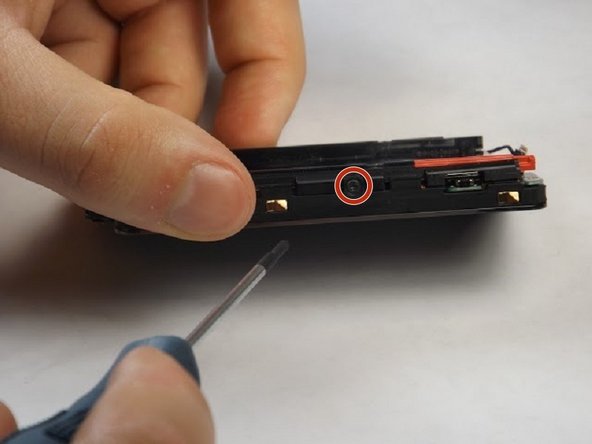
    • Once the screws are removed, the motherboard can be separated from the other components after prying open the gold-colored clamps hidden underneath the battery compartment.

    • Rotate the phone 180 degrees and pry the second clamp that is located on the other side of the component.

    • The motherboard will then easily be removed from the rest.

  11. この手順は未翻訳です。 翻訳を手伝う。

    : 手順 11、 2の画像 1 : 手順 11、 2の画像 2
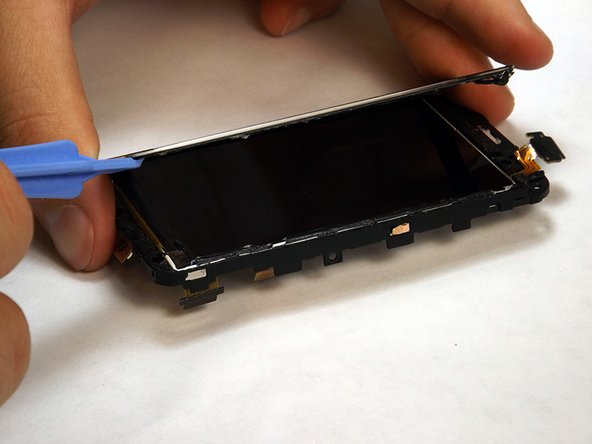
    • Once the screen and motherboard are separated, use a plastic opening tool to pry along the edges of the touchscreen. **Note, the use of a heat gun/heating element will help loosen the adhesive from behind the screen to make prying less physically straining.

    • The screen should now be fully removed.

ゴール

作成者

3人の作成者と共同で作成されました。

Jonathan Franco

メンバー登録日: 10/07/14

98 ポイント

1ガイドが承認済み

チーム

USF Tampa, Team 8-3, Leahy Fall 2014 USF Tampa, Team 8-3, Leahy Fall 2014人のメンバー

USFT-LEAHY-F14S8G3

4 メンバー

10のガイドは作成済み

0 件のコメント

コメントを追加

統計データ:

過去 24時間: 0

過去 7 日: 0

過去 30 日: 0

今までの合計 392