メインコンテンツにスキップ

このバージョンは誤った内容を含んでいる可能性があります。最新の承認済みスナップショットに切り替えてください。

必要な工具と部品

  1. この手順は未翻訳です。 翻訳を手伝う。

    : 手順 1、 1の画像 1
    • Gently insert an iPod opening tool between the rear panel and the inner rear frame near the headphone jack.

    • Use your iPod opening tool to pry up the rear case around the perimeter of the Evo.

  2. この手順は未翻訳です。 翻訳を手伝う。

    : 手順 2、 1の画像 1
    • Lift the rear panel off of the inner rear frame.

  3. この手順は未翻訳です。 翻訳を手伝う。

    : 手順 3、 2の画像 1 : 手順 3、 2の画像 2
    • Using the tip of your finger, lift the battery from the end closest to the camera.

    • Remove the battery from the rear inner frame.

  4. この手順は未翻訳です。 翻訳を手伝う。

    : 手順 4、 1の画像 1
    • Use the flat end of a spudger to pry up the red MicroSD retainer attached to the inner frame.

    • The retainer will move about 1 mm and stop. Do not attempt to completely remove the MicroSD card retainer.

  5. この手順は未翻訳です。 翻訳を手伝う。

    : 手順 5、 1の画像 1
    この手順で使用する道具:
    Tweezers
    $4.99
    購入する
    • Use a pair of tweezers to carefully pull the MicroSD card out of its slot in the inner rear frame.

  6. この手順は未翻訳です。 翻訳を手伝う。

    : 手順 6、 1の画像 1
    • Remove six T5 Torx screws securing the rear inner frame to the inner case.

  7. この手順は未翻訳です。 翻訳を手伝う。

    : 手順 7、 1の画像 1
    • Gently insert an iPod opening tool between the rear inner frame and its plastic surround near the Micro HDMI port.

    • Carefully pry the top edge of the rear inner frame away from the front surround of the Evo.

  8. この手順は未翻訳です。 翻訳を手伝う。

    : 手順 8、 2の画像 1 : 手順 8、 2の画像 2
    • Insert the iPod opening tool between the rear inner frame and its plastic surround and pry up at several points along the left edge of the Evo.

  9. この手順は未翻訳です。 翻訳を手伝う。

    : 手順 9、 3の画像 1 : 手順 9、 3の画像 2 : 手順 9、 3の画像 3
    • Continue the prying procedure, now focusing on detaching the plastic surround from the bottom of the Evo.

    • Pry up the rear inner frame along the right edge using the method described in previous steps.

    • Eventually work around the entire perimeter of the rear inner frame until it is lifted slightly from the inner case.

  10. この手順は未翻訳です。 翻訳を手伝う。

    : 手順 10、 1の画像 1
    • Remove the rear inner frame from the rest of the Evo.

  11. この手順は未翻訳です。 翻訳を手伝う。

    : 手順 11、 1の画像 1
    • Remove the single Phillips screw securing the motherboard to the inner case near the headphone jack.

  12. この手順は未翻訳です。 翻訳を手伝う。

    : 手順 12、 1の画像 1
    • Use the flat end of a spudger to pry the motherboard off the posts securing it to the metal display tray.

    • Do not try to completely remove the motherboard just yet. It is still attached by three ribbon cables.

  13. この手順は未翻訳です。 翻訳を手伝う。

    : 手順 13、 1の画像 1
    • Carefully peel the device information sticker off the left edge of the motherboard and EMI shield to reveal three connectors covered with tape.

    • It is not necessary to peel the entire device information sticker off the EMI shield.

  14. この手順は未翻訳です。 翻訳を手伝う。

    : 手順 14、 1の画像 1
    • Fold the device information sticker up against the top of the motherboard to keep it out of the way while you work.

    • Remove the pieces of tape covering the following ribbon cables:

    • Front-facing camera

    • Front panel ribbon cable

    • Display ribbon cable

  15. この手順は未翻訳です。 翻訳を手伝う。

    : 手順 15、 2の画像 1 : 手順 15、 2の画像 2
    この手順で使用する道具:
    Tweezers
    $4.99
    購入する
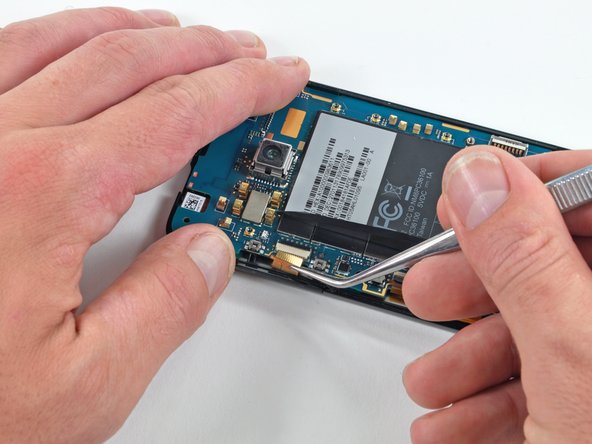
    • Using the tip of an iPod opening tool, flip up the front-facing camera ribbon cable retaining flap.

    • Be very careful and gentle with these flaps. They are very easy to break or dislodge and equally difficult to reinstall.

    • Use a pair of tweezers to pull the front-facing camera ribbon cable straight out of its socket.

  16. この手順は未翻訳です。 翻訳を手伝う。

    : 手順 16、 2の画像 1 : 手順 16、 2の画像 2
    • Using the tip of an iPod opening tool, flip up the front panel ribbon cable retaining flap.

    • Use a pair of tweezers to pull the front panel ribbon cable straight out of its socket.

  17. この手順は未翻訳です。 翻訳を手伝う。

    : 手順 17、 2の画像 1 : 手順 17、 2の画像 2
    • Using the tip of an iPod opening tool, flip up the display ribbon cable retaining flap.

    • Grasp the display ribbon cable with a pair of tweezers and pull it straight out of its socket.

  18. この手順は未翻訳です。 翻訳を手伝う。

    : 手順 18、 1の画像 1
    • Carefully lift the motherboard out of the inner case, minding any cables that may get caught.

    • Be mindful of the top power button and side rocker switch, which may fall out of the front case when the board is removed.

  19. この手順は未翻訳です。 翻訳を手伝う。

    : 手順 19、 1の画像 1
    • Gently lift the front-facing camera out of its recess in the inner case and remove it from the Evo.

ゴール

3 の人々がこのガイドを完成させました。

作成者

2人の作成者と共同で作成されました。

Walter Galan

694,945 ポイント

1,203のガイドは作成済み

0 件のコメント

コメントを追加

統計データ:

過去 24時間: 0

過去 7 日: 0

過去 30 日: 13

今までの合計 24,434