メインコンテンツにスキップ

HP Spectre x360 13t-4000 Motherboard Replacement

必要な工具と部品

  1. HP Spectre x360 13t-4000 Motherboard Replacement, Bottom Cover: 手順 1、 2の画像 1 HP Spectre x360 13t-4000 Motherboard Replacement, Bottom Cover: 手順 1、 2の画像 2
    • Turn off and unplug the laptop.

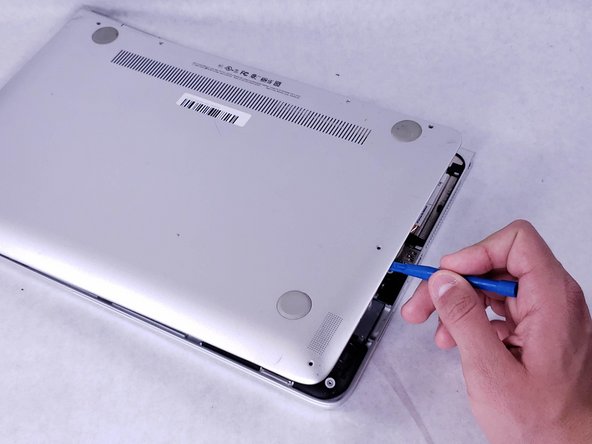
    • Flip over the laptop so that the bottom backplate is exposed.

  2. HP Spectre x360 13t-4000 Motherboard Replacement: 手順 2、 2の画像 1 HP Spectre x360 13t-4000 Motherboard Replacement: 手順 2、 2の画像 2
    • Use a T5 screwdriver to remove the six 3 mm screws that secure the backplate.

    • Use the same screwdriver to remove the two 7 mm screws.

  3. HP Spectre x360 13t-4000 Motherboard Replacement: 手順 3、 3の画像 1 HP Spectre x360 13t-4000 Motherboard Replacement: 手順 3、 3の画像 2 HP Spectre x360 13t-4000 Motherboard Replacement: 手順 3、 3の画像 3
    • Insert an opening tool under the bottom cover at the screen hinges, and gently pry the cover free.

    • Carefully work your way around the cover's edges to pop it off completely.

  4. HP Spectre x360 13t-4000 Motherboard Replacement, Battery: 手順 4、 3の画像 1 HP Spectre x360 13t-4000 Motherboard Replacement, Battery: 手順 4、 3の画像 2 HP Spectre x360 13t-4000 Motherboard Replacement, Battery: 手順 4、 3の画像 3
    この手順で使用する道具:
    Tweezers
    $4.99
    購入する
    • With the backplate removed, remove the four 3 mm screws securing the battery with a Phillips #1 screwdriver.

    • With the screws removed, disconnect the 3 wires connected to the battery.

    • Tweezers may be needed to remove the wires.

  5. HP Spectre x360 13t-4000 Motherboard Replacement, Heatsink and Fan Assembly: 手順 5、 3の画像 1 HP Spectre x360 13t-4000 Motherboard Replacement, Heatsink and Fan Assembly: 手順 5、 3の画像 2 HP Spectre x360 13t-4000 Motherboard Replacement, Heatsink and Fan Assembly: 手順 5、 3の画像 3
    • Use a Phillips #0 Screwdriver to remove the four circled 3 mm screws.

    • Use the same screwdriver to remove the circled 4 mm screw.

  6. HP Spectre x360 13t-4000 Motherboard Replacement: 手順 6、 2の画像 1 HP Spectre x360 13t-4000 Motherboard Replacement: 手順 6、 2の画像 2
    • Remove black adhesive tape and metal shielding.

  7. HP Spectre x360 13t-4000 Motherboard Replacement: 手順 7、 2の画像 1 HP Spectre x360 13t-4000 Motherboard Replacement: 手順 7、 2の画像 2
    • Use a Phillips #0 screwdriver to remove the last 4 mm screw under the black tape.

    • Unplug the cable next to the fan.

  8. HP Spectre x360 13t-4000 Motherboard Replacement: 手順 8、 2の画像 1 HP Spectre x360 13t-4000 Motherboard Replacement: 手順 8、 2の画像 2
    • Remove heatsink and fan assembly.

    • Reapply fresh thermal paste to the CPU before placing a heatsink back in the device.

  9. HP Spectre x360 13t-4000 Motherboard Replacement, Motherboard: 手順 9、 1の画像 1
    • Use a Phillips #0 Screwdriver to remove the 2.6 mm and 2.7 mm screws.

    • Strip wire present in the motherboard must also be removed

  10. HP Spectre x360 13t-4000 Motherboard Replacement: 手順 10、 3の画像 1 HP Spectre x360 13t-4000 Motherboard Replacement: 手順 10、 3の画像 2 HP Spectre x360 13t-4000 Motherboard Replacement: 手順 10、 3の画像 3
    • For the strip wires, push the white tab seen in the photo up gently and slowly pull the strip wire.

    • The normal wires can be removed by holding the sides of the connector and gently pulling away.

    • Finally, the screws can be removed.

  11. HP Spectre x360 13t-4000 Motherboard Replacement: 手順 11、 1の画像 1
    • You may now pull the motherboard off the computer to access it.

終わりに

To reassemble your device, follow these instructions in reverse order.

作成者

2人の作成者と共同で作成されました。

Justin Dages

メンバー登録日: 03/28/23

361 ポイント

3のガイドは作成済み

チーム

IUPUI, Team 2-5, Harley Spring 2023 IUPUI, Team 2-5, Harley Spring 2023人のメンバー

IUPUI-HARLEY-S23S2G5

3 メンバー

3のガイドは作成済み

0 件のコメント

コメントを追加

統計データ:

過去 24時間: 1

過去 7 日: 1

過去 30 日: 5

今までの合計 151