メインコンテンツにスキップ

このバージョンは誤った内容を含んでいる可能性があります。最新の承認済みスナップショットに切り替えてください。

必要な工具と部品

  1. この手順は未翻訳です。 翻訳を手伝う。

    : 手順 1、 2の画像 1 : 手順 1、 2の画像 2
    • Make sure your laptop is powered off.

    • With laptop closed flip to look at the underside of the laptop.

  2. この手順は未翻訳です。 翻訳を手伝う。

    : 手順 2、 1の画像 1
    • On the underside of the laptop towards the hinge for the screen there are two rectangular slide switches located inside of rectangular tracks.

  3. この手順は未翻訳です。 翻訳を手伝う。

    : 手順 3、 2の画像 1 : 手順 3、 2の画像 2
    • The left switch is the battery unlock switch.

    • Inside the rectangular track of this switch there is an image of a closed lock that should be visible. Push this switch to the other end of the track and an image of an open lock should be visible.

  4. この手順は未翻訳です。 翻訳を手伝う。

    : 手順 4、 1の画像 1
    • Then take and slide the other switch to the other end of its track which will pop out the battery.

    • Grab the battery and pull it out of the slot.

  5. この手順は未翻訳です。 翻訳を手伝う。

    : 手順 5、 1の画像 1
    • Flip over and open up the laptop with screen facing you.

  6. この手順は未翻訳です。 翻訳を手伝う。

    : 手順 6、 3の画像 1 : 手順 6、 3の画像 2 : 手順 6、 3の画像 3
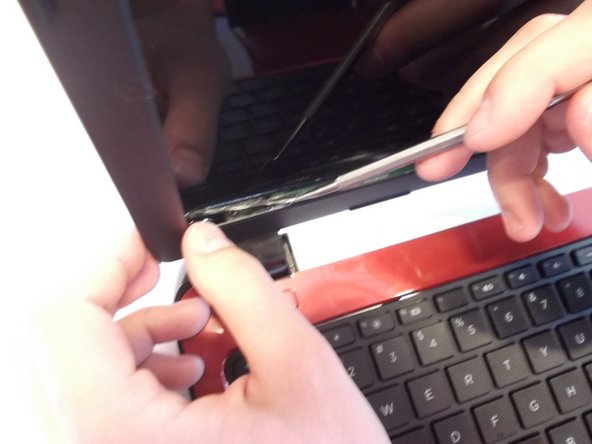
    • Slide plastic opening tool in crack at the top corner of the outer frame of the screen (in the gap between the red and black sections of plastic) and pry apart as shown.

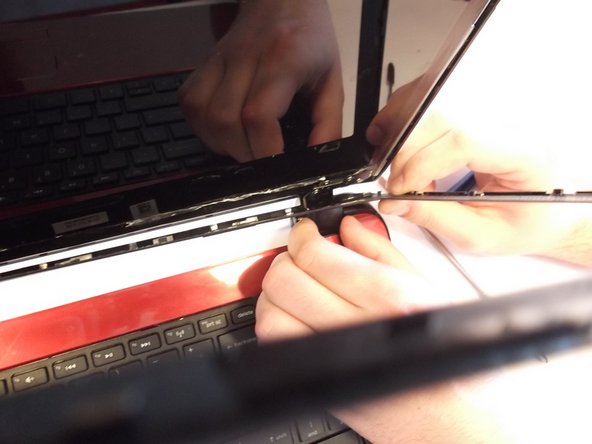
    • Pry apart all edges the same as the top. Use the spudger for the bottom section as it is glued to tape, make sure to pry this apart carefully and the tape should be separated from the black plastic part as shown.

    • The glue is difficult to separate.

  7. この手順は未翻訳です。 翻訳を手伝う。

    : 手順 7、 2の画像 1 : 手順 7、 2の画像 2
    • Separate the black plastic frame from the body of the computer by sliding it up and towards you while rotating the top section away from you.

  8. この手順は未翻訳です。 翻訳を手伝う。

    : 手順 8、 3の画像 1 : 手順 8、 3の画像 2 : 手順 8、 3の画像 3
    • Unscrew the 4x 4mm Phillips #1 screws from the four corners of the screen they are the ones that are attached to the metal tabs coming from the screen itself.

  9. この手順は未翻訳です。 翻訳を手伝う。

    : 手順 9、 2の画像 1 : 手順 9、 2の画像 2
    • Pull the screen away from the plastic backing there will be a plug on the bottom section of the screen near the keyboard.

    • Take small metal spudger and gently scrape up the sticker holding the screen in place.

  10. この手順は未翻訳です。 翻訳を手伝う。

    : 手順 10、 2の画像 1 : 手順 10、 2の画像 2
    • Use a plastic opening tool to lift up the black tab on the ZIF connector.

    • Slowly pull the ribbon cable out of the connector.

ゴール

3 の人々がこのガイドを完成させました。

作成者

3人の作成者と共同で作成されました。

Anthony Ciotti

メンバー登録日: 04/07/16

747 ポイント

5のガイドは作成済み

チーム

UMass Dartmouth, Team 4-5, Catania Spring 2016 UMass Dartmouth, Team 4-5, Catania Spring 2016人のメンバー

UMASSD-CATANIA-S16S4G5

4 メンバー

5のガイドは作成済み

コメント 1 件

What screen would fit that laptop

supermiguel719 - 返信

コメントを追加

統計データ:

過去 24時間: 0

過去 7 日: 3

過去 30 日: 11

今までの合計 3,451