メインコンテンツにスキップ
リペアコミュニティに参加 - アカウントの作成

Front Panel Assembly Replacement

必要条件のみ
これは前提条件のみのガイドです!このガイドは別の手順の一部であり、単独で使用されません。

必要な工具と部品

  1. Front Panel Assembly Replacement, Front Panel Assembly: 手順 1、 1の画像 1
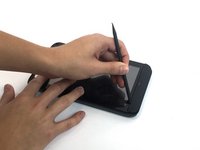
    • Insert the spudger under the capacitive button panel, and slide the spudger all the way around.

    • You will want to heat up the screen edges with the iOpener to help facilitate removal.

  2. Front Panel Assembly Replacement: 手順 2、 1の画像 1
    • Remove the button cover by lifting the cover away from the tablet.

  3. Front Panel Assembly Replacement: 手順 3、 1の画像 1
    • Using the Torx screwdriver, remove the 4mm screws.

  4. Front Panel Assembly Replacement: 手順 4、 1の画像 1
    • With the Torx screwdriver, remove the two 5mm screws.

  5. Front Panel Assembly Replacement: 手順 5、 2の画像 1 Front Panel Assembly Replacement: 手順 5、 2の画像 2
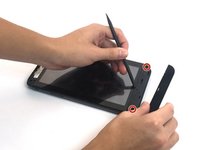
    • Using the spudger, insert it under the black side panel. Slide the spudger all the way around until the cover piece comes off.

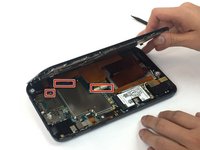
    • With the Torx screwdriver, remove the two 4mm screws.

  6. Front Panel Assembly Replacement: 手順 6、 1の画像 1
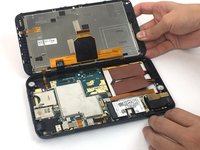
    • Use the spudger to go along the edges of the device and pop out the latches securing the display to the case.

  7. Front Panel Assembly Replacement: 手順 7、 2の画像 1 Front Panel Assembly Replacement: 手順 7、 2の画像 2
    • Ribbon cables are very sensitive and prone to breaking

    • Disconnect the ribbon cables by unlocking the connector and pulling the cable out slowly.

    • Make sure all the cables are unplugged before opening the device completely. Failure to do so might lead to broken or torn cables.

終わりに

To reassemble your device, follow these instructions in reverse order.

ある他の人がこのガイドを完成しました。

作成者

2人の作成者と共同で作成されました。

Carlos Salas

メンバー登録日: 09/30/16

194 ポイント

1ガイドが承認済み

チーム

USF Tampa, Team 4-6, Passmore Fall 2016 USF Tampa, Team 4-6, Passmore Fall 2016人のメンバー

USFT-PASSMORE-F16S4G6

3 メンバー

12のガイドは作成済み

0件のガイドコメント

コメントを追加

統計データ:

過去 24時間: 0

過去 7 日: 1

過去 30 日: 6

今までの合計 113