はじめに
This guide will show you how to replace the camera module of the Fairphone 2.
必要な工具と部品
-
-
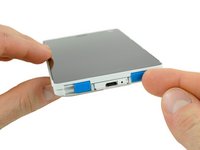
Pick a corner of your slim case and get between the two parts with your thumb's fingernails.
-
Pull up the back part of the slim case to separate the small snap fit connections.
-
Remove the back part of the slim case.
-
-
-
-
Push the battery toward the top of the phone.
-
Pull the battery out away from the phone.
It isn't necessary to remove the rim if all you are doing is changing the battery. That becomes necessary if you are to proceed farther into the phone.
It might be good to begin by saying switch the phone off. The Fairphone is for everybody and most will have no experience of disassembling electronic devices.
-
-
-
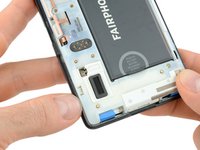
After taking out the battery you can unlock the display assembly.
-
Flip the two blue switches to the inner position.
-
Slide the display assembly towards the bottom of the phone.
Being technically nervous I couldn't do this. I didn't know how much pressure, pull or push was required.
After I'd watched the video my confidence increased!
It was a bit stiff and not so easy.
You don´t mention taking the rim off the display first. That stymied me completely. Do add that to your otherwise clear and helpful instructions. Best wishes - Walt Patterson
This guide is based on the old bumper made in one piece. We should update to the sandwich bumper with a top and bottom part.
I agree. Took a while to figure that one out!
Sorry, I can not slide away the display assembly to change the main camera module. The 2 blue switches seem to be locked. Cristiano, Italy
I replay to myself: I did it at last! ! But it was very, very, very, very hard!
Can’t get any movement at all on screen been trying for over an hour and others too ! there is no way to grip it as its so slippery have tried putting as much presure as possible on display by pushing far end of it with thin plastic implement and endless wiggling and pressing of every possible part of lower case no joy ! feels like its attached at mid sides. Elinor Rivers
try sliding along the display while applying some pressure two or three times. it worked really easily for me
I could slide the display case off very easily after watching the video, but when it came to doing the sequence in reverse I was fiddling about for ages trying to ‘slide’ it back on, until I realised this just wasn’t going to work and needed to click it back into place. Posting here in case this is helpful for others.
-
-
Impossible de déplacer l'écran vers le bas chez moi. Je n'ose pas forcer... c'est normal?
benbahmedf - 返信
I can not slide the display assembly. Some help?
The display sits very tight.
So you need to gently apply a little force to slide it open the first time.
It is hard to get a good grip on the two parts for a successful "magic move".
Leider kann ich weder mit "little force" noch mit "much force" das Display nach der Entriegelung bewegen. Wer kann mit mehr Details helfen?
It did work for me. Make sure, you have unlocked the blue switches in step 3 (sorry, had to mention that). if you can't get a grip, you might try to lay a ruler or two credit cards on top of each other on a table that is tight at the wall,
- place the ruler/credit cards on the table and just attaching the wall
- place the PF2 with the display upside down on the table in front of the ruler/credit cards with the blue switches towards you and the headphone plug attaching the ruler/cards.
- then gently but with increasing force push your two thumbs towards the top of the main FP2 unit (or use more fingers to push both in the centre as well as on the two edges). make sure you push horizontally and that the ruler is not higher than the border of the display unit (1.5-2 mm).
(hope i could explain myself in and understandable way! ;-) )
Thank you a lot ! This worked for me.
Thanks, it worked for us as well.
deRahier -
great tip! Thanks so much
Really helped! This way finally worked for me. Thanks :)
thank you !!
Unglaublich fair, dass ich mich mit diesem Kack alleine beschäftige - wenn ich so weitermache, werde ich demnächst die Trümmer meines Fairphones wahrscheinlich durch Ungeschicklichkeit so beschädigen, dass es unbrauchbar ist!
-
-
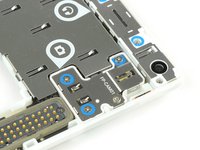
Remove the three Phillips #0 screws of the module which are nicely marked by the blue circles.
Das Thema ist doch die Demontage der Rückkamera. Hier wird aber die Frontkamera demontiert. Wenn man einmal so weit ist, kann man die 2 Schrauben der Rückkamera auch herausdrehen und das Modul entnehmen. Gruß - Ralf
Nein nein, das ist die Rückkamera. Also die mit 8 MP, die auf der Rückseite des Telefons filmt.
Die Frontkamera ist die auf der Seite des Displays. Ist nur eine Definitionssache.
Siehe Beschreibung der Komponenten hier: Fairphone 2
-
-
-
Take out the whole module.
Is it possible to do this last step without the pliers?
Definitely, yes.
merci, ça marche !
Jehan d’Ek
This taking out the camera module and putting it back in again has worked for me! I wonder for how long. Let’s see!
Same for me: taking it out and putting it back ‘repaired’ it. Love the Fairphone!
-


To reassemble your device, follow these instructions in reverse order.
Information on what to do with the old module can be found on the FairPhone support page and in the FairPhone forum.
To reassemble your device, follow these instructions in reverse order.
Information on what to do with the old module can be found on the FairPhone support page and in the FairPhone forum.
71 の人々がこのガイドを完成させました。

チーム

Tobias Isakeit - Repairability Engineer Tobias Isakeit - Repairability Engineer人のメンバー
Business
1 メンバー
1,131のガイドは作成済み
23 件のコメント
Alles gut - hat wunderbar funktioniert, insbesondere dank des Videos für Schritt 4
Hat prima funktioniert dank einfacher Anleitung und einfacher Bauweise.
Geschafft! - Schritt 4 war beim Slim Case nicht so einfach, aber nach ein paar Minuten hatte ich es raus. Ich frage mich bloss, was ich nun mit der alten Kamera mache..? Kann man die zurückschicken? Gibt es dazu irgendwelche Infos? Danke für die Anleitung und allfällige Infos bezüglich “Zukunft der alten Kamera” ;-) !
Hallo Claudia, Gratulation zur gelungenen Reparatur. Bezüglich alten Modulen kannst du hier auf der Seite von Fairphone mal vorbei schauen: https://support.fairphone.com/hc/en-us/a...
cool, einmal auf und zu, und es läuft wieder! Besten Dank!
Great instructions - very easy to use. Thanks a lot!
sehr gute Anleitung, vor allem auch durch das Video. Beim Slim case muss man aber das vordere Rahmenteil auch runternehmen, was ich aber schnell rausgfunden habe. Die Kamera funktioniert jetzt wieder einwandfrei und bringt vorläufig keine Fehlermeldungen mehr.
Katissa St - 返信
I’ve done it and my rear camera works again! Thanks a lot!
Anleitung sehr gut - insbes. durch das Video. Leider ist in der Anleitung die Notwendigkeit des Entfernens dss vorderen Rahmenteils nicht beschrieben. Das muß aber runter, sonst kommt man nicht weiter! Ich hab’s nach einigem hin u. her herausgfunden. Die Kamera funktioniert jetzt v o r l ä u f i g einwandfrei; sie bringt keine Fehlermeldungen mehr. Ich hoffe, dass das bleibt so!
Danke jedenfalls für die Beschreibung!
Danke für den Hinweis. Wir haben den guide aktualisiert, damit er nun auch zeigt, wie die zweiteilige Schale abgenommen wird. Schön zu hören, dass es trotzdem geklappt hat.
My camera is working again. Very clear instructions.
Super Anleitung, vor allem das Video um den Rahmen zu entfernen. Tolles Gefühl, wenn es nachher wieder funktioniert und man hat es selber geschafft! Danke!
How tight should those screws be? Camera is now working again cheers!
Vielen Dank für die Anleitung.! Habe das Handy zum ersten Mal auseinander gebaut und war etwas nervös. Aber mithilfe der Anleitung war es ganz einfach und jetzt scheint meine Kamera wieder zu funktionieren :)
Super! Stap voor stap; heldere taal; duidelijke plaatjes; ook info over ‘what if?’ Geeft gevoel dat je het zelf kunt. > Camera gefixt zonder verzendkosten etc. Echt Fair!
Thanks so much - followed these instructions and my rear-facing camera now works beautifully again!
Hurra! Dank der Anleitung habe ich meine erste Reparatur-Aktion am eigenen Handy geschafft. Nun bin ich gespannt, wie viele Jahre mir das gute Stück weiter treue Dienste leisten wird. Danke für die super Erklärung! Auch mir hat das Video den entscheidenden Schubs gegeben, mit Schmackes dran zu gehen.
danke für die einfache und gut verständliche anleitung. ich keine zehn minuten gebraucht um die kamera auszutauschen.