メインコンテンツにスキップ

Digitac Jazz Ultratab C725 Speaker Replacement

必要な工具と部品

  1. Digitac Jazz Ultratab C725 Speaker Replacement, Speaker: 手順 1、 3の画像 1 Digitac Jazz Ultratab C725 Speaker Replacement, Speaker: 手順 1、 3の画像 2 Digitac Jazz Ultratab C725 Speaker Replacement, Speaker: 手順 1、 3の画像 3
    • Locate the four 3.5 mm Phillips head screws holding the silver back plate and the screen together. There are 2 screws on the top and another 2 screws on the bottom.

    • Using the Phillips #00 Screwdriver, remove all 4 screws.

    • Remove the screws with the least amount of force possible to avoid any damage to the threads. If thread damage occurs, screw removal will be much more difficult or may even become impossible.

  2. Digitac Jazz Ultratab C725 Speaker Replacement: 手順 2、 3の画像 1 Digitac Jazz Ultratab C725 Speaker Replacement: 手順 2、 3の画像 2 Digitac Jazz Ultratab C725 Speaker Replacement: 手順 2、 3の画像 3
    • Flip your device so that the long side without the buttons is facing you.

    • Insert the Plastic Opening Tool between the silver back plate and the screen about 1 inch from corner of the device on either side.

    • Jimmy the Plastic Opening Tool until the screen unsnaps from the back plate.

    • Work your way down the edge of the device, popping out all locations where the screen snaps into the silver back plate.

    • Go around the corners with the Plastic Opening Tool and unsnap additional snap-in locations as necessary.

    • Once the screen is loose, pull it towards you then lift it off to prevent damage to the buttons on the other side of the device.

  3. Digitac Jazz Ultratab C725 Speaker Replacement: 手順 3、 2の画像 1 Digitac Jazz Ultratab C725 Speaker Replacement: 手順 3、 2の画像 2
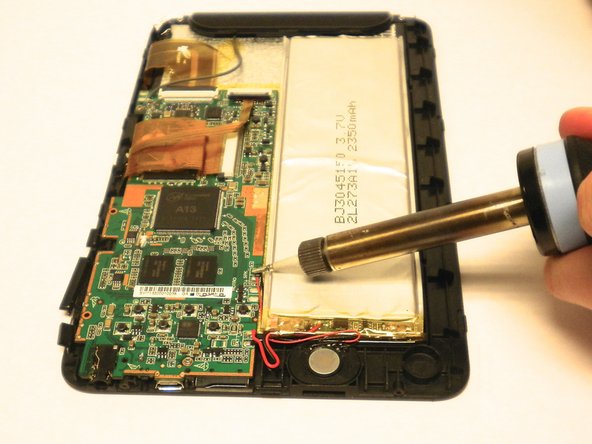
    • Use a soldering iron to melt the solder that connects the speaker to the motherboard.

    • Pull the wires out.

  4. Digitac Jazz Ultratab C725 Speaker Replacement: 手順 4、 3の画像 1 Digitac Jazz Ultratab C725 Speaker Replacement: 手順 4、 3の画像 2 Digitac Jazz Ultratab C725 Speaker Replacement: 手順 4、 3の画像 3
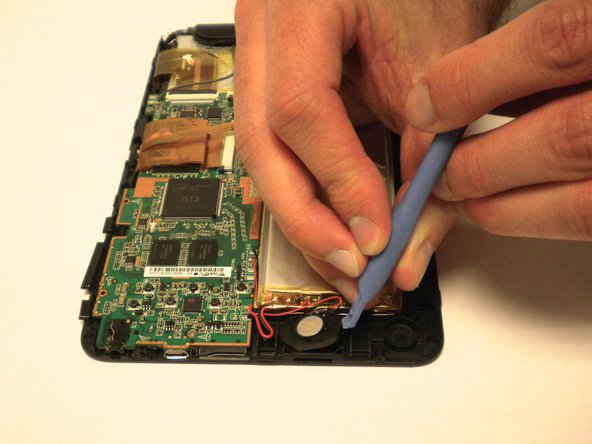
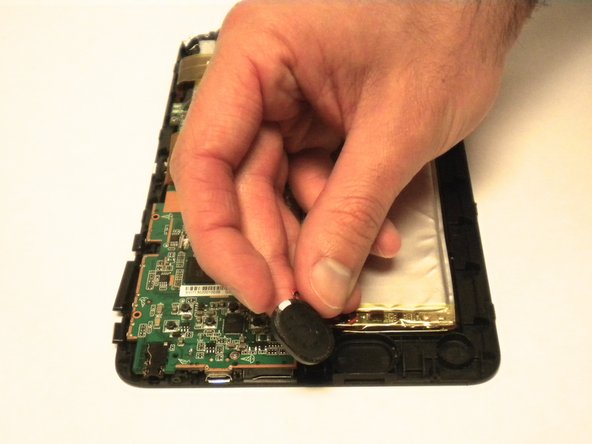
    • Insert the plastic opening tool in the gap between the speaker and the bracket that holds it.

    • Pry the speaker out of the bracket.

終わりに

To reassemble your device, follow these instructions in reverse order.

作成者

2人の作成者と共同で作成されました。

Seth York

メンバー登録日: 01/20/15

355 ポイント

3のガイドは作成済み

チーム

USF Tampa, Team 11-6, Blackwell Winter 2015 USF Tampa, Team 11-6, Blackwell Winter 2015人のメンバー

USFT-BLACKWELL-W15S11G6

2 メンバー

5のガイドは作成済み

0 件のコメント

コメントを追加

統計データ:

過去 24時間: 0

過去 7 日: 0

過去 30 日: 0

今までの合計 95