メインコンテンツにスキップ

DigiLand DL1010Q Screen Replacement

必要な工具と部品

  1. DigiLand DL1010Q Screen Replacement, Rear Case: 手順 1、 1の画像 1
    • With a J00 Philips head screwdriver, unscrew the two 4mm black screws located at the bottom of the device.

    • Before disassembling your device, be sure it is powered off.

  2. DigiLand DL1010Q Screen Replacement: 手順 2、 2の画像 1 DigiLand DL1010Q Screen Replacement: 手順 2、 2の画像 2
    • Using a plastic opening tool, begin softly prying open device by first inserting it in between the front and back panels.

    • Continue prying the edges while moving around the device's perimeter until the back can be easily removed.

  3. DigiLand DL1010Q Screen Replacement: 手順 3、 1の画像 1
    • Carefully lift back panel away from the body of the device.

    • Speaker wires are connected to both the front and back panel.

  4. DigiLand DL1010Q Screen Replacement, Battery: 手順 4、 2の画像 1 DigiLand DL1010Q Screen Replacement, Battery: 手順 4、 2の画像 2
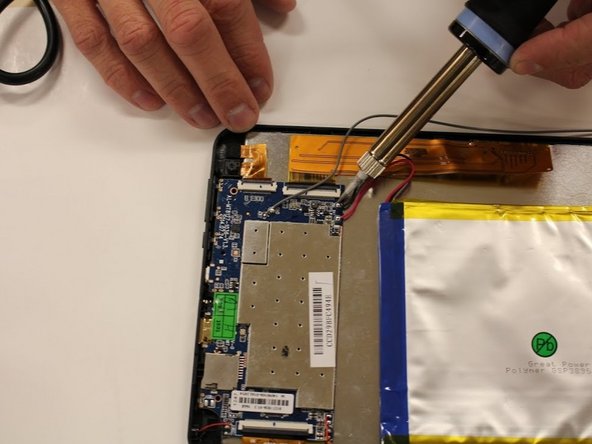
    • Desolder positive and negative, red and black, wires from the mother board that are connected to the battery.

    • The soldering tool is hot, and will burn. For how to use a soldering tool follow the How to Solder Guide

  5. DigiLand DL1010Q Screen Replacement: 手順 5、 2の画像 1 DigiLand DL1010Q Screen Replacement: 手順 5、 2の画像 2
    • Using a metal spudger tool, wedge between battery and metal screen.

    • Follow the edge of the battery to loosen the glue.

  6. DigiLand DL1010Q Screen Replacement: 手順 6、 2の画像 1 DigiLand DL1010Q Screen Replacement: 手順 6、 2の画像 2
    • Once the glue is loosened, you should be able to pry off the battery from the screen.

    • Using your hands, pull up on the battery to pull battery off.

    • Pulling on the battery causes you to bend the battery. Bending the battery could cause it to break open. Battery fumes are toxic and unsafe.

    • The battery will be completely disconnected and you can set the battery aside in a safe place.

  7. DigiLand DL1010Q Screen Replacement, Screen: 手順 7、 1の画像 1
    • Begin by locating the four 3mm silver screws that are holding the screen down to the digitizer. Set screws to the side.

  8. DigiLand DL1010Q Screen Replacement: 手順 8、 1の画像 1
    • Once everything is removed, take one plastic opening tool and pry it between the screen and digitizer.

  9. DigiLand DL1010Q Screen Replacement: 手順 9、 1の画像 1
    • Once the screen is pried free from the digitizer, simply grab the thin orange circuit strip and carefully pull in an upwards motion to remove the screen from the digitizer. Set screen to the side.

終わりに

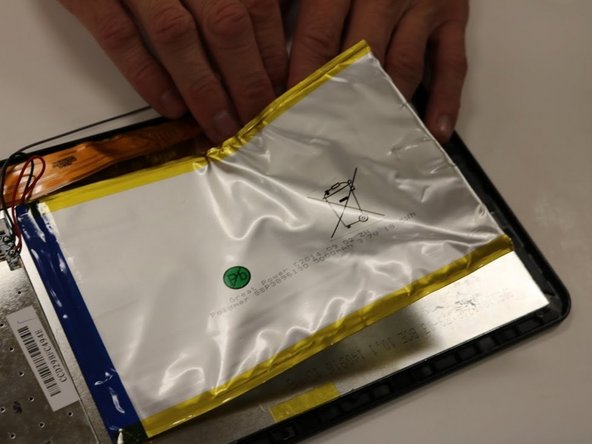
To reassemble your device, follow these instructions in reverse order.

4 の人々がこのガイドを完成させました。

作成者

1人の作成者と共同作成されました。

Marissa Saidy

メンバー登録日: 09/28/15

354 ポイント

2のガイドは作成済み

チーム

Eastern Washington University, Team 1-5, Matresse Fall 2015 Eastern Washington University, Team 1-5, Matresse Fall 2015人のメンバー

EWU-MATRESSE-F15S1G5

4 メンバー

10のガイドは作成済み

3 件のコメント

I find it's not necessary to remove the batttery, but there are scews holding down the main circuit board that he left out.

kevinosborn - 返信

នៅណាមានបង

ខ្ញុំទិញមួយ

ផ្ញើតាមឡានបានអត់

ខ្ញិំនៅតាកែវ ស្រុកកោះអណ្ដែត

mardynie1234 - 返信

コメントを追加

統計データ:

過去 24時間: 1

過去 7 日: 3

過去 30 日: 8

今までの合計 6,112