はじめに
Dell XPS 13のWi-Fiカードを交換するための修理ガイドです。Wi-Fi接続に問題がある場合、ワイヤレスカードを交換または再インストールすると解決する場合があります。
必要な工具と部品
-
-
プラスチックのオープンツールを使って'XPS'の刻印が入った蓋を開けます。
No flap or screw on the XPS 9370, just a press-fit latch at the centre of the cover. This can be gently prised off.
-
-
-
-
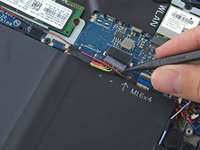
開口ピックまたはプラスチックのへらを使用して、カバーの後ろ側からクリップを外していきます。
It’s not that easy to lift actually, cause there are latches. Had t release them gently all around beforehand.
Also there’s one additional screw under that plate on the bottom!
Maybe the later models are different, since it should be from the front: https://www.youtube.com/watch?v=xFIE2SKs...
Very difficult step, Proceed very carefull
If you are replacing the battery of a 9360 or latter (2016 onward) make sure to do the FRONT first. There are latches on the back that you may break if you try to force it open that way. After prying up the front and the sides, just lift up the front like you would open a hinged box. You shouldn’t feel that much resistance as the back hinges off towards you after you’ve lifted it around 30-40 degrees.
-
-
-
背面カバーを外します。
good evening, is there a site that sells the back part because it's broken
good evening, is there a site that sells the
back part because it's broken
-
-
-
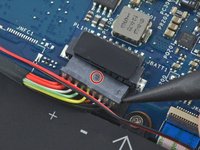
バッテリーのケーブルコネクタをバッテリー側に向けて引き抜いて、ソケットから接続を外します。
-
コネクタが固くて外れない場合は、片側を少し押し出してから、反対側も同じように押し出します。
-
コネクターがうまく抜けない場合は、スパッジャーの先端でコネクターのくぼみを軽く押して、コネクターをスライドさせて抜きます。
-
ディスプレイを開き、電源ボタンを5秒間長押しして、放電します。
DO NOT OPEN THE DISPLAY!!! When I did, on my Dell XPS 13 9360, I cracked something in the top right corner where the power button is, and the plastic part of the button came out. I can still press it, but there is now a gap there and dust can get it.
I opened they display, very carefull. No problem. Open just enough to press they button.
Agree with Asher Grossman, open at your peril!
First put the bottom cover back, with 4 screws, one at each corner. Then you can safely open the display and press the button. Then close the display and take the bottom cover off again.
I did not do the open display and drain the battery because I did not understand this part and I know my battery was essentially dead, hence why I ordered one. Did everything else and voila! Works perfectly!
Opening the display worked fine for me, but when I closed it again, something definitely didn’t quite go right – I think it was trying to push against the missing back cover. I managed to carefully close the display by pushing against the metal corner thingy that was meant to push against the cover, and so far the laptop still seems to work, but I concur with Asher and James, be careful at least. Patrick’s suggestion sounds great if I’d seen it in time :)
Ich konnte den Stecker schliesslich mit Hilfe einer Plektren sehr gut entfernen. Das Display habe ich nicht geöffnet.
Much better to ensure the old battery is fully depleted (unplug from mains & switch on & let it expire) before you begin replacement.
This allows you to leave the unit face down whilst you work on replacing the battery.
-
-
-
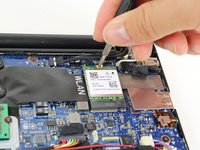
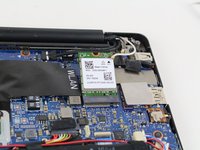
白と黒のアンテナ線のコネクタをワイヤレスカードからまっすぐ上にこじあけ、切り離します。
-
各ワイヤーを再接続するには、コネクタをソケットに注意深く位置合わせをして、しっかりと押し込んでください。
Be very careful about how you “pry” these antenna connectors off or you may pry off the entire socket from the PCB! They should rotate freely in their socket which should help with removal.
My replacement card WISE TIGER AX210NGW had Aux white on right and Main black on left, i.e. the opposite of my original card. I crossed the wires over, and connected black to black and white to white and it works!
-


このデバイスを再組み立てするには、インストラクションを逆の順番に従って作業を進めてください。
このデバイスを再組み立てするには、インストラクションを逆の順番に従って作業を進めてください。
17 の人々がこのガイドを完成させました。
以下の翻訳者の皆さんにお礼を申し上げます:
100%

Midori Doiさんは世界中で修理する私たちを助けてくれています! あなたも貢献してみませんか?
翻訳を始める ›
チーム

Cal Poly, Team S21-G6, Livingston Spring 2017 Cal Poly, Team S21-G6, Livingston Spring 2017人のメンバー
CPSU-LIVINGSTON-S17S21G6
5 メンバー
30のガイドは作成済み
コメント 1 件
Thanks for the instructions on swapping out the WiFi module/chip, it looked pretty straightforward from what I could tell when I had the machine open, I just have a simple question for you.
I recently purchased an Intel Dual Band Wireless -AC 8265 Desktop Kit and I do NOT plan on using the external antenna, or mounting bracket that came with it, ONLY the chip in place of the one on the laptop.
So I wanted to know would the chip in that kit be useable in my Dell XPS 13 9343 model laptop? Everything looks to be about the same with this chip and the actual laptop model [except that the laptop one doesn’t come with the external antenna], so if I can use it that would save me shipping it back and then ordering again.
Thanks
Missing a step about removing the tiny Phillips head screw under the XPS flip up cover in the middle. Also, there are hooks all the way around the cover so it doesn’t simply lift off.
curtis_p_brown - 返信
What about step 3???
Peter Hecht -
Please dont hurry , take your Time to follow this procedure. It takes 20 min (not 5) and step 4 requires half of this Time. Good luck.
Peter Hecht - 返信
+1 Peter Hecht is right - getting the little clips the back is snapped on with is time consuming and a bit fiddly for people not used to “spudging” off covers. Starting from the back is the key those come loose much easier and help with the rest
Doug Steinschneider - 返信
Great guide. It took me 20 minutes and there were no surprises. Battery installed. :)
dhenniga - 返信