はじめに
The Dell Latitude E6330 is a durable and reliable business laptop, but over time, the keyboard may experience wear and tear from heavy usage. Whether you’re dealing with unresponsive keys, sticky buttons, or a cracked keyboard, replacing it can breathe new life into your device.
This guide will walk you through the process of safely removing and replacing the keyboard on a Dell Latitude E6330, ensuring minimal risk to other components.
Before beginning, make sure to power off the laptop, disconnect the battery, and have the necessary tools on hand. With this guide, you’ll have your laptop back to peak performance in no time!
必要な工具と部品
-
-
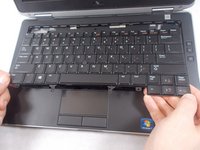
Start by flipping the laptop over and removing the two, deeply recessed, 2.5mm x 5mm screws from the bottom face of the laptop.
-
-


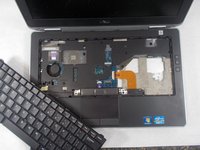
To reassemble your device, follow these instructions in reverse order. Take your e-waste to an R2 or e-Stewards certified recycler.
To reassemble your device, follow these instructions in reverse order. Take your e-waste to an R2 or e-Stewards certified recycler.
2 の人々がこのガイドを完成させました。
チーム

UMass Dartmouth, Team S2-G3, Simcock Spring 2019 UMass Dartmouth, Team S2-G3, Simcock Spring 2019人のメンバー
UMASSD-SIMCOCK-S19S2G3
4 メンバー
5のガイドは作成済み