メインコンテンツにスキップ

Dell Inspiron 1525 Heat Sink Replacement

必要な工具と部品

  1. Dell Inspiron 1525 Heat Sink Replacement, Battery: 手順 1、 1の画像 1
    • Locate the battery release switch on the bottom of the laptop.

  2. Dell Inspiron 1525 Heat Sink Replacement: 手順 2、 2の画像 1 Dell Inspiron 1525 Heat Sink Replacement: 手順 2、 2の画像 2
    • Slide the battery release switch away from the lock symbol until you hear the battery click.

    • Slide the battery towards the back of the laptop until it comes free.

  3. Dell Inspiron 1525 Heat Sink Replacement, Bottom Cover: 手順 3、 2の画像 1 Dell Inspiron 1525 Heat Sink Replacement, Bottom Cover: 手順 3、 2の画像 2
    • Remove/loosen the eight 4.80 mm Phillips #1 screws securing the bottom panel.

    • The screws may only need to be loosened, as they are generally retained by plastic washers.

    • Remove the bottom panel.

  4. Dell Inspiron 1525 Heat Sink Replacement, Heat Sink: 手順 4、 3の画像 1 Dell Inspiron 1525 Heat Sink Replacement, Heat Sink: 手順 4、 3の画像 2 Dell Inspiron 1525 Heat Sink Replacement, Heat Sink: 手順 4、 3の画像 3
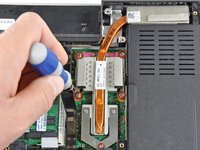
    • Loosen the five #1 Phillips screws securing the heat sink and clean it with compressed air

    • These screws are attached to the heat sink assembly.

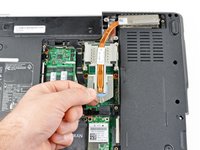
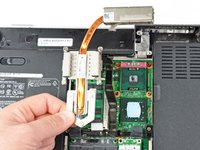
    • Gently lift the heat sink from side indicated in the picture.

    • The heat sink may feel like it is glued to the chips because of the thermal paste. Gently wiggle the heat sink back and forth to help break it free.

    • Be sure to thoroughly clean off the old thermal paste and apply new thermal paste before reinstalling the heat sink. Follow our thermal paste application guide for detailed instructions.

終わりに

To reassemble your device, follow these instructions in reverse order.

5 の人々がこのガイドを完成させました。

作成者

5人の作成者と共同で作成されました。

Miroslav Djuric

158,300 ポイント

144のガイドは作成済み

0 件のコメント

コメントを追加

統計データ:

過去 24時間: 0

過去 7 日: 3

過去 30 日: 3

今までの合計 7,848