はじめに
This guide will show you how to replace the audio board for your Dell Chromebook 3180.
必要な工具と部品
-
-
Remove the 7 screws from the back cover with a Phillips #0 screwdriver
-
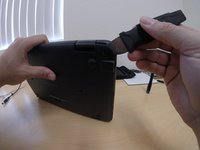
Once all 7 screws have been removed, you can start to pry apart the back cover with your Plastic Blade or your fingers. (See pic)
-
-
-
Disconnect the audio board data cable from the motherboard.
-
Using a Philips #0 , remove the 1 screw from the audioboard.
-
-
-
-
Remove audio board from the packaging. You may not need the new data cable which is included in the packaging. You can always use the old data cable from the old audio board.
-
Look on both sides of the data cable. Peel off the white double sided sticky paper so that the adhesive can stick to the chromebook base. This will help keep the data cable secure.
-
-
-
Insert the new audio board at angle so that the headphone port can fit correctly into the palmrest.
-
Connect the audio board data cable to the motherboard. You can always use the old data cable instead of the new data cable that was included in the packaging.
-


To reassemble your device, follow these instructions in reverse order.
To reassemble your device, follow these instructions in reverse order.
ある他の人がこのガイドを完成しました。