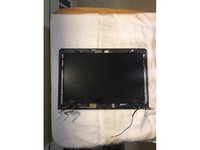
メインコンテンツにスキップ

Dell Chromebook 11 CB1C13 LCD Screen Replacement

必要な工具と部品

  1. Dell Chromebook 11 CB1C13 LCD Screen Replacement, Back Panel: 手順 1、 3の画像 1 Dell Chromebook 11 CB1C13 LCD Screen Replacement, Back Panel: 手順 1、 3の画像 2 Dell Chromebook 11 CB1C13 LCD Screen Replacement, Back Panel: 手順 1、 3の画像 3
    • Make sure that device is fully powered down before attempting to open the back case.

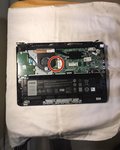
    • Remove all seven 8 mm Philips #0 screws from the back case with a Philips #0 screwdriver.

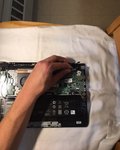
    • Once all seven screws are removed, you can pry the case off using your fingers or a plastic opening tool.

  2. Dell Chromebook 11 CB1C13 LCD Screen Replacement, Screen Cover: 手順 2、 3の画像 1 Dell Chromebook 11 CB1C13 LCD Screen Replacement, Screen Cover: 手順 2、 3の画像 2 Dell Chromebook 11 CB1C13 LCD Screen Replacement, Screen Cover: 手順 2、 3の画像 3
    • Locate the two hinges on the corners of the device.

    • Unscrew the 5 2mm Phillips #00 screws in the hinges.

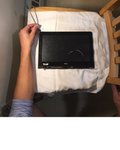
    • Pull the hinges up and slide bottom cover out

    • Gently remove the cover since it is still connected to the device by some wires

  3. Dell Chromebook 11 CB1C13 LCD Screen Replacement: 手順 3、 2の画像 1 Dell Chromebook 11 CB1C13 LCD Screen Replacement: 手順 3、 2の画像 2
    • Locate the two cables that connect the top panel to the device. One black, and one white.

    • Remove these two cables by grabbing the golden ends with your fingers, and gently pulling straight up.

    • Remove pin port lifting up the hinge.

  4. Dell Chromebook 11 CB1C13 LCD Screen Replacement: 手順 4、 3の画像 1 Dell Chromebook 11 CB1C13 LCD Screen Replacement: 手順 4、 3の画像 2 Dell Chromebook 11 CB1C13 LCD Screen Replacement: 手順 4、 3の画像 3
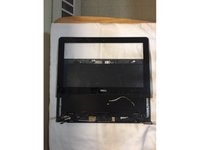
    • Locate the seam between the screen cover, and the top panel

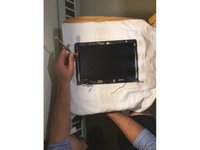
    • Starting at one of the hinge corners, take a thin metal prying tool and gently insert it into the seam.

    • Gently push the tool down towards the top panel until you feel the screen cover disconnect.

    • Repeat this process all around the screen cover until it is completely disconnected from the top panel.

    • During this process, you might hear a rough snapping sound. This is normal, and is just the sound of the screen cover's connections to the top panel coming apart.

    • Make sure to be gentle with your prying, and to move in small increments around the screen cover during this process. This is to prevent any cracks or damage to the cover, which could be harmful.

  5. Dell Chromebook 11 CB1C13 LCD Screen Replacement, LCD Screen: 手順 5、 3の画像 1 Dell Chromebook 11 CB1C13 LCD Screen Replacement, LCD Screen: 手順 5、 3の画像 2 Dell Chromebook 11 CB1C13 LCD Screen Replacement, LCD Screen: 手順 5、 3の画像 3
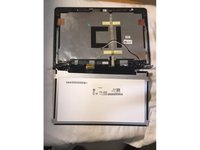
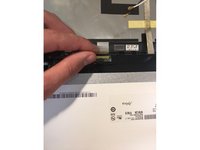
    • Locate 6 2mm phillips #00 screws that connect the LCD display to the screen panel.

    • Unscrew the 6 2mm Philips #00 screws.

    • Carefully flip the LCD display, which is still connected to the device, over the hinges so that it is laying down next to the screen panel.

  6. Dell Chromebook 11 CB1C13 LCD Screen Replacement: 手順 6、 2の画像 1 Dell Chromebook 11 CB1C13 LCD Screen Replacement: 手順 6、 2の画像 2
    • Locate the gold video cable that still connects the LCD cable to the display.

    • There will be a piece of tape on the cable. Carefully peel this off, and the pins should come out easily.

    • The pins are very small and delicate. Any pressure or twisting on them may cause irreversible damage, and require a replacement of the cable.

ゴール

4 の人々がこのガイドを完成させました。

作成者

4人の作成者と共同で作成されました。

Jerry Geffrard

メンバー登録日: 03/25/15

334 ポイント

3のガイドは作成済み

チーム

UMass Dartmouth, Team S3-G6, Bailey Fall 2017 UMass Dartmouth, Team S3-G6, Bailey Fall 2017人のメンバー

UMASSD-BAILEY-F17S3G6

3 メンバー

7のガイドは作成済み

コメント 1 件

Zoom in a little more on the WLAN chip so it’s easier to see what wire goes where.

GanSolo - 返信

コメントを追加

統計データ:

過去 24時間: 0

過去 7 日: 2

過去 30 日: 5

今までの合計 1,759