はじめに
This guide will show how to replace the LCD.
必要な工具と部品
-
-
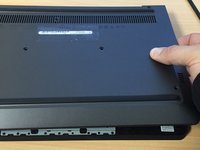
Remove the 7 screws from the back cover with a Phillips #0 screwdriver
-
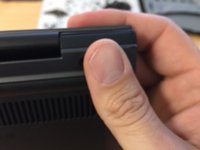
Once all 7 screws have been removed, you can start to pry apart the back cover with your fingers/nails or use a plastic opening tool and carefully start to seprate the back cover from the main chromebook. See pic
-
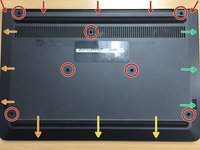
When prying the bottom cover away from the main chassis, you can follow the order of the colored arrows starting with the red arrows while working your way around to green and so on. However, this order is not mandatory but seems to be the easiest.
-
-
-
Remove the 3 hinge screws using a Phillips #0 screwdriver. The left hinge has 2 screws while the right hinge only has 1.
-
The left hinge has 2 screws that can be removed with a Phillips #0 screwdriver.
-
The right hinge only has 1 screw. You may need to pull the charging port up and out of the way so you can get a better view of the 1 hinge screw. (See 3rd pic)
-
-
この手順で使用する道具:Spudger$2.99
-
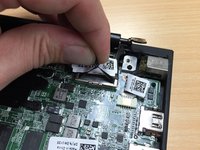
Remove the LCD connector from the motherboard by pulling up on the black tap which is located on top of the connector. (See pic 1)
-
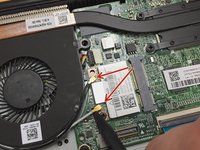
There are 2 wires that run from the LCD assembly to the Wi-Fi card. There is a black and white wire. Using a spudgeryou can carefully navigate under both gold tips of the black and white wires and then lightly pry them off in an upwards motion.
-
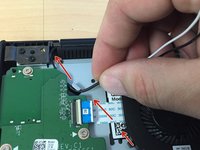
Unwind/remove the black and white wires from their original black clip path which are secured around the fan. There are also 1 metal clip attached to the bottom of the palmrest. (See pic 3)
-
-
-
-
To separate the chromebook chassis from the LCD assembly, pull the chassis upward while holding the LCD assembly against the table. This will cause both hinges to move upward which will then allow enough space for the chassis to be detached from the LCD assembly's hinge joints. (See video)
-
-
-
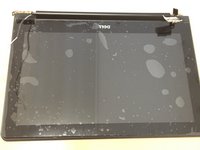
Lay the new LCD assembly upside down on the table. Look for the Dell logoand make sure it reads upside down.
-
Carefully set the main chromebook chassis on top of the new LCD assembly.
-
-
-
Look for the metal notches that are located to the side of each metal hinge. (see video)
-
Slide both corners of the main chromebook chassis under both of these metal notches. (see video)
-
Push both metal hinges down over the chassis. They should be lined up according to the screw hole pattern located on the chassis. (see video)
-
Replace both the left and right hinge screws. (see video)
-
Look for the arrow icons etched into the hinge metal next to each screw hole. These arrows indicate a screw is required. (Example, there are 3 screw holes on the left hinge but only 2 screws are required)
-
-
-
Take the two Wifi wires (black/white) and guide them through the one metal clip which is attached to the bottom of the palmrest right next to the daughterboard. (See Video)
-
Continue to intertwine the wires through the black clips which are attached all around the bottom of the fan. (See Video)
-
Once you have the wires secured and intertwined through the fan clips, take the gold tip connectors at the end of each wire and push (snap) them onto both of the ports attached to the Wifi Card. (See video)
-
Connect the LCD cable connector to the motherboard by pushing the connector down into the motherboards video port.
-
-
-
Set the bottom cover/shell on top of the chromebook and line it up the best you can
-
Start in the top right corner and squeeze the chromebook together. You will hear "snapping"sounds which means that you are properly connecting the bottom cover clips to the main chromebook frame.
-
Continue to snap together the sides of the chromebook in a rotating fashion starting with the red arrows and moving along to the green, yellow, then orange arrows. Listen for the snapping sounds. See 3rd pic. You do not have to follow the order of colored arrows, but it seems the easiest.
-
Replace all 7 screws using a Phillips #0 screwdriver. See red circles in pic. Done!
-


To reassemble your device, follow these instructions in reverse order.
To reassemble your device, follow these instructions in reverse order.
5 の人々がこのガイドを完成させました。