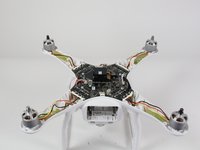
メインコンテンツにスキップ

DJI Phantom 3 Advanced Flight Controller Replacement

必要な工具と部品

  1. DJI Phantom 3 Advanced Flight Controller Replacement, Battery: 手順 1、 2の画像 1 DJI Phantom 3 Advanced Flight Controller Replacement, Battery: 手順 1、 2の画像 2
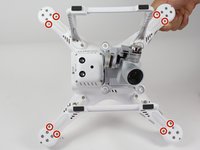
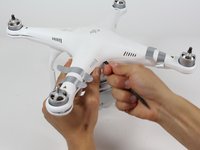
    • With the battery facing you, locate the two tabs on the top and bottom of the battery as shown.

    • Remember to disarm and power down your quadcopter before beginning any disassembly.

  2. DJI Phantom 3 Advanced Flight Controller Replacement: 手順 2、 2の画像 1 DJI Phantom 3 Advanced Flight Controller Replacement: 手順 2、 2の画像 2
    • Press the two tabs with your finger and thumb, and gently slide the battery towards you, out of the quadcopter frame.

    • With your other hand, be sure to hold the quadcopter steady to ensure that it stays still.

  3. DJI Phantom 3 Advanced Flight Controller Replacement, Cover: 手順 3、 1の画像 1
    • Turn the Phantom 3 Advanced upside down.

  4. DJI Phantom 3 Advanced Flight Controller Replacement: 手順 4、 1の画像 1
    • Remove the four 7mm long 2mm screws with a T-6 screwdriver.

    • There is one screw per arm, located at the tip of the arm.

  5. DJI Phantom 3 Advanced Flight Controller Replacement: 手順 5、 2の画像 1 DJI Phantom 3 Advanced Flight Controller Replacement: 手順 5、 2の画像 2
    • Remove the eight 5mm long 2.5mm screws using the T-8 screwdriver.

    • There are two 5mm screws on each arm.

  6. DJI Phantom 3 Advanced Flight Controller Replacement: 手順 6、 2の画像 1 DJI Phantom 3 Advanced Flight Controller Replacement: 手順 6、 2の画像 2
    • Remove the four 10mm long deep 3mm screws using the T-8 screwdriver.

    • There is one screw on each arm located near the landing gear.

  7. DJI Phantom 3 Advanced Flight Controller Replacement: 手順 7、 3の画像 1 DJI Phantom 3 Advanced Flight Controller Replacement: 手順 7、 3の画像 2 DJI Phantom 3 Advanced Flight Controller Replacement: 手順 7、 3の画像 3
    • Carefully flip the phantom back over with the motors facing up.

    • Peel back the silver stickers from the seam in the cover.

    • Using a plastic spudger, slowly separate the two halves of the plastic shell.

    • This step requires some force, and the plastic will click loudly as the shell separates.

    • Do not fully remove the cover. There is a wire that needs to be detached from the control board before the cover is completely free.

  8. DJI Phantom 3 Advanced Flight Controller Replacement: 手順 8、 3の画像 1 DJI Phantom 3 Advanced Flight Controller Replacement: 手順 8、 3の画像 2 DJI Phantom 3 Advanced Flight Controller Replacement: 手順 8、 3の画像 3
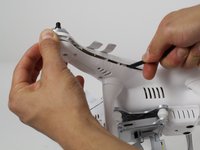
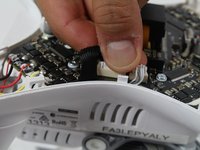
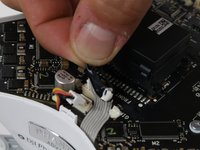
    • Slowly remove the upper half of the plastic case about halfway. There is a ribbon cable that's connects the cover and the control board.

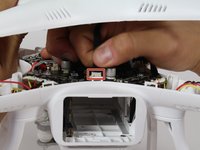
    • Follow the ribbon cable to the control board and locate the connector that connects the cable to the control board.

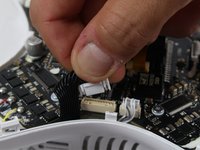
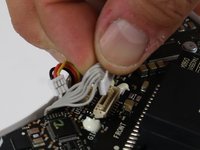
    • Press the tab on the side of the connector and pull up on the cable.

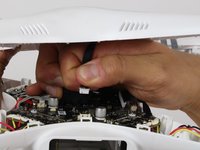
    • Continue to remove the shell the rest of the way.

  9. DJI Phantom 3 Advanced Flight Controller Replacement, Flight Controller: 手順 9、 1の画像 1
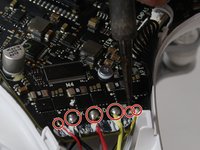
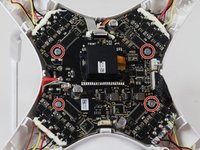
    • Locate the five ribbon cables that need to be disconnected from the control board.

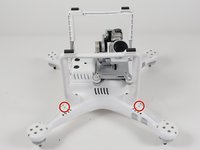
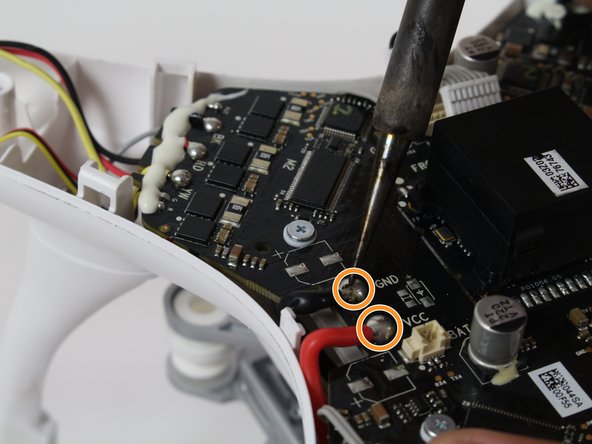
    • Locate the red and black battery wires.

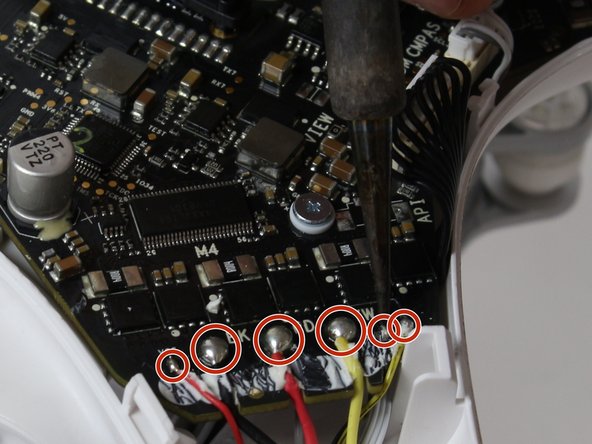
    • Follow the three wires from each motor and the three wires from each LED to where they connect on the control board.

  10. DJI Phantom 3 Advanced Flight Controller Replacement: 手順 10、 3の画像 1 DJI Phantom 3 Advanced Flight Controller Replacement: 手順 10、 3の画像 2 DJI Phantom 3 Advanced Flight Controller Replacement: 手順 10、 3の画像 3
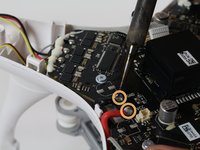
    • Use a plastic opening tool to remove the glue that covers the motor and LED wires. Use a metal opening tool if necessary.

    • Desolder the six motor and LED wires where they connect on the flight controller for each arm. Refer to the Desoldering Guide on how to desolder.

    • Desolder the battery wires.

  11. DJI Phantom 3 Advanced Flight Controller Replacement: 手順 11、 2の画像 1 DJI Phantom 3 Advanced Flight Controller Replacement: 手順 11、 2の画像 2
    • Remove the cable next to where the battery wires were connected. Pinch and hold the top of the connector, then pull it out.

  12. DJI Phantom 3 Advanced Flight Controller Replacement: 手順 12、 3の画像 1 DJI Phantom 3 Advanced Flight Controller Replacement: 手順 12、 3の画像 2 DJI Phantom 3 Advanced Flight Controller Replacement: 手順 12、 3の画像 3
    • Remove the black ribbon cable and the 3-wire cable next to it. Press the small tab on the ribbon cable connector and pull it out.

  13. DJI Phantom 3 Advanced Flight Controller Replacement: 手順 13、 3の画像 1 DJI Phantom 3 Advanced Flight Controller Replacement: 手順 13、 3の画像 2 DJI Phantom 3 Advanced Flight Controller Replacement: 手順 13、 3の画像 3
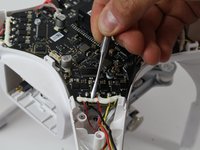
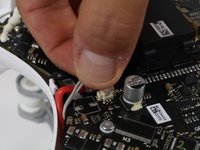
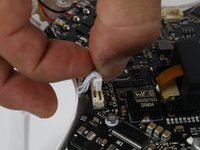
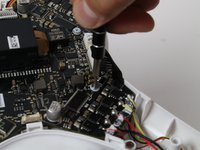
    • Locate the ribbon cable that is next to the word "Front" on the flight controller.

    • Remove the small cable next to the ribbon cable by pinching on the side tab and pulling up on the connector. It has black, red and yellow wires.

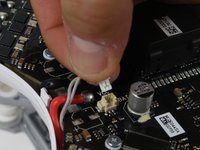
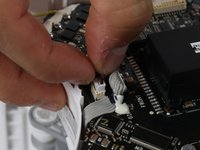
    • Remove the black band from the ribbon cable.

    • Remove the ribbon cable by pinching on the side tab and pulling up on the connector.

  14. DJI Phantom 3 Advanced Flight Controller Replacement: 手順 14、 2の画像 1 DJI Phantom 3 Advanced Flight Controller Replacement: 手順 14、 2の画像 2
    • Remove the four 6.5mm long 2mm screws with a philips head 00 screwdriver.

    • Remove the flight controller now by slowly pulling if off of the frame.

終わりに

To reassemble your device, follow these instructions in reverse order.

11 の人々がこのガイドを完成させました。

作成者

3人の作成者と共同で作成されました。

Robert Comstock

メンバー登録日: 10/06/16

421 ポイント

2のガイドは作成済み

チーム

Cal Poly, Team 10-2, Livingston Fall 2016 Cal Poly, Team 10-2, Livingston Fall 2016人のメンバー

CPSU-LIVINGSTON-F16S10G2

3 メンバー

12のガイドは作成済み

2 件のコメント

Very clear and helpful. Thank You.

Herb - 返信

Excellent with great visuals. Can really see what to do

Leo Miller - 返信

コメントを追加

統計データ:

過去 24時間: 1

過去 7 日: 10

過去 30 日: 34

今までの合計 6,842