はじめに
This guide demonstrates how to remove the outer shell of the DJI Phantom 2 Vision.
Before beginning disassembly, clean any residue around the screws to prevent over- or under-tightening.
You may need to remove the outer shell of the DJI Phantom 2 Vision if your drone has sustained damage to the structure or if you need to access the internal components for repair.
Before you begin, ensure your device is powered off and disconnected from the charger.
Note: The drone used in this guide already had its propellers removed. However, you must remove the propellers before taking off the top shell. Refer to the DJI Phantom 2 Vision+ Propellers Removal for detailed instructions, as the process is identical.
必要な工具と部品
-
-
The battery is located on the backside of the drone. You will see a large rectangular indent protruding outward.
-
-
-
Flip Device so Motors face down
-
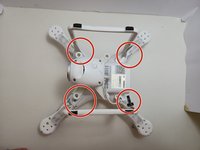
Unscrew 4 (6mm) screws next to the landing gear on each arm using a #2 Allen head bit.
-
-
-
The final screws are located around the base of the four unscrewed sections on each arm from step 1.
-
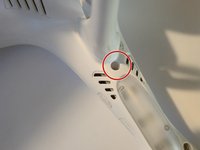
Unscrew each of the 12 screws. There are two (9mm) Allen head screws on each arm. Remove them using #2 Allen head bit. The final screw is located at end of each arm. Remove it using 00 Philips head bit.
-


To reassemble your device, follow the instructions in reverse order.
To reassemble your device, follow the instructions in reverse order.

チーム

Austin Community College, Team 7-1, Watkins Fall 2024 Austin Community College, Team 7-1, Watkins Fall 2024人のメンバー
AUSTINCC-WATKINS-F24S7G1
4 メンバー
5のガイドは作成済み