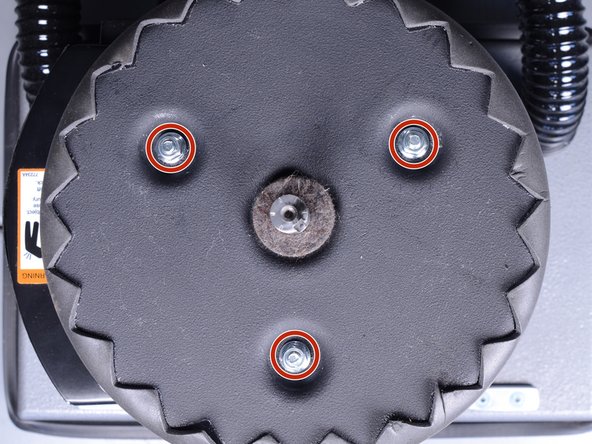
メインコンテンツにスキップ

Clarke Floor Sander 07014A 2012 Blower Plate Replacement

必要な工具と部品

  1. Clarke Floor Sander 07014A 2012 Blower Plate Replacement, Dust Bag: 手順 1、 2の画像 1 Clarke Floor Sander 07014A 2012 Blower Plate Replacement, Dust Bag: 手順 1、 2の画像 2
    • Before you begin, be sure that the sander is unplugged and powered off.

    • Twist and pull the dust bag collar to disconnect it from the elbow pipe.

    • Remove the dust bag.

  2. Clarke Floor Sander 07014A 2012 Blower Plate Replacement, Blower Housing: 手順 2、 2の画像 1 Clarke Floor Sander 07014A 2012 Blower Plate Replacement, Blower Housing: 手順 2、 2の画像 2
    • Peel the rubber sleeve down from the elbow pipe to reveal the pipe socket.

  3. Clarke Floor Sander 07014A 2012 Blower Plate Replacement: 手順 3、 3の画像 1 Clarke Floor Sander 07014A 2012 Blower Plate Replacement: 手順 3、 3の画像 2 Clarke Floor Sander 07014A 2012 Blower Plate Replacement: 手順 3、 3の画像 3
    • Grasp the elbow pipe with your hands and pull up while twisting to disconnect it from the blower housing.

    • Remove the elbow pipe.

  4. Clarke Floor Sander 07014A 2012 Blower Plate Replacement: 手順 4、 3の画像 1 Clarke Floor Sander 07014A 2012 Blower Plate Replacement: 手順 4、 3の画像 2 Clarke Floor Sander 07014A 2012 Blower Plate Replacement: 手順 4、 3の画像 3
    • Twist and pull to disconnect both suction hoses from the blower housing.

  5. Clarke Floor Sander 07014A 2012 Blower Plate Replacement: 手順 5、 2の画像 1 Clarke Floor Sander 07014A 2012 Blower Plate Replacement: 手順 5、 2の画像 2
    • Remove the four 22mm long Phillips screws around the side of the blower housing.

  6. Clarke Floor Sander 07014A 2012 Blower Plate Replacement: 手順 6、 2の画像 1 Clarke Floor Sander 07014A 2012 Blower Plate Replacement: 手順 6、 2の画像 2
    • Lift the blower housing upwards and slide it off of the blower assembly.

    • Remove the blower housing.

  7. Clarke Floor Sander 07014A 2012 Blower Plate Replacement, Blower Plate: 手順 7、 3の画像 1 Clarke Floor Sander 07014A 2012 Blower Plate Replacement, Blower Plate: 手順 7、 3の画像 2 Clarke Floor Sander 07014A 2012 Blower Plate Replacement, Blower Plate: 手順 7、 3の画像 3
    • Use snap ring pliers to remove the retaining ring on the top of the fan axle.

    • Reassembly tip: When you are reinstalling this retaining ring, make sure it sits in the axle groove.

  8. Clarke Floor Sander 07014A 2012 Blower Plate Replacement: 手順 8、 2の画像 1 Clarke Floor Sander 07014A 2012 Blower Plate Replacement: 手順 8、 2の画像 2
    • Lift up and remove the blower fan.

    • Depending on the age of the sander, this may be very difficult to do. If you are having trouble, skip to the next step, which shows how to pry the fan off.

    • Reassembly tip: When you reinstall the blower fan, be sure to push it onto the axle far enough so that it sits below the axle's retaining ring groove.

  9. Clarke Floor Sander 07014A 2012 Blower Plate Replacement: 手順 9、 3の画像 1 Clarke Floor Sander 07014A 2012 Blower Plate Replacement: 手順 9、 3の画像 2 Clarke Floor Sander 07014A 2012 Blower Plate Replacement: 手順 9、 3の画像 3
    • Follow this step if you are having trouble removing the blower fan.

    • Insert a pry bar or the claw end of a hammer under opposing sides of the fan.

    • Slowly pry up on both sides until the fan loosens from its axle.

    • Remove the blower fan.

  10. Clarke Floor Sander 07014A 2012 Blower Plate Replacement: 手順 10、 2の画像 1 Clarke Floor Sander 07014A 2012 Blower Plate Replacement: 手順 10、 2の画像 2
    • Remove the axle key from the fan axle.

    • Re-assembly tip: When you replace the axle key, be sure to lubricate the axle and key with machine oil.

  11. Clarke Floor Sander 07014A 2012 Blower Plate Replacement: 手順 11、 3の画像 1 Clarke Floor Sander 07014A 2012 Blower Plate Replacement: 手順 11、 3の画像 2 Clarke Floor Sander 07014A 2012 Blower Plate Replacement: 手順 11、 3の画像 3
    • Use snap ring pliers to pry open and remove the retaining clip at the base of the fan axle.

  12. Clarke Floor Sander 07014A 2012 Blower Plate Replacement: 手順 12、 1の画像 1
    • Remove the three 7/16" (11 MM OK) nuts securing the blower plate.

  13. Clarke Floor Sander 07014A 2012 Blower Plate Replacement: 手順 13、 2の画像 1 Clarke Floor Sander 07014A 2012 Blower Plate Replacement: 手順 13、 2の画像 2
    • Lift the blower plate up and remove it from the motor assembly.

終わりに

To reassemble your device, follow these instructions in reverse order.

6 の人々がこのガイドを完成させました。

作成者

1人の作成者と共同作成されました。

Arthur Shi

メンバー登録日: 01/03/18

254,622 ポイント

529のガイドは作成済み

チーム

iFixit iFixit人のメンバー

Staff

136 メンバー

17,430のガイドは作成済み

コメント 1 件

You can also tap the 2 holes in the fan with a 1/4 tap then use 1/4 x 2 bolts and it will lift the an off

TIM - 返信

コメントを追加

統計データ:

過去 24時間: 1

過去 7 日: 11

過去 30 日: 31

今までの合計 1,687