はじめに
It’s quite easy to disassemble the Casper light. But replacing the battery takes some skill. It also takes some skill and patience to put back together. The connections to the PCBs are very tiny and can easily break. Working with the Li-Ion battery can be dangerous as well.
必要な工具と部品
-
-
Use a suction cup to remove the caps on each end. Press in and pull out. They should pop right out.
-
-
-
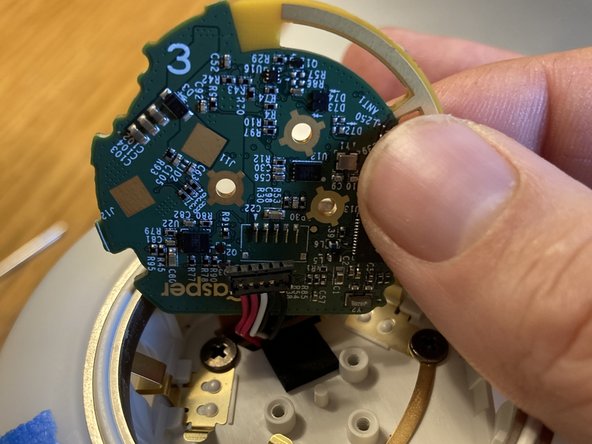
Each side is held in by three tiny screws. You'll need to take those out. Make a note of the numbers on each side. While it's mostly interchangeable, you'll need to keep track of which connection goes in which board.
-
-
-
Warning: once you remove the connections to the PCBs they will be quite difficult to reattach. Unfortunately, you'll need to at least remove one side to access the battery. I recommend starting with the side labeled 10 which does not have a power connection.
-
-
-
-
Remove the 3 screws on the side you want to remove. In the photo here I'm removing the side with the power connection, however, I recommend you start with the other side to see if you can open it up without removing the power connection.
-
-
-
Use a screw driver or something rigid to help you pry out the end cap(s). There is some light adhesive, but with a little force they pop out.
-
-
-
You should now see the LED array with the battery inside.
-
If you removed both caps you should be able to slide it out.
-
If you left the other cap attached, try popping that cap out and removing the attached battery with it (I didn't try this, but it should work).
-
-
-
The battery will just slide out.
-
This is as far as I've gotten right now. I'm a little unsure as to how to proceed at this point. But you'll need a new battery and to be able to solder the connection to it.
-
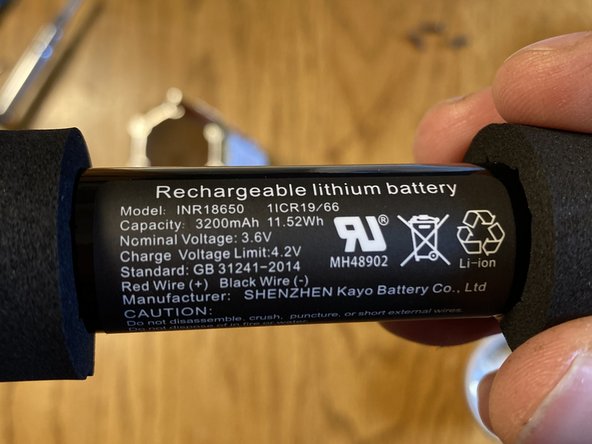
3200mAh INR Lithium Ion cell in a 18650 form-factor pack, inside some foam
-


To reassemble your device, follow these instructions in reverse order. It’s fairly easy to disassemble, but very difficult to replace the battery, and very difficult to put the small connections back together because of the small size and the shape of the end caps.
To reassemble your device, follow these instructions in reverse order. It’s fairly easy to disassemble, but very difficult to replace the battery, and very difficult to put the small connections back together because of the small size and the shape of the end caps.
5 の人々がこのガイドを完成させました。

6件のガイドコメント
I haven't tried it but I think I found a match on the battery: https://www.18650batterystore.com/produc...
If you try it, please post the results. I talked to one of the people who worked on it and he said that you could use "any lithium ion battery that can work in the same voltage range, but there are a few gotchas like how to safely attach the connector". I don't know too much more than that and I just haven't had the time to learn out to attach a battery like this.
Stuart -
Link to battery seems gone. Could you recommend a new one?
Brb -
@brb I think this is a compatible battery: https://www.18650batterystore.com/produc...
INR
3.6V
4.2V charge
Flat top
But I am not an expert.
Great guide replaced my battery.