メインコンテンツにスキップ

この修理ガイドは変更されています。最新の未承認バージョンに切り替えます。

Canon Powershot SD550 LCD Screen Replacement

必要な工具と部品

  1. Canon Powershot SD550 LCD Screen Replacement, Outer Case: 手順 1、 1の画像 1
    • Remove the battery and SD card from the camera.

  2. Canon Powershot SD550 LCD Screen Replacement: 手順 2、 1の画像 1
    • Remove the three 3.8 mm screws from the underside of the camera.

    • Each of the screws is slightly different, so it is important that you note the original location of each screw.

  3. Canon Powershot SD550 LCD Screen Replacement: 手順 3、 3の画像 1 Canon Powershot SD550 LCD Screen Replacement: 手順 3、 3の画像 2 Canon Powershot SD550 LCD Screen Replacement: 手順 3、 3の画像 3
    • Remove the 3.2 mm screw from the right side of the camera.

    • Remove the 2.2 mm screw from the right side of the camera.

    • One of these screws is hidden under the USB port cover.

    • Lift the side panel off.

    • Remove the 1.8 mm screw from underneath the side panel.

  4. Canon Powershot SD550 LCD Screen Replacement: 手順 4、 3の画像 1 Canon Powershot SD550 LCD Screen Replacement: 手順 4、 3の画像 2 Canon Powershot SD550 LCD Screen Replacement: 手順 4、 3の画像 3
    • Remove the two 2.2 mm screws from the left side of the camera.

    • Lift the plate from the camera.

  5. Canon Powershot SD550 LCD Screen Replacement: 手順 5、 3の画像 1 Canon Powershot SD550 LCD Screen Replacement: 手順 5、 3の画像 2 Canon Powershot SD550 LCD Screen Replacement: 手順 5、 3の画像 3
    • Gently lift the rear of the case to remove it from the camera.

  6. Canon Powershot SD550 LCD Screen Replacement: 手順 6、 3の画像 1 Canon Powershot SD550 LCD Screen Replacement: 手順 6、 3の画像 2 Canon Powershot SD550 LCD Screen Replacement: 手順 6、 3の画像 3
    • Remove the front of the camera body.

    • Be sure to keep track of the rubber ring.

  7. Canon Powershot SD550 LCD Screen Replacement, LCD Screen: 手順 7、 3の画像 1 Canon Powershot SD550 LCD Screen Replacement, LCD Screen: 手順 7、 3の画像 2 Canon Powershot SD550 LCD Screen Replacement, LCD Screen: 手順 7、 3の画像 3
    • Next, peel the navigation buttons from the button panel and set them aside.

    • To free the LCD display, remove the .113 inch screw in the top left corner.

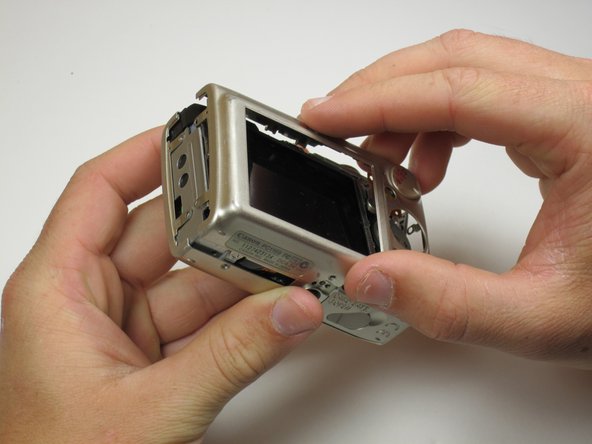
    • Then, rotate the screen clockwise until it lifts away from the camera.

    • There are two ribbon cables attached to the rear of the screen. Do not try to pull the screen off at this point.

  8. Canon Powershot SD550 LCD Screen Replacement: 手順 8、 2の画像 1 Canon Powershot SD550 LCD Screen Replacement: 手順 8、 2の画像 2
    • To unplug the ribbon cables, pull them straight out of their plugs. Do this gently to avoid damaging the connections.

    • After disconnecting both cables, pull the screen away from the camera to remove it.

終わりに

To reassemble your device, follow these instructions in reverse order.

ある他の人がこのガイドを完成しました。

作成者

5人の作成者と共同で作成されました。

Vivian Su

メンバー登録日: 04/17/11

16 ポイント

1ガイドが承認済み

チーム

Cal Poly, Team 18-23, Garner Spring 2011 Cal Poly, Team 18-23, Garner Spring 2011人のメンバー

CPSU-GARNER-S11S18G23

5 メンバー

7のガイドは作成済み

0 件のコメント

コメントを追加

統計データ:

過去 24時間: 0

過去 7 日: 1

過去 30 日: 9

今までの合計 3,262