はじめに
If your Brother CS6000i sewing light is flickering, dim, or not working at all, use this guide to replace the old LED light.
Before you begin, inspect the light for any debris or build up on the bulb. If the bulb is dirty, this could cause it to illuminate less. Make sure this is not the case before disassembling the sewing machine.
Step 5 requires you to remove the light wiring from the PSU. A faulty connection beforehand could be the reason for the light not working. Make sure that the faulty connection is not the issue before buying a new part to replace the light system.
Before beginning, make sure the sewing machine is not connected to any power.
必要な工具と部品
-
-
-
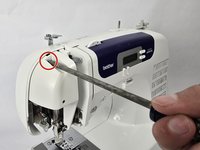
Use a Phillips #2 screwdriver to remove the single 16 mm Phillips #2 screw.
-
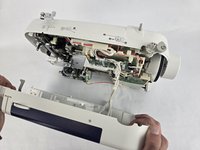
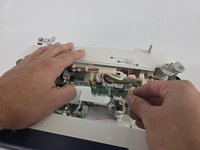
Remove the metal plate.
-


To reassemble your device, follow the above steps in reverse order.
Take your e-waste to an R2 or e-Stewards certified recycler.
Repair didn’t go as planned? Try some basic troubleshooting or ask our Answers community for help.
To reassemble your device, follow the above steps in reverse order.
Take your e-waste to an R2 or e-Stewards certified recycler.
Repair didn’t go as planned? Try some basic troubleshooting or ask our Answers community for help.

チーム

Cuesta, Team 20-1, Krynen Fall 2024 Cuesta, Team 20-1, Krynen Fall 2024人のメンバー
CUESTA-KRYNEN-F24S20G1
5 メンバー
8のガイドは作成済み