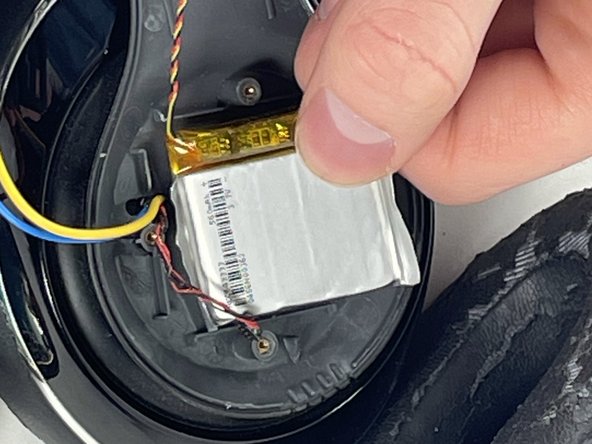
メインコンテンツにスキップ

Beats Studio 2 Wireless Battery Replacement

必要な工具と部品

  1. Beats Studio 2 Wireless Battery Replacement, Battery: 手順 1、 2の画像 1 Beats Studio 2 Wireless Battery Replacement, Battery: 手順 1、 2の画像 2
    • Using a spudger, remove the panel circling the ‘b’ Beats logo on the right earphone by applying pressure upwards under the panel until it is removed.

  2. Beats Studio 2 Wireless Battery Replacement: 手順 2、 2の画像 1 Beats Studio 2 Wireless Battery Replacement: 手順 2、 2の画像 2
    • Remove the four screws securing the housing with a Phillips #00 screwdriver.

  3. Beats Studio 2 Wireless Battery Replacement: 手順 3、 1の画像 1
    • Use a spudger to release the clip in the seam under the silver “studio” label.

    • Remove the right side of the headband.

  4. Beats Studio 2 Wireless Battery Replacement: 手順 4、 1の画像 1
    • Gently remove the right earphone speaker from the headband by sliding the speaker downwards.

  5. Beats Studio 2 Wireless Battery Replacement: 手順 5、 3の画像 1 Beats Studio 2 Wireless Battery Replacement: 手順 5、 3の画像 2 Beats Studio 2 Wireless Battery Replacement: 手順 5、 3の画像 3
    • Use the pointed tip of a spudger to carefully push on each side of the connector to release it from the socket on the motherboard.

    • Be gentle with the connectors as they can break easily.

    • Don't use a metal spudger to remove a battery or any internal component. This is potentially dangerous as it could puncture the battery and cause a fire or worse.

    • Use a nylon spudger to remove the battery from the headphones.

終わりに

To reassemble your device, follow these instructions in reverse order.

2 の人々がこのガイドを完成させました。

作成者

2人の作成者と共同で作成されました。

Jack Wilson

メンバー登録日: 03/20/23

494 ポイント

2のガイドは作成済み

チーム

UMass Dartmouth, Team 5-3, Ramos Spring 2023 UMass Dartmouth, Team 5-3, Ramos Spring 2023人のメンバー

UMASSD-RAMOS-S23S5G3

3 メンバー

4のガイドは作成済み

0 件のコメント

コメントを追加

統計データ:

過去 24時間: 8

過去 7 日: 41

過去 30 日: 149

今までの合計 1,929