メインコンテンツにスキップ

Asus Vivobook Max X541SA-PD0703X Motherboard Replacement

必要な工具と部品

  1. Asus Vivobook Max X541SA-PD0703X Motherboard Replacement, Hard Drive: 手順 1、 1の画像 1
    • Flip the laptop upside down so that the back of the laptop faces you.

  2. Asus Vivobook Max X541SA-PD0703X Motherboard Replacement: 手順 2、 1の画像 1
    • Remove the following ten Phillips #0 screws from the bottom of the laptop:

    • Six 13mm screws.

    • Four 11mm screws.

  3. Asus Vivobook Max X541SA-PD0703X Motherboard Replacement: 手順 3、 3の画像 1 Asus Vivobook Max X541SA-PD0703X Motherboard Replacement: 手順 3、 3の画像 2 Asus Vivobook Max X541SA-PD0703X Motherboard Replacement: 手順 3、 3の画像 3
    • Using a plastic opening tool, pry up the palm rest from the bottom case of the laptop.

    • Don't completely remove as there are ribbon cables connecting the two halves.

  4. Asus Vivobook Max X541SA-PD0703X Motherboard Replacement: 手順 4、 3の画像 1 Asus Vivobook Max X541SA-PD0703X Motherboard Replacement: 手順 4、 3の画像 2 Asus Vivobook Max X541SA-PD0703X Motherboard Replacement: 手順 4、 3の画像 3
    • Use a spudger to flip up the retaining flaps on both keyboard ribbon cable ZIF sockets.

    • Pull the ribbon cables out of their sockets.

  5. Asus Vivobook Max X541SA-PD0703X Motherboard Replacement: 手順 5、 1の画像 1
    • Remove the three 6mm Phillips #0 screws from the motherboard.

  6. Asus Vivobook Max X541SA-PD0703X Motherboard Replacement: 手順 6、 2の画像 1 Asus Vivobook Max X541SA-PD0703X Motherboard Replacement: 手順 6、 2の画像 2
    • Pull the Wi-Fi card out of the motherboard.

  7. Asus Vivobook Max X541SA-PD0703X Motherboard Replacement: 手順 7、 1の画像 1
    • Remove the hard drive by pulling it towards the right, and removing it from the laptop case

  8. Asus Vivobook Max X541SA-PD0703X Motherboard Replacement, Disc Drive: 手順 8、 1の画像 1
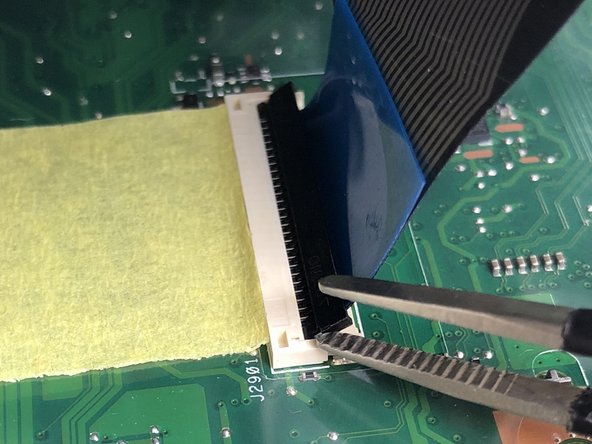
    • Remove the disc drive by sliding it towards the right and removing it from the laptop case

  9. Asus Vivobook Max X541SA-PD0703X Motherboard Replacement, Motherboard: 手順 9、 2の画像 1 Asus Vivobook Max X541SA-PD0703X Motherboard Replacement, Motherboard: 手順 9、 2の画像 2
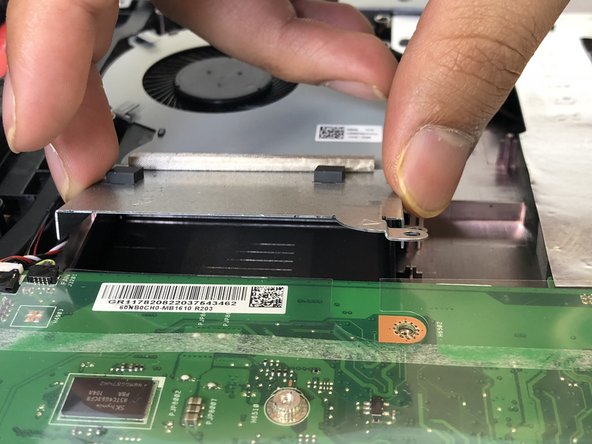
    • Remove the three 6mm Phillips #0 screws from the fan shroud.

    • Remove the shroud from the motherboard.

  10. Asus Vivobook Max X541SA-PD0703X Motherboard Replacement: 手順 10、 1の画像 1
    • Pull the metal casing to the right.

    • Be careful when pulling the case because it may break the motherboard.

  11. Asus Vivobook Max X541SA-PD0703X Motherboard Replacement: 手順 11、 2の画像 1 Asus Vivobook Max X541SA-PD0703X Motherboard Replacement: 手順 11、 2の画像 2
    • There is a wire attached to the screen display.

    • Peel the sticker and disconnect it from the motherboard.

  12. Asus Vivobook Max X541SA-PD0703X Motherboard Replacement: 手順 12、 1の画像 1
    • Remove the plastic covering off of the motherboard.

  13. Asus Vivobook Max X541SA-PD0703X Motherboard Replacement: 手順 13、 1の画像 1
    • Remove the five 6mm Phillips #0 screws from the motherboard.

  14. Asus Vivobook Max X541SA-PD0703X Motherboard Replacement: 手順 14、 2の画像 1 Asus Vivobook Max X541SA-PD0703X Motherboard Replacement: 手順 14、 2の画像 2
    • Remove the cables connected to the motherboard by unplugging them using a plastic opening tool, or by hand.

  15. Asus Vivobook Max X541SA-PD0703X Motherboard Replacement: 手順 15、 1の画像 1
    • Pull the motherboard to the right and lift up.

終わりに

To reassemble your device, follow these instructions in reverse order.

2 の人々がこのガイドを完成させました。

作成者

4人の作成者と共同で作成されました。

Hetvi Mehta

メンバー登録日: 02/22/18

781 ポイント

5のガイドは作成済み

チーム

USF Tampa, Team S1-G4, Cagle Spring 2018 USF Tampa, Team S1-G4, Cagle Spring 2018人のメンバー

USFT-CAGLE-S18S1G4

4 メンバー

7のガイドは作成済み

0 件のコメント

コメントを追加

統計データ:

過去 24時間: 0

過去 7 日: 6

過去 30 日: 16

今までの合計 3,119