メインコンテンツにスキップ

Apple Thunderbolt Display Thunderbolt & MagSafe Cable Replacement

必要な工具と部品

  1. Apple Thunderbolt Display Thunderbolt & MagSafe Cable Replacement, LCD: 手順 1、 3の画像 1 Apple Thunderbolt Display Thunderbolt & MagSafe Cable Replacement, LCD: 手順 1、 3の画像 2 Apple Thunderbolt Display Thunderbolt & MagSafe Cable Replacement, LCD: 手順 1、 3の画像 3
    • Lay down the display with screen side up.

    • Since the display is able to be tilted up and down, we found it useful to prop up the screen up with a styrofoam block in between the screen and the base.

    • Place the two suction cups on both sides of the top of the screen and make sure to lock them in place.

    • The glass screen is connected to the rest of the display by small magnets. Lift slowly and the screen will come right off.

  2. Apple Thunderbolt Display Thunderbolt & MagSafe Cable Replacement: 手順 2、 2の画像 1 Apple Thunderbolt Display Thunderbolt & MagSafe Cable Replacement: 手順 2、 2の画像 2
    • Unscrew the 12 screws around the side edges and the top of the LCD with the TR 10 Screwdriver.

  3. Apple Thunderbolt Display Thunderbolt & MagSafe Cable Replacement: 手順 3、 2の画像 1 Apple Thunderbolt Display Thunderbolt & MagSafe Cable Replacement: 手順 3、 2の画像 2
    • Slowly lift the LCD out from its placement and tilt it upwards.

    • It can be very helpful to have an extra set of hands to hold the LCD up while you work with the cables underneath.

    • There are four wires that connect the LCD to the rest of the components. Make sure not to pull hard and break any of the wires.

  4. Apple Thunderbolt Display Thunderbolt & MagSafe Cable Replacement: 手順 4、 3の画像 1 Apple Thunderbolt Display Thunderbolt & MagSafe Cable Replacement: 手順 4、 3の画像 2 Apple Thunderbolt Display Thunderbolt & MagSafe Cable Replacement: 手順 4、 3の画像 3
    • For the first of the four wires (furthest away from the wire that is held in by a screw), grab onto the connector and pull slowly.

  5. Apple Thunderbolt Display Thunderbolt & MagSafe Cable Replacement: 手順 5、 3の画像 1 Apple Thunderbolt Display Thunderbolt & MagSafe Cable Replacement: 手順 5、 3の画像 2 Apple Thunderbolt Display Thunderbolt & MagSafe Cable Replacement: 手順 5、 3の画像 3
    • For the next connector, which is right next to the previous wire, there is a piece of tape attached to a metal bar.

    • Flip the metal bar over using the tape as a handle.

    • Next, grab onto the connector and slowly pull it from the socket in the logic board.

  6. Apple Thunderbolt Display Thunderbolt & MagSafe Cable Replacement: 手順 6、 3の画像 1 Apple Thunderbolt Display Thunderbolt & MagSafe Cable Replacement: 手順 6、 3の画像 2 Apple Thunderbolt Display Thunderbolt & MagSafe Cable Replacement: 手順 6、 3の画像 3
    • For the connector on the other side of the logic board, grab the connector from underneath and carefully pull it from the board.

  7. Apple Thunderbolt Display Thunderbolt & MagSafe Cable Replacement: 手順 7、 1の画像 1
    • For the last wire connecting to the LCD, use your T 10 Screwdriver to remove the screw.

  8. Apple Thunderbolt Display Thunderbolt & MagSafe Cable Replacement: 手順 8、 2の画像 1 Apple Thunderbolt Display Thunderbolt & MagSafe Cable Replacement: 手順 8、 2の画像 2
    • The LCD has now been fully disconnected from the casing and can be repaired/replaced!

    • its best to set the LCD on a bed or on a thick towel to avoid damage to the LCD

  9. Apple Thunderbolt Display Thunderbolt & MagSafe Cable Replacement, EMI Filter: 手順 9、 2の画像 1 Apple Thunderbolt Display Thunderbolt & MagSafe Cable Replacement, EMI Filter: 手順 9、 2の画像 2
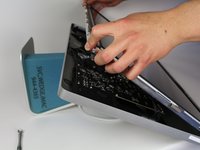
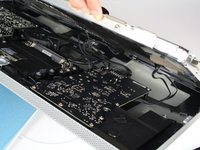
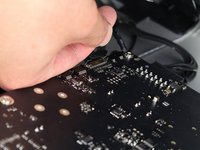
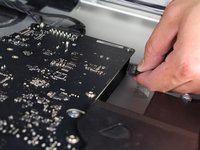
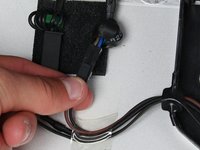
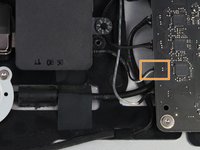
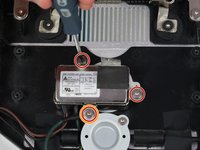
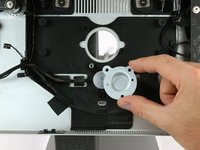
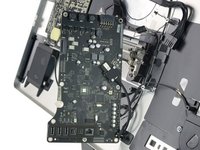
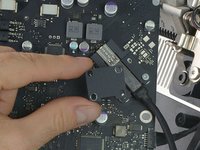
    • You should now see the EMI filter right in the middle of the device (although held in by a few other components).

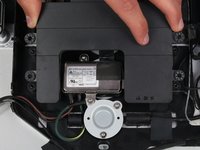
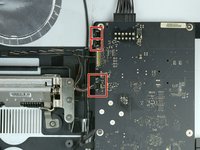
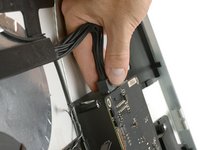
    • Follow the wires coming out of the bottom of the Power adapter off to the left.

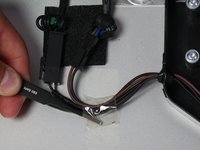
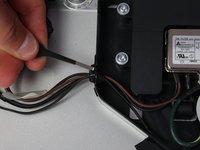
    • Take the tweezers and remove the piece of tape holding the wires to the casing.

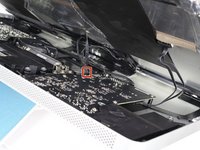
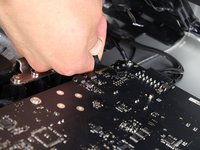
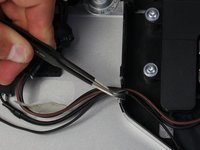
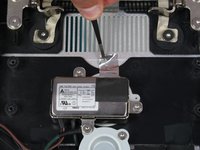
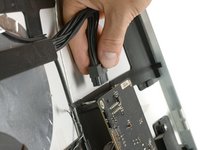
    • There is only one connector that needs to be taken out (even though there are two right next to each other!).

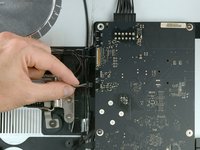
    • Grab the connector from the bottom and pull it carefully from its corresponding socket.

  10. Apple Thunderbolt Display Thunderbolt & MagSafe Cable Replacement: 手順 10、 2の画像 1 Apple Thunderbolt Display Thunderbolt & MagSafe Cable Replacement: 手順 10、 2の画像 2
    • Next, remove the piece of electrical tape that is holding wires into the casing connecting to the power adapter.

  11. Apple Thunderbolt Display Thunderbolt & MagSafe Cable Replacement: 手順 11、 3の画像 1 Apple Thunderbolt Display Thunderbolt & MagSafe Cable Replacement: 手順 11、 3の画像 2 Apple Thunderbolt Display Thunderbolt & MagSafe Cable Replacement: 手順 11、 3の画像 3
    • The surrounding speaker component (the black box) around the power inlet needs to be removed.

    • Use the TR 10 screwdriver to remove the four screws.

    • Disconnect the speaker from behind the logic board by carefully pulling at the plastic end of the cable.

    • Remove the speaker.

  12. Apple Thunderbolt Display Thunderbolt & MagSafe Cable Replacement: 手順 12、 2の画像 1 Apple Thunderbolt Display Thunderbolt & MagSafe Cable Replacement: 手順 12、 2の画像 2
    • Now that the middle speaker is out of the way, the EMI filter is easily accessible.

    • Using tweezers, remove the silver tape that is at the top of the filter.

  13. Apple Thunderbolt Display Thunderbolt & MagSafe Cable Replacement: 手順 13、 3の画像 1 Apple Thunderbolt Display Thunderbolt & MagSafe Cable Replacement: 手順 13、 3の画像 2 Apple Thunderbolt Display Thunderbolt & MagSafe Cable Replacement: 手順 13、 3の画像 3
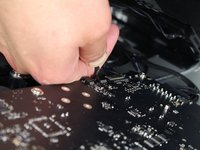
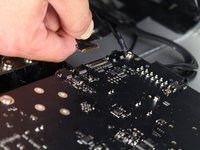
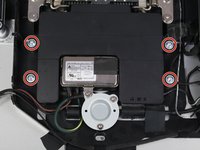
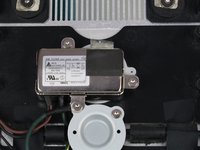
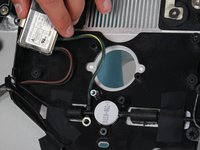
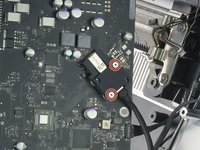
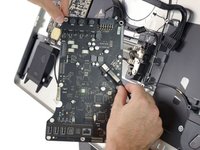
    • The EMI filter is connected by three screws. Use the T10 screwdriver to remove them.

    • The screw that holds in both the filter and a wire that is connected to it is a different size and should be kept identifiable from the other two screws.

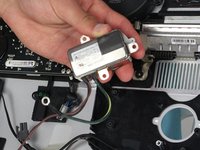
    • The green and yellow wire that was held in by the different screw is tucked behind another component. To get it out, squeeze it behind the black wire and the filter will be able to be removed from the casing.

  14. Apple Thunderbolt Display Thunderbolt & MagSafe Cable Replacement, Thunderbolt & MagSafe Cable: 手順 14、 2の画像 1 Apple Thunderbolt Display Thunderbolt & MagSafe Cable Replacement, Thunderbolt & MagSafe Cable: 手順 14、 2の画像 2
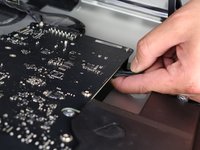
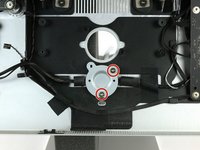
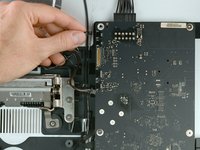
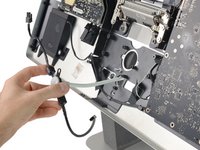
    • Remove the two T10 screws from the metal plate holding the cable in place.

    • Remove the metal plate.

  15. Apple Thunderbolt Display Thunderbolt & MagSafe Cable Replacement: 手順 15、 3の画像 1 Apple Thunderbolt Display Thunderbolt & MagSafe Cable Replacement: 手順 15、 3の画像 2 Apple Thunderbolt Display Thunderbolt & MagSafe Cable Replacement: 手順 15、 3の画像 3
    • Carefully remove three cable connectors from the logic board by walking them out while holding them at the plastic end.

    • From top to bottom these are:

    • Fan control cable

    • Temperature sensor cable

    • Fan power cable

    • In some cases there are only the top and bottom cables.

  16. Apple Thunderbolt Display Thunderbolt & MagSafe Cable Replacement: 手順 16、 1の画像 1
    • Remove the seven Torx T10 screws from the logic board.

  17. Apple Thunderbolt Display Thunderbolt & MagSafe Cable Replacement: 手順 17、 2の画像 1 Apple Thunderbolt Display Thunderbolt & MagSafe Cable Replacement: 手順 17、 2の画像 2
    • Now you are able to reach behind the logic board to disconnect the cable running to the power board.

    • The connector has a small tab on the back that needs to be pressed for the connector to be pulled out.

  18. Apple Thunderbolt Display Thunderbolt & MagSafe Cable Replacement: 手順 18、 3の画像 1 Apple Thunderbolt Display Thunderbolt & MagSafe Cable Replacement: 手順 18、 3の画像 2 Apple Thunderbolt Display Thunderbolt & MagSafe Cable Replacement: 手順 18、 3の画像 3
    • Carefully flip the logic board to the left using the remaining cables as a hinge to get access to the display port.

    • Remove the two Torx T6 screws from the metal plate securing the display port connector.

    • Remove the metal plate.

  19. Apple Thunderbolt Display Thunderbolt & MagSafe Cable Replacement: 手順 19、 2の画像 1 Apple Thunderbolt Display Thunderbolt & MagSafe Cable Replacement: 手順 19、 2の画像 2
    • Unplug the Thunderbolt cable from the logic board.

    • Thread the remaining Thunderbolt & MagSafe cable through the cutout in the rear case.

終わりに

To reassemble your device, follow these instructions in reverse order.

83 の人々がこのガイドを完成させました。

作成者

2人の作成者と共同で作成されました。

Tobias Isakeit

メンバー登録日: 03/31/14

117,226 ポイント

188のガイドは作成済み

チーム

Master Techs Master Techs人のメンバー

Community

322 メンバー

2,519のガイドは作成済み

64 件のコメント

Unbelievable amount of very detailed and careful work to replace a Thunderbolt cable which is attached on the inside to a standard Thunderbolt socket! Why not just have the socket on the back of the unit?????

Lewis Naylor - 返信

You can actually use the socket on the back of the unit as an input if your octopus cable is dying, as long as you are connecting directly to a Thunderbolt 1 or 2 Mac. If you are using the Thunderbolt-3-to-Thunderbolt-2 adapter, you have to use the built-in cable.

Tim -

In reply to Tim - This is not true - I am running a 2018 Mac Mini using the Thunderbolt 3 to Thunderbolt 2 adaptor and a standard Thunderbolt 2 cable connected to the external thunderbolt connector on the Thunderbolt Display - It works fine.

Giles Norton -

Me as well. Was dreading the repair until I plugged a spare Thunderbolt 2 cable from a Thunderbolt 3 (to 2) adapter to the back of the display. Thanks!

Jim Hoyt -

Thank you for the tip. I actually went to Apple store and they said they will not repair it. I was about to open it up until I see this note. Big save of the day!!!

Michael Yao -

コメントを追加

統計データ:

過去 24時間: 29

過去 7 日: 192

過去 30 日: 986

今までの合計 102,209