メインコンテンツにスキップ
Alcatel Jitterbug Smart Headphone Jack Replacement

Alcatel Jitterbug Smart Headphone Jack Replacement

Minyu Zhang

Minyu Zhang とその他 4 人の作成者

最終更新日: August 15, 2021

25分
難しい

Use this guide to replace the headphone jack. This guide requires soldering.

For more information on how to solder and desolder connections, please visit this guide.

必要な工具と部品

ツール

もっと見る

  1. Alcatel Jitterbug Smart Headphone Jack Replacement, Battery: 手順 1、 2の画像 1 Alcatel Jitterbug Smart Headphone Jack Replacement, Battery: 手順 1、 2の画像 2
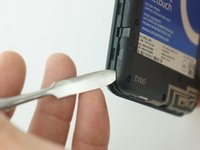
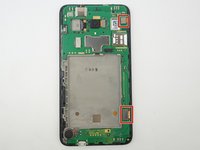
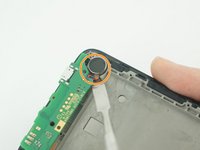
    • Pry back cover open with a medal spudger, or your fingernail, in the divot at the bottom left corner of the phone.

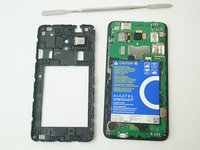
    • Lift open case by the corner nearest the divot and remove it from the phone.

  2. Alcatel Jitterbug Smart Headphone Jack Replacement: 手順 2、 3の画像 1 Alcatel Jitterbug Smart Headphone Jack Replacement: 手順 2、 3の画像 2 Alcatel Jitterbug Smart Headphone Jack Replacement: 手順 2、 3の画像 3
    • Remove 13 1mm JIS screws with JIS #000 Screwdriver.

  3. Alcatel Jitterbug Smart Headphone Jack Replacement: 手順 3、 2の画像 1 Alcatel Jitterbug Smart Headphone Jack Replacement: 手順 3、 2の画像 2
    • Gently pry off the Mid frame from the phone using a Metal Spudger.

  4. Alcatel Jitterbug Smart Headphone Jack Replacement: 手順 4、 2の画像 1 Alcatel Jitterbug Smart Headphone Jack Replacement: 手順 4、 2の画像 2
    この手順で使用する道具:
    Tweezers
    $4.99
    • Use a pair of tweezers to pull the battery connector from its port.

    • Be careful not to tear the battery from its connection.

  5. Alcatel Jitterbug Smart Headphone Jack Replacement, Motherboard: 手順 5、 3の画像 1 Alcatel Jitterbug Smart Headphone Jack Replacement, Motherboard: 手順 5、 3の画像 2 Alcatel Jitterbug Smart Headphone Jack Replacement, Motherboard: 手順 5、 3の画像 3
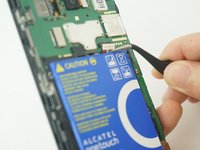
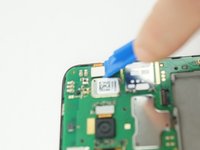
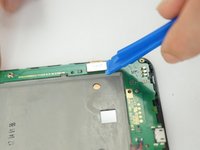
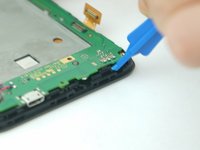
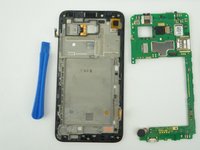
    • Use the Plastic Opening tools to gently dislodge the two connection on the top and bottom right of the phone from the inside of the phone.

  6. Alcatel Jitterbug Smart Headphone Jack Replacement: 手順 6、 2の画像 1 Alcatel Jitterbug Smart Headphone Jack Replacement: 手順 6、 2の画像 2
    この手順で使用する道具:
    Tweezers
    $4.99
    • Use a pair of tweezers to pull the black ribbon connector from its port.

    • Use a metal Spudger to gentle remove the speaker that glued at the bottom left of the phone.

    • Be careful to avoid damage the black connector or the wire connect the speaker to motherboard.

  7. Alcatel Jitterbug Smart Headphone Jack Replacement: 手順 7、 2の画像 1 Alcatel Jitterbug Smart Headphone Jack Replacement: 手順 7、 2の画像 2
    • Using a plastic opening tool, begin to gently pry the motherboard, away from the display assembly.

    • The motherboard will freely remove.

  8. Alcatel Jitterbug Smart Headphone Jack Replacement, Headphone Jack: 手順 8、 2の画像 1 Alcatel Jitterbug Smart Headphone Jack Replacement, Headphone Jack: 手順 8、 2の画像 2
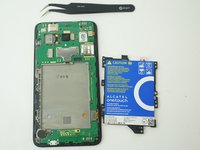
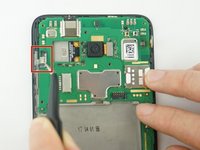
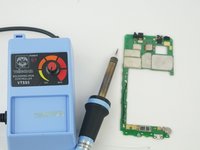
    • Flip the motherboard upside-down and desolder the pin connection of headphone jack to the motherboard.

    • Once pins desolder, pull the headphone jack out.

    • If you need helps on solder/desolder, here is the line to the soldering skills guide.

終わりに

To reassemble your device, follow these instructions in reverse order.

作成者

4人の作成者と共同で作成されました。

Minyu Zhang

メンバー登録日: 02/13/18

181 ポイント

2のガイドは作成済み

チーム

USF Tampa, Team S11-G4, Cheng Spring 2018 USF Tampa, Team S11-G4, Cheng Spring 2018人のメンバー

USFT-CHENG-S18S11G4

4 メンバー

10のガイドは作成済み

0 件のコメント

コメントを追加

統計データ:

過去 24時間: 2

過去 7 日: 8

過去 30 日: 11

今までの合計 251