はじめに
AirPodsの修理は、修理店だけでなく、Appleにとっても常に難題です。現在のAppleのアフターセールス方針は、アフターセールス基準を満たしたAirPodsを直接新品と交換することとなっています。ユーザーの観点からは、この方法はユーザーの満足度を上げられませんが、修理の難しさも反映されています。本日の修理講座は、AirPods 1のバッテリー交換についてです。
必要な工具と部品
ビデオの概要
-
-
ホットエアガンの温度を100℃、風量を7に設定し、螺旋状の風に切り替えます。
-
AirPodsをホットエアガンの周囲2cmに配置して、メタルキャップを3分間加熱します。加熱中、AirPodsを常に反転させ、均一に加熱する必要があります。
-
-
-
-
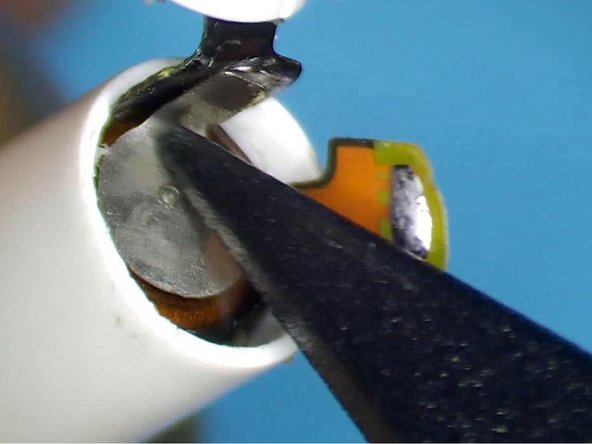
はんだ付け後、フレキケーブルを押さえます。バッテリーの陽極を定位置に置き、はんだごてで加熱してはんだ付けします。
-
その後、AirPodsを充電ケースに入れてテストします。AirPodsが充電できるようになりました。
-
AirPodsの底面にB7000接着剤を塗布します。
Gent.mo ho sostituito le batterie degli AirPods 1 prima generazione. Si caricano ma non si connettono al cellulare pur avendo fatto il reset. Ho provato a dissociare dispositivo e ricollegarle. Il cellulare vede gli auricolari vede la carica ma non si collegano. Nell’attesa di consigli Grazie
-


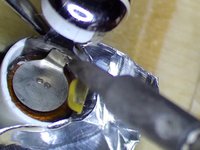


AirPodsのバッテリー交換は、ヘリカル風を使ったホットエアガンで金属製のキャップを加熱してください。3分ほど加熱した後、金属キャップを横からL字にこじ開けます。その後、接着剤を剥がし、固定されているケーブルを傷つけないように注意します。接着剤除去後、プラスチックケースをアルミホイルで保護し、電池の正極と負極を固定されているケーブルから分離してください。バッテリーを取り外すには、AirPodsの底面を加熱し続け、改良されたピンセットでバッテリーを取り出します。最後に新しいバッテリーを取り付け、バッテリーのカソードとアノードをハンダ付けし、接着剤で固定します。
AirPodsのバッテリー交換は、ヘリカル風を使ったホットエアガンで金属製のキャップを加熱してください。3分ほど加熱した後、金属キャップを横からL字にこじ開けます。その後、接着剤を剥がし、固定されているケーブルを傷つけないように注意します。接着剤除去後、プラスチックケースをアルミホイルで保護し、電池の正極と負極を固定されているケーブルから分離してください。バッテリーを取り外すには、AirPodsの底面を加熱し続け、改良されたピンセットでバッテリーを取り出します。最後に新しいバッテリーを取り付け、バッテリーのカソードとアノードをハンダ付けし、接着剤で固定します。
57 の人々がこのガイドを完成させました。
以下の翻訳者の皆さんにお礼を申し上げます:
100%


これらの翻訳者の方々は世界を修理する私たちのサポートをしてくれています。 あなたも貢献してみませんか?
翻訳を始める ›

19 件のコメント
Where do you buy the batteries?
You can buy the batteries from AliExpress and shipping to Turkey is cheap.
When it don’t work no more I love taking things apart and possibly upgrading them. I really don’t know why people throw electronics away when it could either be fixed or taken apart to build something else. Like many circuit boards for example.
Repair Pug - 返信
Gent.mo ho sostituito le batterie degli AirPods 1 prima generazione. Si caricano ma non si connettono al cellulare pur avendo fatto il reset. Ho provato a dissociare dispositivo e ricollegarle. Il cellulare vede gli auricolari vede la carica ma non si collegano. Nell’attesa di consigli Grazie
Incredible work here. Shame on Apple for making this so difficult.
broken apple 2gen battery use very simple gen1 airpods very powerfull battery thanks
Mr serbest - 返信
I followed this tutorial successfully. Tried on 3 AirPods (from 2 pairs) and got two of them working again. Except for a little bit of soldering this is really no more difficult than replacing an iPhone battery. If you are on the fence, give it a try.
Urs Koster - 返信
Hi, thanks for your information. I follow your instruction and change my air pods bettery. But It is only working in pods. If airpods out of pod, it didn't working. device can't pairing. Could you know what is problem?
Ciao ! Le mie airpods A2031 non portano batterie cilindriche. Per errore un giorno me ne cadde una e si aprì il vado cassa e da lì uscì quella che credo fosse una batteria quadrata avvolta nel classico film argento, di piccolissime dimensioni… che a voi risulti, è esistito in commercio un modello che avesse questo tipo di batterie piuttosto che quelle cilindriche? Premetto che queste mi furono regalate da un amico che credendo di averle perse ne comprò un altro paio per poi ritrovare queste… ma se potessi ripararle sarebbe una soddisfazione per me. Grazie
Very nice. I will use the heat gun to melt my face instead.
WARNING: This guide omits from step 6 the critical information that the Airpod's antenna, which is made of ceramic and very fragile, is glued to the side and top of the battery. Not knowing this at the time, I only found out because the antenna came out along with the battery, pretty much destroying the Airpod as the antenna cannot be repaired.
I failed once, tried twice. Few things that are critical.
1: Rewerted tweezers, just gently while heating up or the anode rips out
2: ultra fine point bent soldering tip or the airpod melts even when not touching.
3: Flux thevone they use.
4: worst thing is heating. Too much it melts. Too little it breaks.
5: prying the cap, it broke in half at the white separation lines. I thought it was all metal.
At the end, you gotta try and fail on few ones until you grt the grasp of it
Kashif Zia - 返信
What a work of art! (Referring to the author's work, not Apple's, obviously)
Hmm. I have 3 pairs of gen 2 airpods, did the replacement on the first set and the first AirPod I did (the right one) plays loudly out of the outer mesh now and quietly inside the ear, like its inverted on the speakers. The left one is normal. Not sure whats up with that. Maybe I damaged the ribbon cable? I don't understand how that would invert the speakers but still play out of both but oh well. I guess it was good practice.
Oh and for anyone that's going to attempt this; get heat resistant tape. I got some on Aliexpress when I ordered batteries. It was like $3 USD. Worked wonderfully. Didn't melt anything and somehow everything went swimmingly for my first attempt. Word of warning though be super careful with the ribbon cable; I'm guessing that I damaged the ribbon attached to the end cap on my first attempt because that AirPod plays very quietly in the ear but loudly outside of the ear. Or it could be that when I inserted the battery it wasn't perfectly lined up so maybe its shorting something. Just take it slow, use heat resistant tape, and rely more on isopropyl to pull the battery out than heat. The battery in the first one I did came out with just isopropyl and the heat of my hand.