はじめに
Replace the battery for the AKG bluetooth headphones. Same procedure for AKG C50BT.
-
-
X-Acto Knife
-
Tweezer
-
Philips Screwdriver
-
Double-sided Tape
-
AOLIKES 3.7V Rechargeable Lithium Polymer Replacement Battery 1500mAh or equivalent
-
-
-
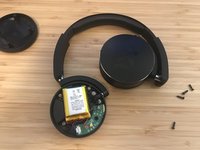
Remove the left (L) ear pad by rotating it counter clockwise and it will be removed
-
-
-
-
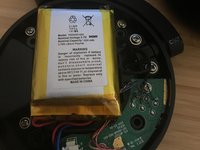
Confirm the replacement battery has the wires in the correct orientation (Red / Black / Traveller). If not, pry the connector and remove pin and replace in correct position
-
-
-
Remove pin connector by prying back the connector. Tip - use a tweezer
-
Connect the replacement battery to ensure it works
-
-
-
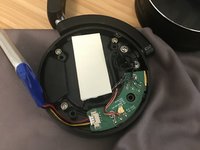
The battery is adhered with double sided tape. Carefully remove the battery by using a tool to pry out the tape, i.e. X-Acto knife
-
Remove the residue by using rubbing alcohol
-
-
-
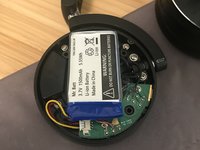
Insert double-sided tape
-
Place the battery in an orientation that does not block the screw holes for the cover
-


To reassemble your device, follow these instructions in reverse order.
To reassemble your device, follow these instructions in reverse order.
7 の人々がこのガイドを完成させました。
10 件のコメント
Very clear directions with excellent photo accompaniment. Battery shown is not the 1500 mAh recommended by manufacturer.
D Hamilton - 返信
Is ist possible to get a Link for the korrekt Battery
Foto and Instruktion very good!!
I have linked it in the instructions but here it is, https://www.amazon.ca/gp/product/B07K1J4.... The key is to find a battery that fits the headset.
Remember to reorient the wires, Step 5. For this battery, I had to swap the yellow and black wires.
Kevin -
Great, thanks Kevin!
For the other not so terribly handy fortune-hunters out there, here's another instruction to Step 5:
To remove the 2 wires from the connector in order to swap them, with a thin/sharp cutter/knife/needle you can carefully move up a little the plastic parts of the connector that cover and block the ends of the wires, and then pull out the wires, then push the plastic parts back down, and then push the wires back in correctly.
Bought a replacement battery. Didn't work so replaced my old battery which, surprisingly, charged up (for a couple of months) and then died. Went back to the replacement, realised the wires were not in correct places. Read this, swapped two over and now working fine.
Thank you so much!