Has anyone gotten the Err8 error?
Not having any luck finding other people online with these problems. YouTube is completely unhelpful. Ninja says I need to replace the base which is almost as much as a new air fryer.
Hi, I just managed to fix my Ninja ol750.
The issue was a severed wire coming from the heat coil to the PCB.
I did not have to put another wire through since it was long enough.
I took most of the machine apart to access all the bits.
Do you still need help?
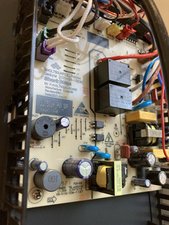

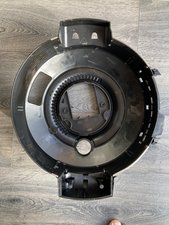

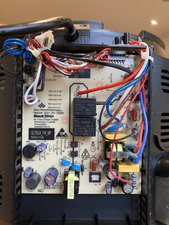
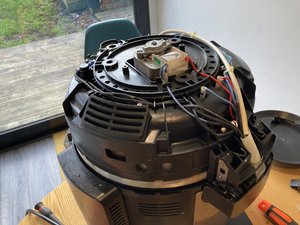
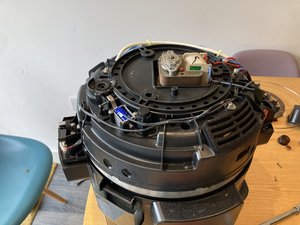

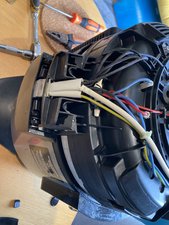
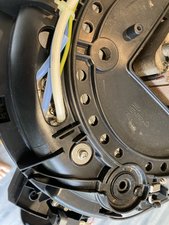
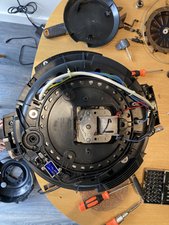
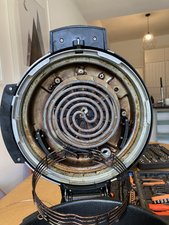
Screws that need to be removed are circled red on the picture. One additional screw is on the locking slider which holds the grey slider.
このアンサーは役に立ちましたか?
@danielmann31775 hope you took some good pictures. Would be awesome if you can create a quick and dirty guide for that. Lot's of Ninja questions could be resolved by that. https://ifixit.com/Guide/new The iFixit community will appreciate this.
Wow this is great! I'm going to use your information and try to fix mine
@danielmann31775 Awesome. It'll really help people out!
@anniehughes while you work on yours take some good pictures as well and maybe we can all put those together and create a guide for the community.
@danielmann31775 how did you remove the top plastic cover on the hinge? As this seems to be the only bit I need to remove to get access to the rest of the lid, I think my thermal fuse has gone, as no fan working.
There are 2 parts to the lid.
One is the top hat which is held in by clips/tabs.
The other one is held in by a couple of screws. One of them is within the tab that you use to slide to select the different cooking options.
You need to remove the top lid first. I broke one of the tabs because I didn’t know better. Look at the pictures carefully to remove it without breaking. There are 2 screws under the top hat to completely remove the lid cover.
@eugeneqthrung I have made some progress!
Look under the lip on the hinge side where you hold to lift the whole appliance up - where your fingers go there is an insert on the underside - your fingertips touch it as you grip and lift. Carefully prise out this insert - it will pop out if you lever in the right places. You can see the tabs holding it in place here...

Underneath this insert are two screws - undoing these enables the lower hinge cover to be removed. This photo shows the removed cover, the insert and the two screws that were underneath the cover. Note that these two screws are pan head...

Now you have access to the hinge. Push the hinge rod slightly in on one side so you can release the upper hinge side plate from it. Then push the hinge pin slightly back the other way to release the other upper hinge side plate. Do NOT push the hinge pin any further than you have to or it will dislodge the hinge springs and that will be a nightmare to put back together. Now carefully lift open the lid back further than it normally goes and then pull it away from the body to release the ends of the springs. The lid will now be separate from the base apart from the wires going to the lid. This reveals another two screws which hold the outer body of the lid - they go into the fingernail bits you mentioned earlier - this is the pressure/holding point you were unable to get past. You can see the screws still in place in my photo. Note that these two screws are countersunk. Remove these two screws and now the outer lid can be released.

My next challenge is to find the thermal fuse in the lid - I am assuming that there will be one somewhere within it.
Hope this gets you to the next stage @eugeneqthrung
このアンサーは役に立ちましたか?
@anniehughes "err8" should be a blown thermal fuse. should be on the inside of the lid. Looks to me like you are needing to get ready to take your Foodi apart. There is always the possibility of a bad heating coil or a bad fan. You did not tell us if your Foodi just gave up quietly or if anything preceded this.
Since there is not a lot of information about it out, you are venturing in unexplored territory. Take lots of pictures and post those on here if you are encountering problems.
While you work on your Foodi , take lots of pictures. Once you are done with it, take those pictures and create a guide for iFixit. That will help the next person that has the same problem as you do. It's easy and fun to create these guides. https://ifixit.com/Guide/new The iFixit community will appreciate this.
このアンサーは役に立ちましたか?
This just happened one day when turning it on. Nothing preceded this. Foodi worked normally the day prior. I will try inside the lid first.
I just encountered the same problem this week with mine. It was working fine prior, I was in the middle of air frying and it just stopped and gave that message. We’re you able to fix it?
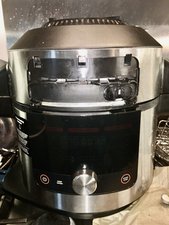
Daniel’s answers have been really helpful, but despite removing the top hat and every screw in sight, I am reluctant to try levering the lid cover off, and it won’t lift gracefully.
I’m trying to get to the slider sensor. The hinge side plastic cover looks like it might need removing separately, as your photo shows two ‘finger nail’ shaped cut-outs that are plainly covered in normal circumstances, but it’s not budging. Also you have removed the vent pin, but I don’t see how.
Here’s my progress so far. Any hints would make me v. happy. Thanks in advance (to Daniel and the rest of the community).


このアンサーは役に立ちましたか?
Steam vent assembly & pin now out - knurled retainer needed unscrewing. Lid cover still stubborn.
@eugeneqthrung @danielmann31775 any more ideas/suggestions please on how to remove the lid - like Eugene I have removed the top hat which is clipped in and have undone the two screws that were underneath. The outer lid will still not move. Do we have to pry - if so where? Or is there another step required to get to https://guide-images.cdn.ifixit.com/igi/...
Mine is still attached, I'm still stalled.
Hi all, on the underside of the lid are 4 more screws to remove plus the slider/lock. I think it was a snug fit to lift the lid off.
I have replied to this with a fuller description of how to get past this stage getting into the lid - it has appeared further up this thread though.
過去 24時間: 40
過去 7 日: 286
過去 30 日: 1,249
今までの合計 6,955
2 件のコメント
What is an Error 8 code on a ninja foodi air fryer
Jorge さんによる
On mine it was a severed within the hinge. It was the power feed for the heater element. The error can also mean that the fuse on that same wire it burnt out. Looks like error 8 means no continuity from the pcb via the heater element.
Daniel Mann さんによる